Author Archives: dawn of food

Unknown's avatar

About dawn of food

Wife and mother who loves to uncover old recipes that fit into our modern world.

Goofy Toast

OLYMPUS DIGITAL CAMERA

I can’t believe I am writing this post, but kids are insistent.   “You have to do a post on this!” They cried.  Now, when I made the Chocolate Chip Cookies Noir, they forbid me from putting the recipe on the blog.  They didn’t want the “secret” recipe to get out.   But for this, they thought everyone should share in the fun.  I’m having trouble because I’m not sure this is “blog worthy”, but I’ll give it a go.

Let me start by saying the reason I made this dish is that I announced we were having pork loin for dinner. You may have heard the crying and whining where you are. Let’s just say pork loin doesn’t pique the kids’ fancy. Any chance they can get, they’ll try to make a play for “breakfast for dinner”. If they sense any weakness in the resolve of the person making dinner, the begging will commence. Seriously, it is their favorite meal. You may notice a lot of breakfast dishes on this blog. We mostly have them for dinner. Tonight is no exception. Since Daddy was away, they made a play for Goofy Toast. The idea of pork loin wasn’t too hot with mom either, so they won that round.

The history of Goofy Toast begins at Disney World. We have taken many a vacation to Disney World.  Back during the depths of the  Depression Recession, Disney was deeply discounted.  So discounted, we could afford to stay at the Polynesian Resort.  Man, does that spoil you.  We went one year and got 30% off the hotel, free food AND a $250 Visa Gift Card.  Now, you may get 30% off the hotel rate, but that’s about it.  The exact same vacation is nearly twice as much money as it was 3-4 years ago.  I guess the economy has recovered? Luckily, we have pictures to relive the experience.  Anyway, at one of the many breakfasts we ate at the Polynesian during our stay was something called “Goofy Toast”.  The kids loved the name and ordered it.  In the old days we would have called it “Eggs in a Nest” or something like that.  Now, Goofy Toast.  I’m sure that’s trademarked or something.

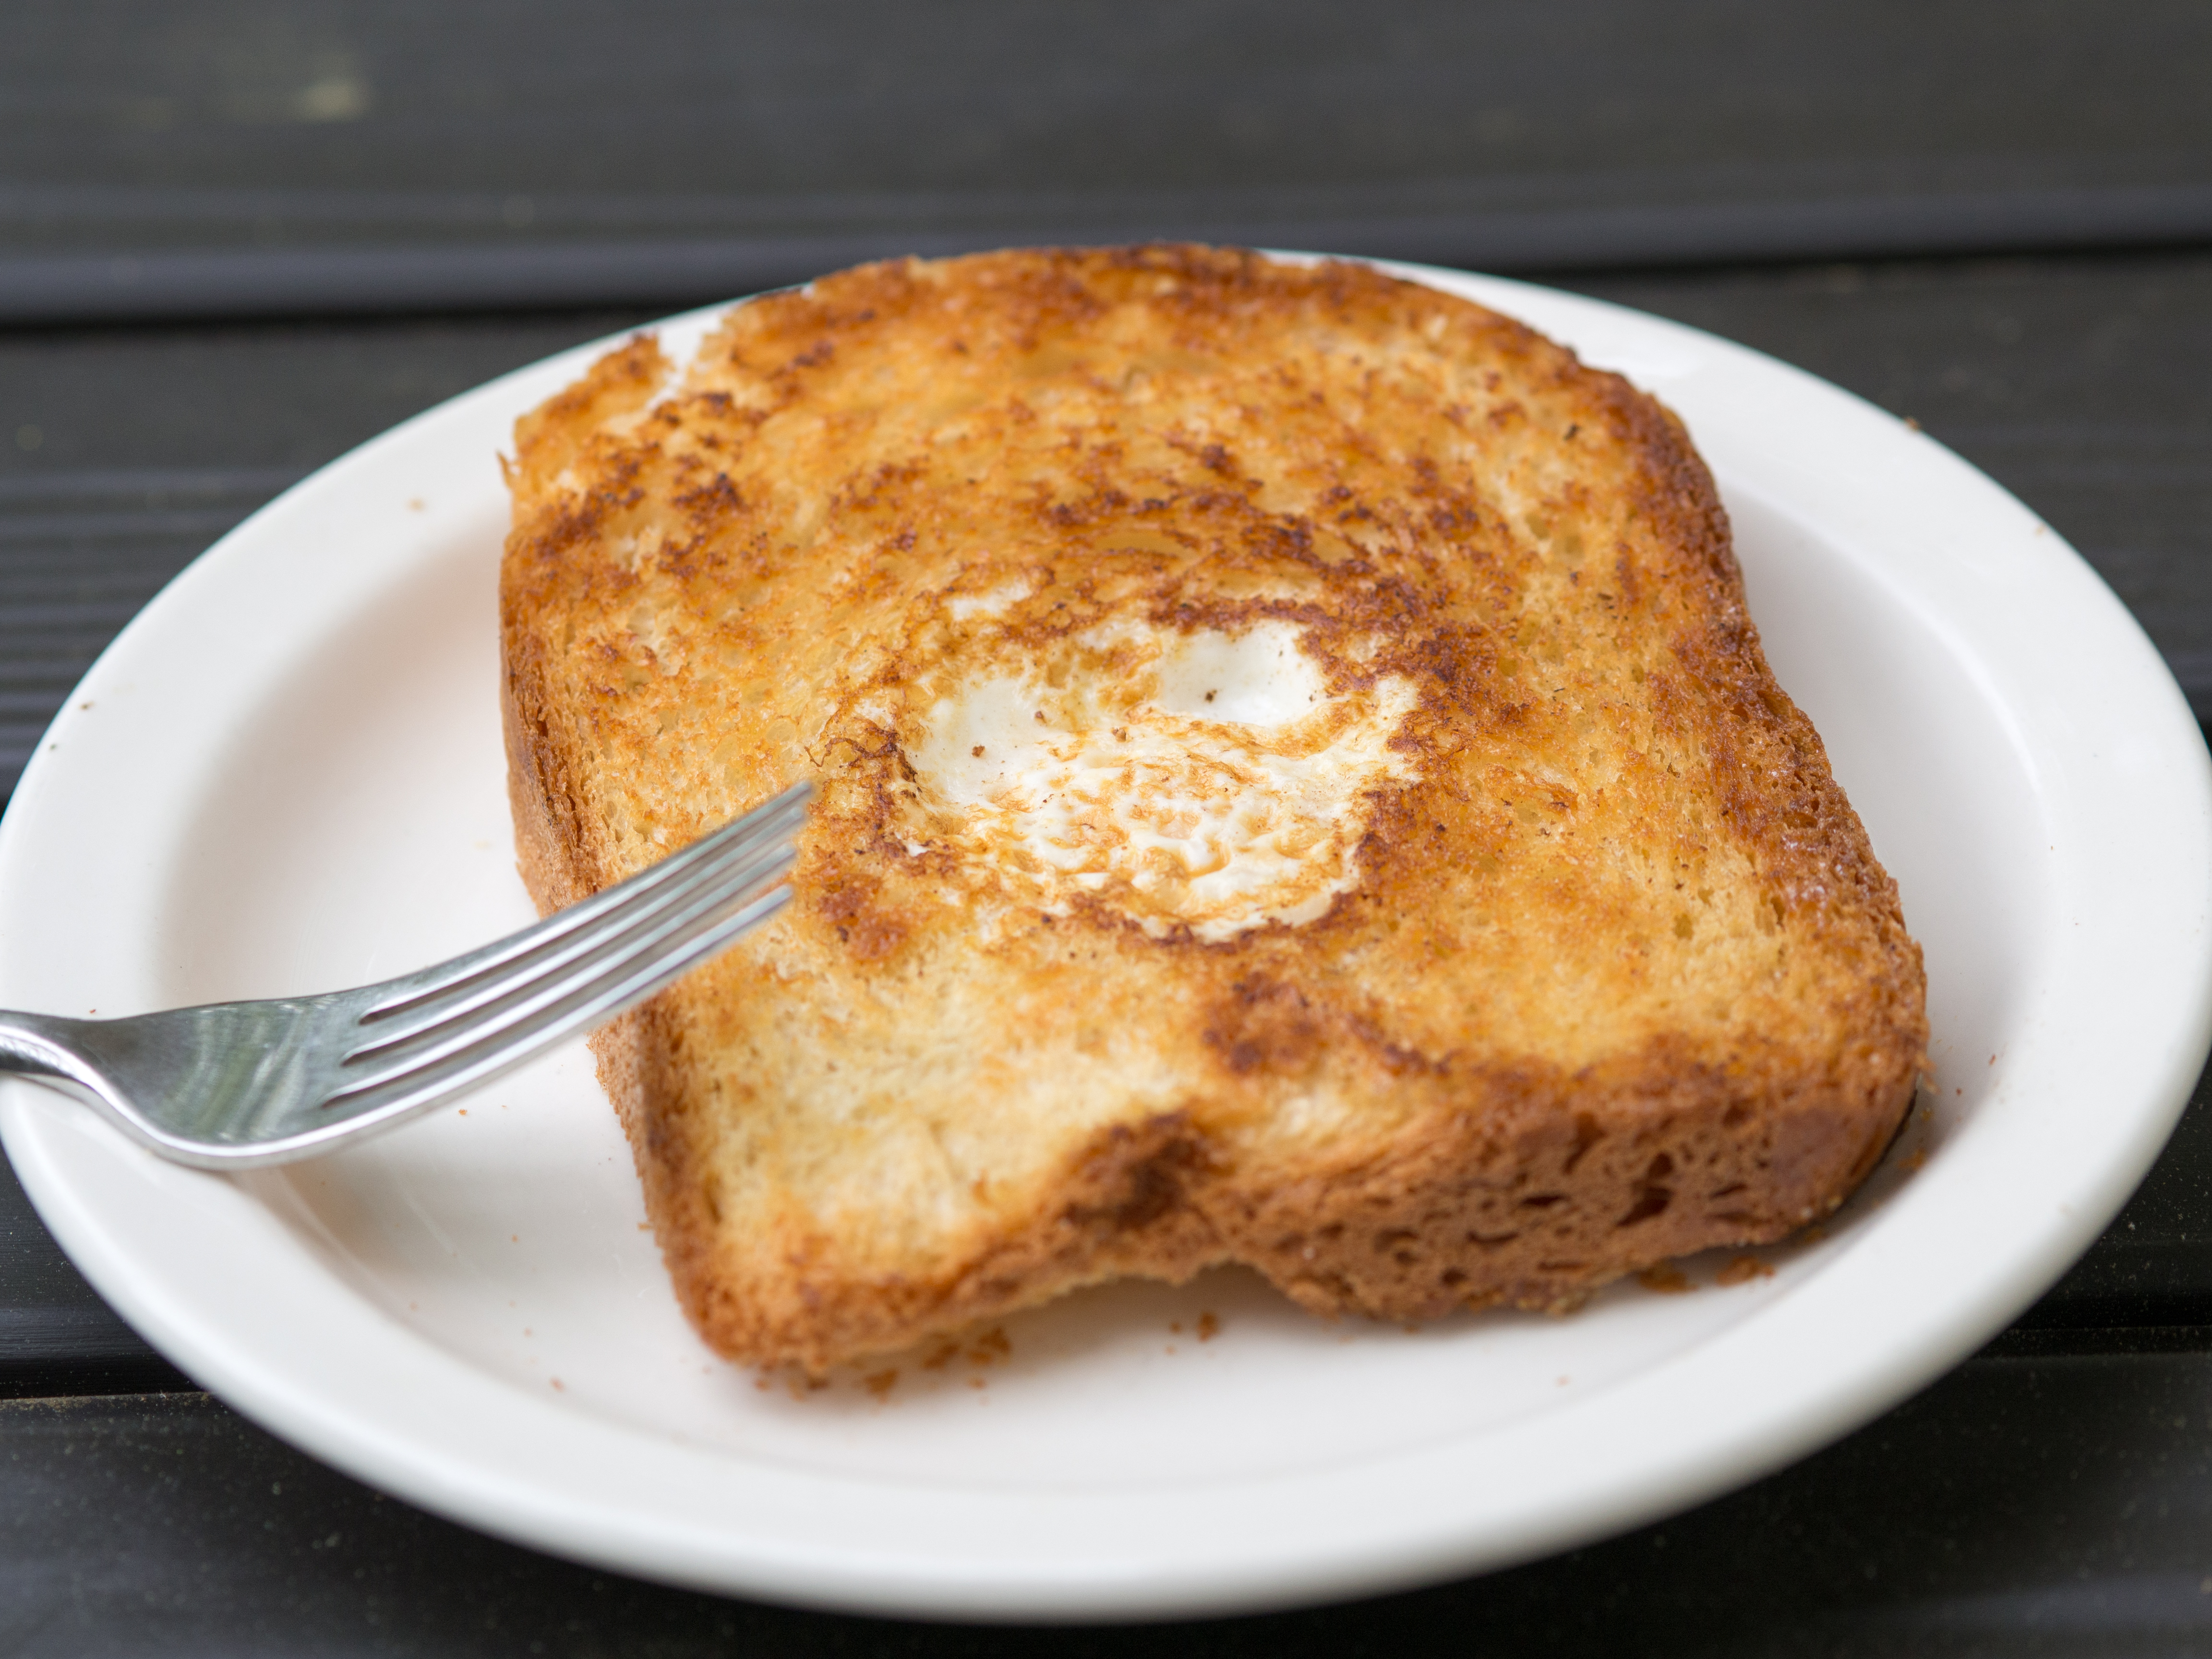
My kids fawned all over this dish.  I looked at it and it appeared to be grilled bread with an egg in the middle.  No big.   I was perplexed as my children were not big egg eaters.  Nor were they particularly fond of toast, unless it was slathered with peanut butter and dotted with chocolate chips.  But the Goofy Toast had cast its spell.  Moving the egg from the side of the plate to the middle of the toast transformed both moderately despised food items into an edible creation. I guess those Disney people really know their target audience.

So, when we got home I asked if they wanted Goofy Toast.  I got the eye roll.  No, really, I can make it, I replied.   So, I made it and they were amazed that I could recapture the magic of the Goofy Toast.   Truly amazed.  Like I had turned lead into gold amazed. Ok…..

So, if you would like to try something ever so slightly different for breakfast, here you go.  Apparently, this is crazy kid friendly!  I will say, it is an elegant presentation of what is otherwise humdrum eggs and toast.  So, there is that.

Goofy Toast (aka Eggs in a Nest)
makes 1

butter
slice of bread
egg
salt and pepper

Melt butter in a nonstick pan over medium heat.

While the butter is melting, cut a hole in the middle of the bread.

Place bread in pan.

Crack egg into the hole in the bread. Season with salt and pepper. Dot bread with butter. When egg has set on the bottom (2-3 minutes), carefully turn over in pan. Cook until desired doneness.

Seriously, that’s it. As a variation, my daughter only likes scrambled eggs, so I scramble the egg before putting it into the opening in the bread.

OLYMPUS DIGITAL CAMERA

OLYMPUS DIGITAL CAMERA

OLYMPUS DIGITAL CAMERA

OLYMPUS DIGITAL CAMERA

Coq Au Vin

OLYMPUS DIGITAL CAMERA

One of my earliest cooking memories revolves around a very old set of cookbooks.  I want to say they were Time Life’s World Cookbooks or something like that.  These cookbooks seemed so much fancier than our trusty red and white checkered Better Homes and Gardens’ New Cookbook.  So, of course I poured over them more.  The red checked book seemed so, well, American.

The cookbooks were divided by country and there was an entire cookbook dedicated to French Cooking.  As a child who’s most exotic meals were tacos or spaghetti, these cookbooks seemed other worldly.    So, one night I asked my mom if we could make something out of the French cookbook… and I kept asking for a while until she finally relented.  The most exotic recipe to me (I was probably all of 8 or 9 years old) was Coq Au Vin.  Chicken in Red Wine.  To go with it, Chocolate Mousse.  I’d never had chocolate mousse, but had heard of it.  I had chocolate pudding, but was pretty sure mousse was somehow better. My parents were beer drinkers, so we got cooking wine for the red wine…  I know, stop laughing.  But this was the 70s and, well, we didn’t know.  Why would they sell it if it wasn’t good?

So, that was my first foray into French cooking:  making a recipe from Time Life with supermarket cooking wine.   We weren’t exactly well to do, and, at the time it was a fairly expensive meal.  So, my parents were very kind to indulge me.   For the record, the chocolate mousse was amazing.  To this day I remember that meal.  I was so proud to make it.  I felt truly grown up.

In the many years since then, cooking Coq Au Vin, made famous in the States by Julia Child, seems odd and quant.  Like a 70s fondue party.   I’m almost sheepish about telling people I eat this dish, much less make it.   This is another recipe like my 40 Cloves of Garlic Chicken that really should be in the rotation.  It deserves a spot in your repertoire!  While it is an old dish, and old dishes are not fussy.  There’s no crazy ingredient you’ll only use one and rue the rest of the time it’s in your pantry (looking at you walnut oil!).  The ingredients are fairly cheap and easy to come by, depending, of course, on the type of wine you use.

Coq Au Vin is normally made with a tough, old bird.  It’s rare to come across those nowadays, although my farmer’s market does have a great guy that sells “stewing hens”.  So, I use chicken thighs.  Today’s chicken breasts get woefully overcooked in this dish and can’t really stand up to the red wine.  You also don’t have to simmer the chicken as long, because the chicken isn’t really “old” anymore and becomes tender rather quickly.

I will admit to a cheat. Julia Childs starts this recipe off by rendering the fat off of carefully sliced lardons. As someone who is always looking to maximize my food use, I fastidiously save the bacon fat every time I cook bacon. So, I can skip the rendering step and shave about 20 minutes off the cook time.  If you don’t have bacon drippings, please render away!
Coq Au Vin
Serves 6

1/4 cup rendered bacon fat (may substitute any vegetable oil that can handle high heat, like canola)
6 chicken thighs
1/2 teaspoon salt
1/2 teaspoon ground black pepper
3 stalks of celery, coarsely chopped
2 carrots, coarsely chopped
1 small onion, small dice
3 cloves of garlic, minced
3 cups of red wine
2 bay leaves
1/2 teaspoon dried thyme
1 cup of water or chicken stock
2 tablespoons butter
2 tablespoons flour

Preheat oven to 350 degrees Fahrenheit.

Heat bacon fat in an enameled dutch oven over medium high heat. Sprinkle chicken thighs with salt and pepper and place in the pan skin side down when fat sizzles on contact with chicken. Cook chicken until the skin is a golden brown and flip over. Cook the other side until golden as well. Remove the chicken to a platter and set aside.

Saute celery, carrots and onions until the celery is soft. Reduce heat to medium. Add the garlic, stirring to prevent it from burning. When the garlic becomes fragrant, add the red wine, bay leaves and dried thyme and bring to a simmer. Return the chicken to the pan. If the wine does not almost cover the chicken, add the water or chicken stock. Otherwise, you can omit. Cover and place in the oven to finish cooking the chicken through, about 40 minutes.

Remove the chicken from the pot, cover and set aside.  Combine flour and butter together.  Whisk into the red wine sauce and cook until slightly thickened and glossy.  Serve chicken with sauce.

Julia Child’s recommends serving this dish with braised mushrooms and brown braised onions. I made those by sautéing the onions in butter and adding quartered mushrooms and cooking them over medium heat for about 20 minutes. In the pictures, the vegetables in the back are roasted carrots and parsnips. I just heated the oven to 375, roughly chopped the vegetables, covered with oil olive and salt and pepper, and roasted for 20 minutes until browned. I shook the pan occasionally. All told, the dinner took about 90 minutes, but most of that was the chicken cooking in the oven, not active prep time.

OLYMPUS DIGITAL CAMERA

OLYMPUS DIGITAL CAMERA

OLYMPUS DIGITAL CAMERA

OLYMPUS DIGITAL CAMERA

OLYMPUS DIGITAL CAMERA

Breakfast Sausage

OLYMPUS DIGITAL CAMERAFor those of you who have read my rib trimmin’ post, I have my follow up on what to do with all those meat scraps. We like to use everything we can here, so we turned these scraps into INCREDIBLE breakfast sausage.   We ended up with several pounds of trimmings to repurpose.  If you don’t have pork scraps, you can still make this recipe with a pork butt (aka Boston Butt or Pork Shoulder).

One of my favorite breakfast sausages is made by Bob Evans. All things considered, the ingredients aren’t horrible:

Ingredients (7):
Pork, Ham Fresh, Pork Tenderloins, Water, Salt, Spice(s), Monosodium Glutamate

However, the treatment of the pigs and the use of MSG (monosodium glutamate) are highly controversial. The animals are frequently given feed that includes antibiotics that cause antibiotic resistant bacteria as well. To avoid all of this, we tried MSG-free breakfast sausages made with more humanely treated animals that were free from antibiotics. They tasted, well, off. None had the sagey goodness of Bob Evans. The motto in our house is if you want something, you make it. So, my husband did. We wanted wonderfully sagey, MSG-free breakfast sausage made from humanely raised animals that weren’t treated with hormones or antibiotics. He delivered.

My husband came across a great recipe from Alton Brown simply titled “Breakfast Sausage“.  The recipe combines sage, rosemary and thyme.  Alton adds brown sugar, nutmeg and a dash of heat with cayenne and red pepper flakes.  The sausage is really amazing.  We alter the recipe to suit to our taste, and the fact that we have nearly 6 pounds of pork trimmings from our ribs.  If you decide to give this a go, you will never go back to store bought again, I promise.

As a bonus, we made 3 racks of ribs and converted the trimmings into 6 pounds of breakfast sausage, all for under $30.    You can barely get 2 racks of ribs for that price.  Quite amazing when you cut out the middleman and do things the old fashioned way!

The special piece of equipment you will need is a grinder.  We got a grinder attachment for our kitchenaid mixer.  It does a fairly good job, if not overly taxed.  Keep meat in small dice and not too frozen and usually the mixer can keep up.

The key to great sausage texture is keeping the meat cold.   Alton recommends stirring all the ingredients together, then chilling for an hour, then grinding.  We usually have “not quite thawed” pork that we stir the other ingredients into, then grind.

OLYMPUS DIGITAL CAMERA

Sage Sausage (rib trimmings version)

6 pounds of rib trimmings
4 teaspoons kosher salt
1 tablespoon freshly ground black pepper
2 tablespoons finely chopped fresh sage leaves
2 tablespoons finely chopped fresh thyme leaves
1 1/2 teaspoons finely chopped fresh rosemary leaves
3 tablespoons light brown sugar
1 teaspoon fresh grated nutmeg
1 teaspoon cayenne pepper
water

Sage Breakfast Sausage (pork butt version)

2 pounds pork butt (2 1/2 pounds with bone), diced into 1/4-inch pieces
1/2 pound fat back, diced into 1/4-inch pieces
2 teaspoons kosher salt
1 1/2 teaspoons freshly ground black pepper
2 teaspoons finely chopped fresh sage leaves
2 teaspoons finely chopped fresh thyme leaves
1/2 teaspoon finely chopped fresh rosemary leaves
1 tablespoon light brown sugar
1/2 teaspoon fresh grated nutmeg
1/2 teaspoon cayenne pepper
water

Directions for both:

Thoroughly combine all the ingredients except the water in a large bowl and chill for at least an hour.  The mixture should be very cold, almost frozen.

Grind the meat mixture and return to the bowl.  Add enough water to make the mixture sticky, about 1/4 to 1/2 cup.

Form into patties.  In a lightly greased fry pan over medium high heat, cook until completely done, about 15 minutes.   Otherwise, wrap in wax paper and aluminum foil and freeze until ready to use.

OLYMPUS DIGITAL CAMERA OLYMPUS DIGITAL CAMERA OLYMPUS DIGITAL CAMERA OLYMPUS DIGITAL CAMERA OLYMPUS DIGITAL CAMERA OLYMPUS DIGITAL CAMERA OLYMPUS DIGITAL CAMERA

OLYMPUS DIGITAL CAMERA OLYMPUS DIGITAL CAMERA

OLYMPUS DIGITAL CAMERA

Kale and Andouille Soup

OLYMPUS DIGITAL CAMERA

Here’s a quick post about a soup recipe that my family loves.  Even the kids!  We got this from adapting Emeril Lagasse’s recipe:  http://www.emerils.com/recipe/3934/Kale-and-Andouille-Soup.   I am a huge Emeril fan from way back.  I went to law school in New Orleans in the 1990s, and because you can’t have too much graduate school loan debt, I also got my MBA.   My graduate school debt will be paid off in 2028.  I kid you not.  I will have retired before then.  But, I’m not bitter.  🙂

Anyway…. At the same time I was in grad school, Emeril was on this little network called the Food Network.  You remember that network? The Food Network used to show viewers how to cook food, with chefs like Mario Batali, Emeril Lagasse, Sara Moulton.  Of course, that before the network became reality TV food programming.  Seriously, can Chopped be on more?

But I digress, Emeril was also chef and proprietor of a couple of restaurants in New Orleans.  Whenever my parents came down to visit (which was surprisingly often…), they always wanted to eat at Emeril’s.  And why not?  The service was amazing and the food was outstanding, plus the chef was famous.  Way back then (GET OFF MY LAWN!!!!), the “famous chef” just wasn’t the norm as it is now.  One night, my dad and I were eating at Emeril’s and we asked if they had any signed cookbooks we could buy for my mom’s birthday.  Emeril himself came to our table with one of his cookbooks!  He chatted with us for a bit and then signed the book for my mom.  AMAZING.  He was very nice and it was just such an incredible moment.

New Orleans is an fantastic city and just a complete culinary extravaganza.  My mother and I were really inspired to cook by the city.  You just can’t find New Orleans-type food here in Maryland.  So if you want gumbo, étouffée, dirty rice, or bread pudding, you need to make it yourself.

Needless to say, we have all of Emeril’s cookbooks.  Some recipes are crazy fussy and you won’t see me do them here.  Real and Rustic  and his holiday cookbook-ette are the most used.  But this recipe makes a really quick, easy and superbly good meal.  The recipe is especially useful if you have lots of kale on hand to use.

I made a few adjustments, however.  As we made the soup as part of our regular menu, we realized that not many of us actually ate the potatoes Emeril includes in his recipe.  Also, sometimes we don’t want the spiciness of the andouille and sub out kielbasa for the sausage.

Kale and Andouille Soup
Serves 8

1/4 cup high heat fat (lard, bacon drippings, vegetable oil)
1 medium onion, diced
3 stalks of celery, sliced thin
3 cloves of garlic, minced
1/2 teaspoon dried thyme
2 bay leaves
2 pounds of smoked sausage (andouille, kielbasa, chorizo, etc.), sliced into rounds
3 quarts of chicken stock
4 cups of kale, rinsed, stemmed and torn into manageable pieces
Salt and Pepper

In a large pot suitable for soup, heat the fat over medium heat. When heated, sauté the onions and celery until translucent, but not browned. Add the garlic, thyme, and bay leaves and cook until fragrant (1-2 minutes). Add the sausage and cook another minute.

Add the chicken stock. In thirds, add the kale, stirring between additions, and let boil. Reduce heat and let simmer for 20-30 minutes, until the kale is sufficiently tender. Taste the soup and add salt and pepper as necessary.

OLYMPUS DIGITAL CAMERA

OLYMPUS DIGITAL CAMERA

OLYMPUS DIGITAL CAMERA

Pie or Pastry Crust

OLYMPUS DIGITAL CAMERA

Behold my flaky layers!

There’s nothing that seems to scare the crap out of people more than flour, salt, solid fat (butter, lard, shortening), and cold water.  In other words, pastry.   When I bring pies to places people cannot believe I have made my own pie crust.  It’s like a bucket list item:  Climbed Everest, Visited Easter Island, made own Pie Crust.  Done.

The Food Industrial Complex has made people so complacent that most don’t see the need to make their own crust.  Just unroll the crust from the refrigerated section of your grocery store and BAM! pie crust.  But is it really?  Gummy, lacking any snap or palpable flakey layers, is it really pie crust?  Or something lesser.  Let’s look at the competition.

Pillsbury Rolled Pie Crust ingredient list:

Wheat Starch, Lard Partially Hydrogenated, with BHA and, BHT To Protect Flavor, Wheat Flour Bleached, Water, Sugar, Rice Flour, Salt, Xanthan Gum, Potassium Sorbate Preservative, Sodium Propionate Preservative, Citric Acid, Color(s), with Yellow 5 and, Red 40

My ingredients?  Seriously: flour, sugar, butter, lard, salt and cold water.  No competition.  I’m not even sure what Wheat Starch is and why it is the largest ingredient on the list.  Flour is a distant third.  What’s wrong with their ingredients that they need to add food coloring?  Oh, that’s right, there’s no butter to give the “pie crust” a warm golden color.

The competition is rather sad.  A pale imitation of real pie crust.  In The 1892 Boston Cooking School Cook Book by Fannie Farmer (yes, she was a real person), there is an entire chapter dedicated to pastry.   In this chapter Fannie Farmer divides pastry by duty.  Puff pastry was suitable for rims and upper crusts of pies, vol-au-vents, patties, rissoles, bouchees, cheese straws, and tarts.  But is never for lower crusts!!  Puff pastry is made exclusively with butter, according to Mrs. Farmer.   Plain paste, with a mix of lard and butter, was more suitable for lower crusts.  James Beard detailed various pastry in 9 pages of his American Cookery published in 1972.    Today, sadly, most people don’t make pies much less pie crust.   After reading these books, it is easy to see why.  The first few sentences of Mr. Beard’s introduction are flat out intimidating:

Flaky, tender pie crust must have a delicate balance of fat and flour and not too much liquid.  For this reason, measure the ingredients carefully. Too much flour can make a tough crust; too much fat, a greasy crumbly crust; and too much liquid will in turn require more flour and result in a tough crust.

But persevere!  Look at the Pillsbury ingredients.  There are no liquids.  What do you think you have there?  A tough, non-flaky mess.  That is your competition.   If your dough is “tough”, seriously, who’s going to know?  Few people expect a flaky crust anymore because most are used to the industrial stuff.  That’s the worse that happens.  You make a crust with no preservatives that is still better than what you can roll out of a package.  Fear not!

The recipe is super easy and if you have a food processor, it’s laughably easy.  You will scoff at yourself for ever being too intimidated to try.

My goal here is to get you to make a great crust.  Give it a go, so to speak.  You don’t have the time?   Is 10 minutes too long?  If you take out the time it takes to assemble the ingredients, it takes 2 minutes, tops to actually “make” the crust.  Then it rests.  Then you roll it out.  Done.  I make mine the day before I need to make the pie.

This recipe is adapted from Paula Deen’s Perfect Pie Crust.  It is a sweet, but not too sweet crust and very aptly named.

Perfect Pie Crust

2 1/2 cups all purpose flour
1/4 teaspoon fine salt
3 tablespoons granulated white sugar
1/4 cup lard, very cold (may substitute vegetable shortening)
12 tablespoons butter, very cold and cubed
1/4-1/2 cup ice water

Hand mixing directions:

Sift the flour, salt and sugar together in a large mixing bowl. Work the lard into the flour mixture with your hands. Work quickly so that the lard doesn’t get too warm. Add the cold butter and quickly work into the mixture until the flour is crumbly, like coarse cornmeal. Add the ice water slowly until the mixture comes together, forming a dough. Gently shape the dough into a ball. Divide the ball into two, shape into disks, wrap each disk in plastic wrap, and refrigerate for at least 30 minutes prior to use.

Food processor directions:

Place the flour, salt and sugar in the processing bowl, pulse until combined and aerated. Add the lard in pieces and pulse until incorporated. Add the cubes of butter a few at a time, pulsing between additions until the additions are incorporated. Slowly drizzle the water into the bowl and pulse. Stop adding water when the dough comes together in the bowl. Turn the dough out on a floured surface, gently shape into a ball, and divide the ball into two disks. Wrap each disk in plastic wrap and refrigerate for 30 minutes prior to use.

It’s really that easy.  Use for almost any recipe that requires a crust.  This recipe makes two 9 inch pie crusts.

OLYMPUS DIGITAL CAMERA

Not the course meal like texture already developing.

OLYMPUS DIGITAL CAMERA

OLYMPUS DIGITAL CAMERA

Chicken Pot Pie

OLYMPUS DIGITAL CAMERA

It’s 5 o’clock and I’m staring the fridge, hoping for a revelation as to what to make for dinner.  I’ve got left over chicken thighs.  Every other protein source is froze solid.  So, I thought, what to do with you?  The kids can’t stand chicken salad.  So, I decided to make Chicken Pot Pie.  There were a variety of old recipes that involved the entire chicken being in the pot and covered with crust.  That seemed a little, um, rustic.

I remembered the pies of my childhood.  You know the ones in the box of the freezer section.  Crust, bits of chicken and random veggies with a creamy broth in a pie shape.  As a kid, these things are amazing.  As an adult, well, here’s the ingredients for Swanson’s Chicken Pot Pie:

Ingredients (75):

Water, Flour Enriched (Wheat Flour, Niacin, Ferrous Sulfate, Thiamine Mononitrate (Vitamin B1),Riboflavin (Vitamin B2), Folic Acid (Vitamin aB)) , Chicken Cooked (Chicken Meat Dark, Salt, Soy Protein Isolate, Carrageenan, Food Starch Modified, Sodium Phosphate, Spice(s) Extract) ,Carrot(s), Potato(es), Sodium Pyrophosphate, Shortening (Lard, Lard Hydrogenated,Soybean(s) Oil Partially Hydrogenated) , Chicken Cooked Mechanically Separated, Food Starch Modified, Chicken Base (Wheat Flour Bleached Enriched [Barley Malted Flour,Potassium Bromate, Niacin, Iron Reduced, Thiamine Mononitrate (Vitamin B1), Riboflavin (Vitamin B2)] , Salt, Maltodextrin, Whey Powder, Whey Protein Concentrate, Garlic Powder, Soy Lecithin, Yeast Extract, Onion(s) Powder, Annatto, Spice(s), Turmeric Extract, Xanthan Gum) ,Contains 22% or less Peas, Chicken Fat, Dextrose, Flavor(s) Natural and Artificial Chicken(Salt, Chicken Powder, Chicken Fat, Yeast Extract Autolyzed, Water, Flavor(s) Natural & Artificial, Sugar Invert, Chicken Broth, Onion(s) Powder, Flavor(s) Grill [Soybean(s) Oil Partially Hydrogenated, Cottonseed Oil Partially Hydrogenated] , Cottonseed Oil Partially Hydrogenated, Soybean(s) Oil Partially Hydrogenated, Tocopherols) , Salt, Dough Conditioner(s) (Sodium Aluminosilicate, Salt, Wheat Gluten Vital, Enzyme(s), Soy Protein Flour,Ammonium Sulfate, Fumaric Acid) , Caramel Color, Annatto for color retention

Oh my.

So, I gathered my ingredients on hand and transformed tired leftovers into something that used to be quite common place, but is now very exotic:  a chicken pot pie.  The kids were amazed at the transformation of such humdrum ingredients.  In going through the historic cookbooks, “pot pies” were rather common place.  I find them to be an efficient use of leftovers!! I’ll put measurements on here, but really, it’s all about what you have on hand.

Chicken Pot Pie
Serves 6

1/2 recipe Pie Crust, or a 9 inch pie crust

1/4 cup high heat tolerant cooking fat (lard, bacon drippings, vegetable oil)
3 carrots, sliced thin
3 celery stalks, sliced thin
1 medium onion, small dice
1 8 ounce container of mushrooms, sliced
1-2 pounds cooked chicken, cubed
1/2 teaspoon dried sage, crushed
1/2 teaspoon dried thyme, crushed
2 tablespoons flour
2 cups heavy cream
Salt and Pepper

1 egg
1 tablespoon water

Preheat oven to 350 degrees fahrenheit

Place the cooking fat in a sauté pan over medium heat. When heated, add the carrots, celery, onion and mushroom. Sauté, stirring occasionally, until the carrots and celery are soft (or the texture you like them), about 15-20 minutes.

Add the chicken, sage and thyme, cook until fragrant. Add the flour and cook for a bit until the raw flour taste is cooked out.

Add the heavy cream and cook. The sauce will thicken. You want the sauce to continue to thicken as it cooks, about 5-10 minutes. Taste and season with salt and pepper as needed.

Place the mixture in a oven proof pan (I used a large soufflé dish) and smooth the top.

Roll out the pie crust and drape over the top of the baking dish. Pinch the crust over the top of the dish to hold the crust firm.

In a small bowl, beat the egg and water together and brush on pie crust.

Cut a vent slit in the crust, and place the dish on a cookie sheet. Bake until the crust is golden brown, about 30 minutes.

OLYMPUS DIGITAL CAMERA

OLYMPUS DIGITAL CAMERA

OLYMPUS DIGITAL CAMERA

OLYMPUS DIGITAL CAMERA

OLYMPUS DIGITAL CAMERA

OLYMPUS DIGITAL CAMERA

OLYMPUS DIGITAL CAMERA

OLYMPUS DIGITAL CAMERA

Rib Trimmin’

OLYMPUS DIGITAL CAMERA

No, we are not discussing some plastic surgery that people in Hollyweird may or may not have done.  We are discussing trimming ribs so that they look their best on your barbecue.  As part of my continuing series on our barbecue competition aspirations, I wanted to share some behind the scenes magic.  Using a knife is dangerous stuff, please be careful and take all necessary precautions.

My husband has graciously (and patiently) decided to teach me and my camera the art of rib trimming.  First, please make sure you have a very sharp knife and a great cutting board.  Then, you need a bowl to keep those trimmings!  Don’t throw them away.  I’ll have a post on what to with the trimmings that will seriously blow you mind.  It’s awesome.

Most of you will start with this crazy hunk of meat:

OLYMPUS DIGITAL CAMERA

Kind of intimidating and not very “rack of rib” like.

With the ribs facing away from you, remove the top flap of meat with your sharp knife.

OLYMPUS DIGITAL CAMERA

Flip the ribs over and cut through the cartilege so that the extra triangle you see below is removed.  The rack should appear more rectangular now.

OLYMPUS DIGITAL CAMERA

OLYMPUS DIGITAL CAMERA

To me, the next step is crucial.  Turn your rack of ribs back over.  You’ll see a membrane covering the boney rib part.   That sucker has to go.  If you don’t remove it, the ribs are tough and your rub can’t penetrate into the meat as effectively.  You want to gently insert your knife (or a butter knife, depending on the strength of the membrane) and wriggle a starting piece free.  Once you get a decent sized starting piece, the whole membrane will pull free.

OLYMPUS DIGITAL CAMERA

Flip the ribs over and carefully remove any excess fat on the top.

OLYMPUS DIGITAL CAMERA OLYMPUS DIGITAL CAMERA

Your ribs should now look amazing and of uniform size and ready for the rub!!

OLYMPUS DIGITAL CAMERA

Generously apply the rub of your choice.

OLYMPUS DIGITAL CAMERA

Make sure you have your charcoal and wood chips/blocks are ready to go, and your smoker is at temperature.

OLYMPUS DIGITAL CAMERA OLYMPUS DIGITAL CAMERA

Place the ribs on a rack and smoke for a few hours (2-3) over 250 degrees fahrenheit.

OLYMPUS DIGITAL CAMERA

Ready to wrap!

Wrap the ribs in foil and return to the smoker for another hour until perfect!

OLYMPUS DIGITAL CAMERA

Frittata Madness

OLYMPUS DIGITAL CAMERA

In eating low carb, breakfast can be a bit of a challenge.  Besides eggs and your typical breakfast meats (bacon, sausage, scrapple, etc.), most of breakfast is a bit of a carbfest.  Pancakes, Waffles, croissants, muffins, pastries, doughnuts.  Oh my!!

So, when you are stuck with eggs every day and rotating the breakfast meats and adding berries, eventually you come to a point where enough is enough.  Enter the frittata.   The frittata is supposed to be a fried egg, which part of this recipe is.  With the advent of broiling ovens, the cooking style for this dish has changed from completely fried, to a hybrid of fried and broiled.   While this may not be as authentic as a true frittata, it does make the dish easier to make without compromising its integrity.

Frittata has its origins in Italian cuisine and was considered a great way to use up leftovers, especially vegetables.  In the United States, it appears more as a brunch dish and the ingredients used vary wildly from only vegetables to a meat extravaganza.

In my house, we have used leftover taco meat and cheese to create a Mexican inspired frittata. For this recipe, we use gumbo-inspired ingredients, onions, peppers, andouille sausage and garlic.  You can use anything you have on hand, really.

The general plan of a frittata starts with a well oiled, oven safe sauté or fry pan that can handle the bulk of the ingredients.  You need a pan that can contain not only the eggs, but everything you want the eggs to contain.  I use my All-Clad d5 12 inch fry pan.  I buy All-Clad because they are still made here in America (except the lids) and are made with Stainless Steel.   I bought the cookware on sale (it was a open box set) at Williams Sonoma and have never looked back.  I can assure you, no business has given me any products to try or endorse.  I bought it and love it.  There’s no warping, it’s not thin in spots and it looks beautiful.   Plus, it’s made in Pennsylvania.  I am more than happy to support products from countries that oversee (to some extent) the manufacturing process and require a decent wage to be paid to its workers.  Not all of the All-Clad line is made in the USA, so you have to look (like if you see a certain BAM! chef on the box, just walk away).  There’s a reason it’s cheaper.

Anyway, I mention this because not all cookware is meant to be put in the oven under the broiler.  Usually the darker and non-stick pans advise against it.

So you have a well oiled pan, heat the oil and make sure it coats the entire interior of the pan.  Add your additions to the frittata and sauté until you achieve the texture you want in the additions (peppers and onions soft, for example).  Add beaten eggs to the pan.  Cook on the stove top until the bottom and sides are set and the top is less runny.  At this point, the pan should be placed in the pre-heated oven set on high broil.  You need to keep an eye on it.  Broil the frittata until puffed in the center and there’s no jiggle when the pan is moved.

In a nutshell, that’s a frittata.  It’s not hard, it’s all in one pan and easy to clean up.  It’s also an excellent way to repurpose leftovers into a sum greater than the parts.

In this frittata, my son wanted to try out his knife skills.  So, we have a very rustic version of the dish.  You can take the time to fine dice everything for a more refined appearance.  Frittatas are a nice way to stem the madness you may experience at breakfast if you are following a lower carb way of living. In my house, they are also a very quick weekday meal using leftovers in a brand new and not so humdrum way.

Frittata

Olive Oil (enough to more than cover a 12 inch fry pan), about 1/4 cup
1 small onion, diced
1 bell pepper, diced
1 teaspoon salt, divided
1 teaspoon black pepper, divided
1 tablespoon minced garlic
1 pound andouille sausage (I used 1/2 pound andouille and 1/2 pound kielbasa)
8 large eggs, slightly beaten
1 cup shredded cheese (I used Monterey Jack)

Place oil in 12 inch fry pan over medium heat, swirl to coat the entire pan. When oil is heated, add onions and peppers, season with 1/2 teaspoon each of salt and pepper, and cook until soft. Add the garlic and sauté further until fragrant. Add sausages and sauté until warmed through.

Preheat broiler set on high.

Add to the beaten eggs the remaining salt and pepper. Stir in the cheese, until combined.

Distribute the pan ingredients evenly throughout the pan with a wooden spoon. Add the egg and cheese mixture. Cook on the stovetop over until the sides and bottom are set and the eggs are runny on top. This step is hard to describe, but you want a layer of runny egg mixture, but it shouldn’t be very deep. At this point, you want to place the pan in the oven under the broiler. Leaving the door slightly ajar, broil until the egg is puffed in the center and the mixture does not jiggle when you shake the pan.

Remove from oven, cut in wedges and serve.

Note of caution: when removing the pan from the oven, keep in mind the ENTIRE pan was in the oven. So, a few seconds later you will see the pan on the stove and may not think too much about it if you have to hold it to cut the frittata to serve. As the handle is now extremely hot, you will get burned. I avoid this by draping a hot pad or oven mitt over the handle to remind myself that while my handles aren’t normally hot, in this case it is scorching.

OLYMPUS DIGITAL CAMERA

OLYMPUS DIGITAL CAMERA

OLYMPUS DIGITAL CAMERA

OLYMPUS DIGITAL CAMERA

OLYMPUS DIGITAL CAMERA

OLYMPUS DIGITAL CAMERA

Chocolate Chip Cookies Noir

OLYMPUS DIGITAL CAMERA

My daughter came home from school with a little challenge.  She had bought cookies at school.  Fudge Chocolate Chip cookies.  She handed the cookie and her purloined package (they are supposed to throw the trash away, of course) and very cutely said that she wanted me to recreate these cookies.  She even bought me the package so that I could see the ingredients!  How cute is that?  Seriously.  Super cute.

So, I looked at her little face and said that I would try.  She proudly handed me the package and said it was easy, since I also had the ingredients.  Flour, sugar, chocolate, fiber (I kid you not, that was an ingredient), high fructose corn syrup and some long chemically sounding names.  She then gave me a microscopic taste of the cookie, and ate the rest, of course.   The taste from my extremely tiny piece was distinctly underwhelming.  Cloyingly sweet with a bare whisper of chocolate taste.  A hint of chewy.  That was I had to work with.  I asked if she minded if I tried to make the cookie better.  She said I could try, but, in her opinion, that cookie was hard to beat.

Clearly I was making Chocolate Chocolate Chip Cookies.  But how?  Recipes seemed evenly divided between adding melted chocolate to a slightly modified chocolate chip cookie recipe or adding cocoa powder instead.  Some omitted chocolate chips and substituted white chocolate chips to avoid a monotonous look.  Some used all white sugar, others split the sugar between white and brown.

What did I want from these cookies?  I wanted a very chocolatey cookie.  More importantly, what ingredients did I have on hand?  Recipes that used melted chocolate, used more than I had on hand.  So, I wanted to try a hybrid, part melted chocolate, part cocoa powder.  I also had both white chocolate and dark chocolate chips.  I knew I wanted to use brown sugar and white sugar because of the great results I have with my regular chocolate chip cookies.   And I wanted to rest the cookie dough for at least a day.  It really helps develop the flavor of the cookie.  So with all of these parameters, what did I get?

One naughty, naughty cookie.  This is Noir.  Dark.  Sinful. Thick.  Rich. Chocolate.  No cloying sweetness.  Just flat out unbridled chocolate.  This is a cookie that is begging for whole milk. You will not be disappointed.  Neither was my daughter.  In her mind, these were “way better”.

The chocolates I used were:  Scharffen Berger Unsweetened Natural Cocoa Powder, Ghirardelli Unsweetened Chocolate, Ghirardelli Bittersweet Chocolate Chips, and E. Guittard White Chocolate chips.

Chocolate Chip Cookies Noir

2 1/4 cups flour
1/3 cup of cocoa powder
1 teaspoon baking soda
1/2 teaspoon salt
1 cup butter, softened
3/4 cup light brown sugar, packed
3/4 cup granulated sugar
2 teaspoons vanilla
2 eggs
2 ounces unsweetened chocolate, melted
1 cup white chocolate chips
1 cup bittersweet chocolate chips
1 cup chopped walnuts (optional)

In a medium bowl, combine the flour, cocoa powder, baking soda and salt. Whisk to combine and aerate.

In a mixing bowl, cream the butter and the sugars. Add the vanilla and mix until incorporated. Add the eggs, one at a time, and mix until each is incorporated. Add the melted chocolate and mix until thoroughly incorporated.

Add the dry mixture by thirds to the creamed mixture and mix until combined. Mix in the chocolate chips and nuts, if used. Cover dough and refrigerate for at least 24 hours.

Preheat the oven to 375 degrees fahrenheit. Place a heaping tablespoon of dough on a lined cookie sheet. Bake 9-11 minutes.

OLYMPUS DIGITAL CAMERA OLYMPUS DIGITAL CAMERA OLYMPUS DIGITAL CAMERA

OLYMPUS DIGITAL CAMERA

OLYMPUS DIGITAL CAMERA

OLYMPUS DIGITAL CAMERA


OLYMPUS DIGITAL CAMERA

Onion and Wine Braised Chuck Roast

OLYMPUS DIGITAL CAMERA

Ah, pot roast.  Few thinks provoke a rash of tears like me telling my kids we are having pot roast for dinner.  Actual tears.  “No, no pot roast!! Sob!”  My husband and I are completely stumped.  We eat it, it tastes really, really good.  They won’t touch it.

When I was a child, I remember the tears that pot roast bought to me, but my tears were different (GET OFF MY LAWN!!  Sorry, I feel compelled to say that when I sound like a old coot).  My mother made “pot roast”.  The roast went in a lovely shade of red and came out gray with a nice black bark on top.  She served it with gravy.  The gravy made is edible and helped the tough swallow factor.  That was pot roast.  Who wouldn’t cry?

One night, when I was in high school, I went to my friend’s house for dinner.  When Mrs. Gordon brought out her pot roast, it was moist and glistening with a wonderful pink center.  It was beefy tasting and really good.  You didn’t need gravy.  When I asked her what it was, she laughed and said “pot roast”.  No, it wasn’t.  Not the kind I knew.  I came home and told my mom that one could make pot roast that wasn’t gray.  I’m sure she appreciated that.  Anyway, she now does a much better pot roast.  The key is not only the “pot”, but the lid.

I’ve tried pot roast in a slow cooker and, while it’s close to being good, that’s about all I can say.  When you make it with a dutch oven, it’s just better.  Tough pieces of meat like chuck roast need long, moist cooking time.  When they get it, the results are silky, tender, and sublime.

Also, and I can’t really emphasize this enough, when you order your cow by the “half side”, you get lots of roasts.  Lots of them.  Sure you tell them “maximum ground beef”.  Doesn’t matter.  Roasts are plentiful.   Necessity is the mother of invention.  I couldn’t have a roast with potatoes, carrots and onions again.  Seriously, couldn’t.  So tired of it.  As I have to kid friendly a bunch of my meals, since they won’t eat the pot roast anyway, I went all out adult on this recipe.  Every non-kid friendly ingredient I used it.  Wine?  Check?  Lots and lots of onions?  Check.  Rosemary?  Check.  Hitting all the high marks!

Pot roast isn’t about measurements.  I’ll try my best, but if I say a 4 lb chuck roast and you have a 3 pound one, don’t sweat it.  This is definitely a “close enough” recipe.

Onion and Wine Braised Chuck Roast

2-3 tablespoons of high temperature cooking fat (lard, bacon drippings, vegetable oil, etc.)
1 chuck roast (3-4 pounds)
Salt and Pepper
4-5 medium onions, sliced in half rings
2 tablespoons garlic cloves, minced
1 teaspoon dried thyme, crushed
1 teaspoon of dried rosemary, crushed
1 bay leaf
1 tablespoon tomato paste
1 1/2 cups red wine (I used a cabernet sauvignon)
1 cup water

Preheat oven to 350 degrees Fahrenheit.

In a dutch oven (I used my trusty 5 quart), heat cooking fat over medium high heat until hot. Salt and pepper the roast and sear on both sides in the dutch oven until each side is browned. Remove and set aside.

Lower the heat to medium low. Place the onions in the dutch oven and stir. Salt and pepper the onions (I used around a teaspoon of each). Try to use the liquid of the onions to draw the lovely bits of brown seared roast off the bottom of the pan. Caramelize the onions, or wilt them until they turn a light brown. This will take a long time and require patience and semi-regular stirring. You may need to add more fat if you find that the onions are sticking. You also may need to turn down the heat if they are burning. Just as the onions are reaching the light brown stage, add the garlic and cook for 2 minutes. Add the thyme, rosemary and bay leaf. Cook for 2 minutes more. Add the tomato paste and cook until you can smell a slightly tomato-y smell (about a minute or so).

Add the red wine and stir well, and add the water. Simmer for a bit to get the ingredients married.  Return the roast to the pan. Cover and cook in the oven for 1 1/2-2 hours, or until the roast is tender.

I served this with sautéed brussels sprouts. I halved the brussels sprouts and sautéed in bacon grease until caramelized. Finished with salt and pepper. Awesomely good.

OLYMPUS DIGITAL CAMERA

OLYMPUS DIGITAL CAMERA

OLYMPUS DIGITAL CAMERA

OLYMPUS DIGITAL CAMERA