Category Archives: Holiday Recipe

Buttermilk Pie

Buttermilk Pie

I read with great sadness that the Hominy Grill closed in Charleston, South Carolina. I’ve never actually been to the Hominy Grill, but always wanted to go there because food publications frequently featured its chef, Robert Stehling, for his lowcountry inspired cooking. As a bit of a tribute, I looked to see what some of the famous Hominy Grill dishes were and Buttermilk Pie was mentioned quite a bit in a wide variety of publications. Buttermilk pie intrigued me, and only me because there wasn’t a single person in the house who wanted me to make the pie because to them the name sounded awful. The kids side-eye nearly dessert proposal lacking a chocolate component.

Despite many, many people’s misgivings, this pie turned out great. It’s a sweet, layered custardy pie with lots of lemon flavor. The pie was promptly devoured and everyone admitted they may have been judging poor ol’ buttermilk pie a bit harshly. This dessert would be a fantastic ending to a savory or barbecue-type meal with brisket or ribs. The recipe is very easy to make because there are no taxing double boiling or melting steps.

I loved this pie, as it is emblematic of what makes lowcountry cooking great. Simple, local, fresh ingredients that come together and create something greater. This pie creates three gorgeous layers with little effort or expense.

Mr. Stehling modified this recipe over time, so I picked one version that I think tastes the best and slightly tweaked it. If lemon isn’t your thing, I would think vanilla would be equally appealing in this recipe.


Buttermilk Pie

  • Servings: 6-8
  • Difficulty: Easy to Moderate
  • Print

A fantastic custardy pie.

Ingredients

  • 1 basic pie crust, blind baked with pie weights for 10 minutes at 400 degrees Fahrenheit, and 10 minutes at 375 with the crust edge covered. Or store bought
  • 1 stick unsalted butter, softened
  • 1 1/2 cups sugar
  • 3 large eggs, separated
  • 1/4 cup all-purpose flour
  • 2 cups buttermilk, room temperature
  • 1 teaspoon lemon zest
  • 1 tablespoon fresh lemon juice
  • 1/2 teaspoon freshly grated nutmeg

Directions

  1. Preheat oven to 350 degrees Fahrenheit.
  2. Combine sugar and butter in a mixing bowl and mix on medium speed until fluffy.
  3. Add the egg yolks and flour to the butter until combined.
  4. Add the buttermilk, lemon zest and juice, and nutmeg and beat on medium or medium-low speed until combined.
  5. Add the egg whites to a separate mixing bowl and beat until the peaks are stiff, but the egg whites do not appear dry.
  6. Fold the egg whites in three parts into the buttermilk mixture until the eggs whites are incorporated and there are no white streaks.
  7. Pour the pie mixture into the prepared pie crust, protect the edge of the crust and place pie in the preheated oven. Cook until the custard has risen and is golden, about 45-50 minutes. Unlike most custard pies, this one will be a bit more wobbly than expected.


Cinco De Mayo

http://dawnoffood.com

See those things?  Right up there?  They scared me. Seriously, what are they?  Fruit?  Vegetable? Starch?  Don’t make the mistake of thinking they are tomatoes.  They are not.  No.  Just no.  They aren’t just wrapped green tomatoes.  I think these are the one item I may avoid 2nd only to yeast in a recipe.  Tomatillos are just so unfamiliar and alien.  But then Cinco De Mayo came up and I thought I would conquer my fear of these things and try a simple recipe that called for them.

The recipe was a really big hit with everyone but my picky girl.  Green sauce?  Pass.  But those willing to try a sauce with a very different green color were rewarded with a very bold blast of flavor.

I made a classic Mexican recipe that I found on the Epicurious Website: Soft Fried Tortillas with Tomatillo Salsa and Chicken.   I made some changes, however.  Cooked chicken?  That’s all?  No.  We need a nice acidic marinade for chicken going into this dish.  So, I came up with one.

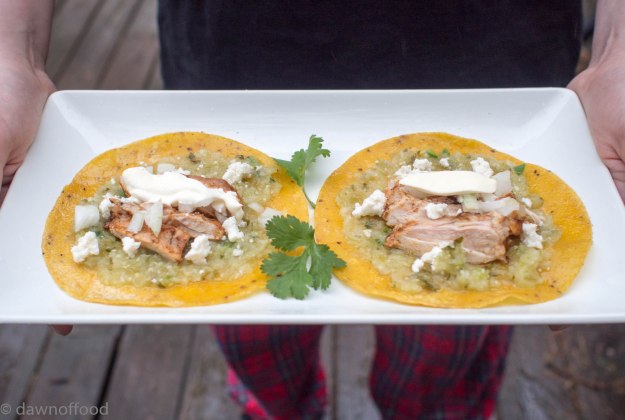
Soft Fried Tortillas with Tomatillo Salsa and Grilled Marinated Chicken. It may look like a lot of steps, but there’s not much to any of the steps, if that makes sense.

For Marinated Chicken

1/2 cup Fresh Lime Juice
1/4 cup olive oil
2 cloves of garlic, minced
1 1/2 teaspoon chili powder
1 teaspoon cumin
1 teaspoon salt
2 pounds boneless, skinless chicken thighs (or breasts, if you prefer)

For Tomatillo Salsa

1/2 lb fresh tomatillos, husks discarded and tomatillos rinsed and quartered
2-3 fresh green serrano chiles, coarsely chopped (including seeds, may use less if you don’t want it particularly spicy)
1/4 cup chopped white onion
3 garlic cloves, quartered
3/4 teaspoon salt, or to taste
1/2 cup water
2 tablespoons lard, vegetable oil or any other high temperature fat
3 tablespoons finely chopped fresh cilantro

For Chalupas

1 to 2 tablespoons vegetable oil, lard or clarified butter
12 (4-inch) organic corn tortillas
2 to 3 tablespoons
crema or crème fraîche
1/3 cup finely chopped white onion
1/3 cup finely crumbled queso fresco (Mexican fresh cheese)

For the marinaded chicken: combine all of the ingredients,except the chicken, in a gallon plastic storage bag. Close the bag and shake until combined. Add the chicken, close the bag, and massage the marinade on the chicken. Marinate for at least 2 hours. Grill over medium high heat, about 4-5 minutes per side or until cooked through to at least 165 degrees Fahrenheit.

For the tomatillo salsa: Combine the tomatillos, chiles, onions, garlic, salt and water in a blender or food processor. Pulse until relatively smooth. Heat the oil in a medium-large skillet over medium high heat. Add the salsa to the pan, taking care because the liquid will cause the oil to splatter. Bring the salsa to a simmer and cook until thickened, around 8-10 minutes. Stir in cilantro, cook for another minute and remove from heat. Cool, then refrigerate until ready to serve. May be made up to 2 days in advance.

For the Chalupas: Melt the oil over medium high heat in a heavy, large skillet. Place the tortillas in the heated oil (as many as will fit), and lightly fry for about 10 seconds on each side. The intent is to soften the tortillas, not really fry them. Remove the tortilla and drain on a paper towel. If not being used immediately, keep warm on a tray in the oven. When ready, spread with the salsa and top with the grilled chicken, crema and queso fresco.

http://dawnoffood.com

http://dawnoffood.com

http://dawnoffood.com

http://dawnoffood.com

Chicken Big Mamou

http://dawnoffood.comI went to graduate school in New Orleans.  New Orleans blew my mind, food wise.   For one of our first food adventures, my mom and I ate at Paul Prudhomme’s K-Paul’s in the French Quarter.  All of the food was so lovely!  I looked at the menu and Chicken Big Mamou stood out as something I wanted to try, but I’m not a spicy food person.  The menu warned that it was a very spicy dish.  My mother scoffed and said that this is a restaurant, they’ll moderate it and make it so that everyone can eat it.

I fell for it and ordered it.  For me, it was inedible.    Beyond spicy.  Torture level hot.  I couldn’t tell you what it tasted like because it just felt like molten lava in my mouth.  My mom traded with me (thanks mom!) and ate it because she loves food spicy.  It was hot for her, but she loved it.  We bought the cookbook and made it at home.  Others had to appreciate how hot a dish can be!!

The men in the house ate it, but it looked like they were having a heart attack:  red faced, pouring sweat and clearly uncomfortable.

So, why make it?  Well, one it’s Mardi Gras season.  I didn’t want to do a shrimp creole or crawfish etouffee.   Two, my husband and son love spicy food.  They make their own hot sauce!  So, back to my enemy.  I looked at the recipe.  My goodness, what a fussy recipe!  Lots and lots of ingredients, and butter.  Lots of steps.  Ugh.  So, I googled it.  Prudhomme had changed the recipe!!   Wrap your head around that.  The recipe on his website is 1/10th the fussiness of the one in his fantastic cookbook.   But in reviewing it,  I was about to make it a lot less fussier.  This has now become an easy (and cheap!) weeknight meal that anyone can add into the rotation.

Don’t misunderstand what I’m going to say here, but while I love Prudhomme, his recipes are maddening.  Extra steps that don’t seem to add much turn homey recipes into complicated, time consuming affairs.  The  spice lists alone are daunting.  I never got the sense that people in the bayou would cook this way.  Maybe they did and I’m totally off base.  But, it just seemed like he was “fancying up” traditional recipes so that food critics would take Louisiana cooking seriously.

So, first he modified the recipe, then I “unfancied” it.  And it is really, really good and very true to the original.  Excellent entertaining dish as well!!

Chicken Big Mamou
Serves 4-6
Prep Time: 15 minutes
Cook Time: 50 minutes (40 are low effort simmering)

3 tablespoons olive oil
3 tablespoons butter
6-8 chicken thighs or legs
2 1/2 tablespoons Paul Prudhomme’s chicken magic, divided (see below for a substitute)
1 cup very finely chopped onions
1 cup very finely chopped celery
3/4 cup very finely chopped bell peppers
1 bay leaf
1 1/2 teaspoons minced garlic
3/4 teaspoon ground red pepper (preferably cayenne, if you want it really hot!!)
2 cups tomato sauce
2 cups chicken stock or water
3/4 cup finely chopped green onions
1/4 cup finely chopped parsley leaves

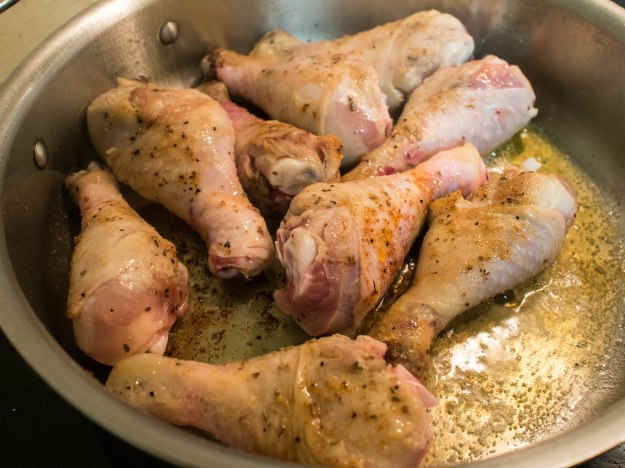
Heat olive oil and butter over medium heat in a large saute pan. Sprinkle 2 teaspoons of the poultry magic over the chicken pieces. Brown the chicken in the saute pan, about 2 minutes per side. Remove from the pan and set aside. Saute the onions and peppers in the remaining oil, until the onions are translucent. Add oil or butter if needed to prevent the veggies from burning. Add the remaining chicken magic, bay leaf , minced garlic, and cayenne pepper (if you want it really hot!) and cook for about a minute. Add 2 cups of tomato sauce and 2 cups of stock. Return chicken to the pan and simmer for about 40 minutes, until the chicken is cooked through.

Serve over cauliflower “rice”, rice or pasta. Top with the green onions and parsley.

From “Top Secret Recipes“, Paul Prudhomme’s Chicken Magic:
1 1/2 teaspoons salt
1/2 teaspoon paprika
1/4 teaspoon cayenne
1/4 teaspoon onion powder
1/4 teaspoon garlic powder
1/4 teaspoon ground black pepper
1/4 teaspoon dried thyme
1/4 teaspoon dried oregano
1/4 teaspoon rubbed sage
dash cumin

Combine spices.

http://dawnoffood.com

New Year’s Day Black Eyed Peas

New Year's Day Blackeyed Peas

Blackeyed peas, or cowpeas, or black-eyed peas are a Southern Tradition for New Year’s Day.   I learned this from my wonderful grandmother.   Every New Year’s Day my parents would take us to my grandparent’s house where we would have black eyed peas and ham for the holiday dinner.    Whether we wanted to or not, we had to eat the beans for good luck.  Mostly, being a kid, I didn’t want to eat the beans.  In hindsight, I wish I would have been a tad more excited about the prospect.

There are a variety of reasons for the inclusion of the black eyed peas on the New Year’s Day menu.   Various sources link the practice to the influence of Jewish immigrants to Georgia in the late 1700s.  Black eyed peas are traditionally served as part of the Rosh Hashanah celebration, which is the celebration of the Jewish New Year.  As the black eyed pea was a plant that was among the few not looted by Union soldiers, it was available.  As the South was left little else to eat, these peas were precious and appreciated.

I wasn’t excited to make this recipe, initially.  Not surprisingly, my northern cookbooks didn’t have any recipes for this dish.  My southern ones did, but the older ones said to soak the beans all day, change the water, boil for an hour.  Nothing else.  Beans boiled in water.  Um….  Not sounding great.

So, I “smothered” them, in the Southern food vernacular.  Onions, celery, garlic and a ham hock joined the party.  My son is dying for me to make them again and my husband took the leftovers to work. So, it was a bit of a hit! As usual, my daughter politely tried them and left them on her plate.  I’m going to say not picky eater friendly.

I had a blast reliving our New Year’s family tradition.

New Year’s Black Eyed Peas
Serves 6-8
Prep Time: 15 minutes
Cook Time: 60 minutes

¼ cup bacon drippings, vegetable oil or lard
1 medium onion, small dice
3 stalks of celery, small dice
1 teaspoon salt
¼ teaspoon cayenne
3 cloves of garlic, minced
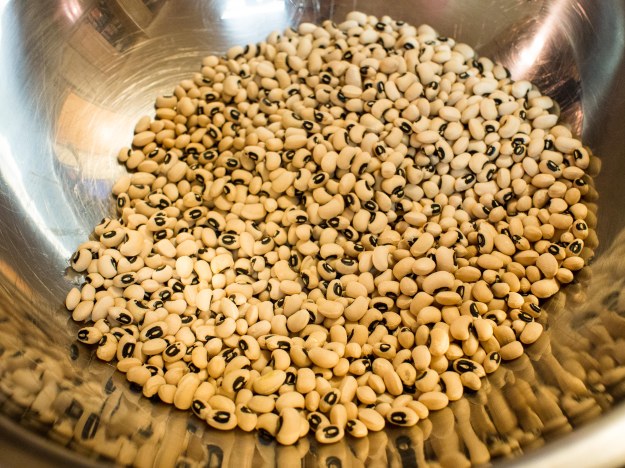
1 pound dried black eyed peas (usually 1 bag, rinsed and picked over)
1 ham hock (or other smoked meat part)
water to cover beans (not considered “lucky” to use chicken stock)

In a large 8 quart stock pot, heat fat over medium heat. Sauté onions and celery until the onions are translucent. Add the salt, cayenne and garlic, sauté for another minute. Add beans, ham hock and enough water to cover the beans. Bring to a boil, then cover and lower the heat to a slight simmer for 45-60 minutes, until the beans are tender and most of the water is absorbed. Remove ham hock and shred the meat. Return meat to the beans. Check seasonings, adjust if necessary, and serve.

OLYMPUS DIGITAL CAMERA

OLYMPUS DIGITAL CAMERA

Peanut Butter Blossoms

Peanut Butter Blossoms

I remember making Peanut Butter Blossoms when I was a kid.  Sure, it was a trans fat nightmare way back then.  But, what wasn’t?  Now, I look at the recipe for Peanut Butter Blossoms helpfully provided on the back of the package of Hershey’s Kisses and think:  I can do better.  Shortening?  No thanks.    I don’t have anything against vegetable shortening, per se, I’m just skeptical.  Vegetable shortening is pure white and kind of waxy.  What vegetable has this kind of fat?  If it’s soy, I’m out.  Too many GMO issues.  Ditto corn.  I’m just at a loss to explain how a vegetable has fat that is pure white.  So, I don’t use it.

Reese’s Peanut Butter?  Eek!  Have you seen the ingredients list?

ROASTED PEANUTS; SUGAR; CONTAINS 2% OR LESS OF: HYDROGENATED VEGETABLE OIL (RAPESEED, COTTONSEED, AND SOYBEAN OILS); SALT; PEANUT OIL; MONOGLYCERIDES; MOLASSES; CORNSTARCH

Pass.  So, I subbed out lard and butter for the shortening and a “no stir” natural peanut butter for the Reese’s brand.  Jif Natural Peanut Butter has Palm Oil for the stabilizer and while that particular ingredient has environmental issues, it’s not hydrogenated.  Every ingredient can’t be completely perfect!

The result?  Well, I was really nervous.  As much as trans fat is bad for you, it does serve a purpose in the baking world.  There are entire cookies that are based on trans fats because of their specific mouth feel.  I avoid them like the plague, but was concerned with what would happen with my little cookie.  Would they crumble?  Be too dry?  Not hold the blossom?

The cookies didn’t make it more than a few days in the house.  They were actually better than the normal recipe!  The cookies were crispy on the outside, tender on the inside.  My husband, who is not a peanut butter cookie person loved these.  The kids were  scarfing these down.  Lastly, the blossom stayed in place!!  Success!!!

By using old world ingredients, I remade this cookie to be not so lethal.

Peanut Butter Blossoms
Makes 34-48 Cookies (depends on side of cookie created)

48 HERSHEY’S KISSES Brand Milk Chocolates, unwrapped (mileage may vary here, I got about 34 cookies)

¼ cup unsalted butter
¼ cup lard
¾  cup Natural, No Stir (I used Jif) Peanut Butter
1 teaspoon baking soda
⅓  cup granulated sugar
⅓  cup packed light brown sugar
1 egg
2 tablespoons whole milk
1 teaspoon vanilla extract
1-½  cups all-purpose flour
½  teaspoon salt
Additional granulated sugar

    Preheat oven to 375 degrees Fahrenheit.
    In a mixing bowl, combine the butter, lard and peanut butter.  Mix until well combined.  Add the sugars and the baking soda.  Mix well until fluffy.   Add the egg and mix.  Add the whole milk and mix again.  Add the vanilla extract and mix until all ingredients are incorporated.
    In a separate bowl, whisk together the flour and the salt.   In 3 separate additions, add the flour to the sugar mix, mixing well between additions.
    Shape dough into roughly 1 inch balls.  Roll the balls in granulated sugar and placed on a baking sheet lined with parchment paper or a silicone mat.  Bake 8-10 minutes until lightly brown.
    Upon removal from the oven, immediately press a chocolate kiss in the center of the cookie.  Expect the cookie to crack.
    Remove cookies from the pan and let cool on a wire rack.

Peanut Butter Blossoms

Careful not to burn yourself while you put the kiss in the screaming hot cookie!

Peanut Butter Blossoms

Gingerbread Cookies

Gingerbread Cookies

I tell people my kids decorate the cookies.

I’ve pretty much always hated gingerbread, in all forms, until about 2 years ago.   Maybe I had bad gingerbread in the past.  Maybe I didn’t want to waste the calories on a non-chocolate cookie.  Who knows.  I had no interest in gingerbread.  Plus, my attempts at icing a cookie would probably get me a star spot on a pinterest fail website.  In other words, while I can cook, I cannot decorate.  I don’t think I have the fine motor skills required for such precision work.  So, these cookies were never on my “to make list” because they lacked chocolate and required decoration.  One day I was looking at traditional Christmas fare and, well, gingerbread is pretty traditional and old.  It should be something I tried.   I tried making it, and… it was awesome, for a non-chocolate cookie!!  While I still can’t decorate them well (see above), poor optics is a small price to pay for good cookies.

Despite all the grand varieties of Christmas cookies I am willing to make (and eat!!), the kids request this cookie first every year!

Gingerbread is a rather old food, some think as many as a thousand years old.    It can be a crisp cookie or a thick bread.  It can be dark in color or light.  There’s really no one gingerbread.  What I love about these cookies is that they aren’t particularly sweet, but very crisp and are bursting with traditional Christmas spices.  Also, no mixer is used in the making of these cookies, allowing multiple cookie doughs to be prepared at one time!

As this is a very old fashioned recipe, it lacks a certain level of fussiness.  No need to refrigerate the dough for an hour (or overnight).  The dough is incredibly easy to roll out.  It’s not sticky at all.  It won’t mess up your hands or completely coat your dough roller.  It doesn’t need to rise.  You make it, you bake it.    I cannot speak highly enough about this recipe.

Typically, I try to use historical recipes for my blog.  However, when I looked through all of my historical recipe books for a really old gingerbread cookie recipe, the measurements were a bit scary.  A peck of flour.  Um, say again?  A dozen eggs.  How many cookies are we making?!?!  So, I found a recipe on epicurious.com that used traditional methods but had actual measurements I could follow.  I tweaked it and came up with the one below.  I cannot stress how easy these are to make, but more importantly, how awesome they are to eat.

Having made this recipe lots of times, you really need to Martha Stewart the prep work and have it all done and ready to go before you begin. The recipe moves very fast. Again, it’s not hard, just fast.

Gingerbread Cookies
Yield: Depends on size of cookie cutters
Prep Time: 20 minutes
Cook Time: 9-10 minutes per batch (turn cookie sheet halfway through at the 4 minute mark)

2/3 cup molasses (not robust)
2/3 cup packed dark brown sugar (I used light brown with no adverse consequences)
2 tablespoons ground ginger
1 tablespoon ground cinnamon
1 teaspoon ground allspice
1 teaspoon ground cloves
2 teaspoons baking soda
2 sticks (1 cup) unsalted butter, cut into tablespoon pieces
1 large egg, lightly beaten
3 3/4 all-purpose flour
1/2 teaspoon salt

Preheat oven to 325 degrees Fahrenheit.

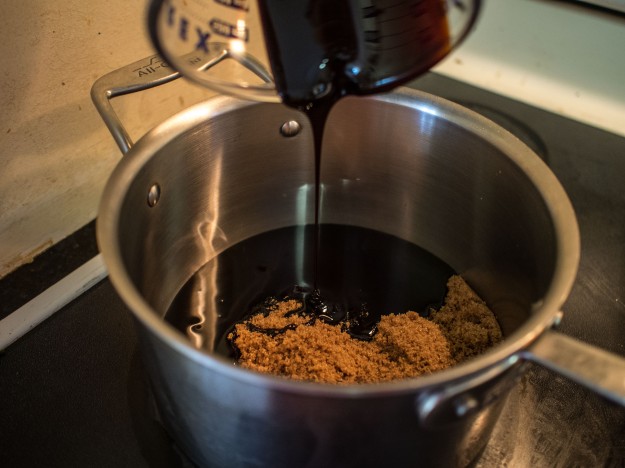
In a heavy bottomed 4 quart sauce pan, bring molasses, brown sugar, ginger, cinnamon, allspice and cloves to a boil over medium heat, stirring frequently. Once a boil is reached, remove pan from the stove and add the baking soda. The mixture will foam and “grow” at this point, as well as lighten in color slightly. If you have kids, this part is really cool. After the baking soda is incorporated, add the butter 2-3 pieces at a time. Butter should be completely incorporated prior to the next addition. Add the egg and combine well. Stir in the flour and salt.

Turn the dough out on a lightly floured surface. Knead until the dough is soft and easy to handle. You may need to add some flour if the dough is too wet (no more than ¼ cup). I’ve never really had to add much more than an obligatory sprinkle on top, no where near the ¼ cup. Unfortunately, this isn’t an exact science, so I can’t give you a precise amount.

Divide the dough in half. Wrap half of the dough in plastic wrap and set aside. Roll the remaining dough out on a lightly floured surface to 1/8th of an inch. Use your favorite cookie cutters and cut shapes. Transfer the cookies to a lined baking sheet (with a silicone liner or parchment paper, etc.), and bake about 9-10 minutes. The directions of the original recipe advise to bake “until the edges are slightly darker”. Well, the cookies are really dark to begin with, so I never see much of a difference. They just look done at somewhere around the 9 to 10 minute mark.

Cool on wire racks and decorate. I use cookie icing products that have the tips built in. I know, it’s processed “food” and bad. I’m already eating a cookie loaded with gluten and sugar. We are beyond bad at this point. Besides, these products don’t taste that much different than homemade and are so much easier to clean up!!

Gingerbread Cookie Spices

Gingerbread Cookies

Gingerbread Cookie Dough

GIngerbread Cookie dough

Soft and ready to roll!!

Pumpkin Cream Pie

Pumpkin Cream Pie

As I mentioned in my post on stuffing, I love Thanksgiving.  It’s a food extravaganza.  People aren’t shy about carbing it up.  Stuffings, breads, pies, and potatoes of all varieties grace the table.  Unfortunately, most of the time, pumpkin pies are either bought from the supermarket bakery or reheated from frozen.  Sad.  Why?  Because the hardest part of a pumpkin pie is deciding when it’s finished in the oven.  It’s a dump and bake proposition, otherwise.

Most people will make the Libby’s recipe for pumpkin pie on the back of the can of canned pumpkin.  While it’s perfectly fine, that’s kind of the problem, it’s fine.  I discovered this other pumpkin pie recipe several years ago and just found it to be so superior to the Libby’s version, I had to try it.  It’s from the New York Times Cookbook (the Craig Claiborne version). First, it had cream.  Real, heavy, cream.  NOT evaporated milk.  It had me at cream, really.  Then it had 3 cups of canned pumpkin, which is a LOT more than one 15 ounce can.  I was intrigued.  If you are familiar with the New York Times Cookbooks, there are no pictures, you are on your own.  I tried it and it changed our family’s pumpkin pies forever.  This is a rich pie with lots of creamy pumpkin flavor, not wan or thin.  It’s truly amazing.  Many people who didn’t like pumpkin pies, like this version.

This recipe just cannot be easier, for the amazing dessert you end up presenting.  Get a store bought crust (I prefer the frozen ones to the refrigerated roll out kind), and it’s super easy.  I like making my own crust, which presents a variety of challenges, all of which end up in deliciousness.

Now, the hard part:  when is the pie done.  Generally speaking, it’s done when the center jiggles just a little.  Helpful, no?  How much is a little?  When is a jiggle?  Why has my pie cracked open?  I avoid these issues with a low temperature baking.  This varies from Claiborne’s instructions.  If I follow his instructions, it comes out pretty cracked and sort of not done in the center.  Could be my oven.

Pumpkin Cream Pie
Serves: 8
Prep Time: 5 minutes
Cook Time 1 hour and 15 minutes (approx.)

Pie Crust
3 cups canned pumpkin
¾ cup sugar
½ teaspoon salt
½ teaspoon grated nutmeg
1 teaspoon cinnamon
½ teaspoon powdered ginger (or 1 teaspoon fresh grated ginger)
3 large eggs, lightly beaten
1 cup heavy cream

Preheat oven to 425 degrees Fahrenheit.

If using a homemade crust, roll out crust and place into pie dish. Prick holes in the crust all around with a fork to prevent bubbles. Add pie weights. Blind bake (bake with no batter) the crust for 10 minutes at 450. Remove the weights and reduce heat to 375 and bake for another 10 minutes. Remove from oven and set aside.

Preheat oven to 425 degrees Fahrenheit.

Combine remaining ingredients in a mixing bowl. Blend well over medium speed. Pour the mixture into the prepared pie shell and place in the oven.

Bake for 15 minutes. Reduce heat to 325 degrees Fahrenheit. Check crust for signs of browning, if brown, cover. Bake for 45-55 minutes more, or until the center is just slightly jiggles when the pie is slightly jostled. You may want to check often after the 40 minute mark, as oven temperatures vary.  Cool and serve.

Pumpkin Cream Pie

Pumpkin Cream Pie

Pass the Prosciutto- Thanksgiving Stuffing Featuring Parma Ham

Pass the Prosciutto

Yes, you can make stuffing with no bread and have it look this awesome!

Sponsored Post

There are few holidays that really excite me food-wise as Thanksgiving. First of all, you have the tradition. You can go full bore and serve exactly what the pilgrims ate, or you can do the modern classical Thanksgiving: Turkey, stuffing, various potatoes, token green veg, rolls and pumpkin pie. It’s a virtual carbohydrate bonanza! Over the years, however, various dietary needs have arisen and several beloved family members have been diagnosed with diabetes. The traditional Thanksgiving meal is a disaster for your typical diabetic. Instead of “going without”, I am all about making something equally good from more low carb friendly fare.

My most favorite dish on the Thanksgiving table is stuffing. As a kid, there was nothing better than the box of Stove Top Stuffing, amended with sausage and mushrooms and placed on the table. Nothing. Sure, I can laugh now, but back then, you angled to get a seat by the stuffing.  Stuffing by its very nature, however, is a high carb endeavor.

So, I started looking at all the stuffings from the yesteryear for inspiration.  Stuffings with sage or chestnuts or oysters! Oh my! So much to try. So I stumbled upon the recipe below quite by accident. I wanted a touch of richness, a bit of history, and a whole bunch of easy.  One of my go to ingredients when I’m looking for rich and clearly special is Prosciutto di Parma.  It gives a fantastic, complex, flavor without the excess, and rather random amount of fat and smoke that bacon brings.

Initially, I came up with a stuffing with sausage, chicken livers, oysters, prosciutto di parma, seasonings and bread crumbs. There wasn’t a single drop of stuffing left. Everyone ate every last bit and wanted more.  However, the carb count was likely crazy high.  So, I had to turn my focus to the low carb version.   Then, I got an assignment that asked me to concentrate on gluten free cooking that included the amazing Prosciutto di Parma, or parma ham. Could I adapt the my high carb, gluten riddled recipe recipe? Would it work? These questions kept me up at night.

First, my philosophy for low carb is not to make a thin imitation. While you’ll never convince me that pureed cauliflower is mashed potatoes, the dish is really quite good in its own right.   And, more importantly, I don’t miss the potatoes.   My goal for this dish was: good and you don’t miss the original.  How can you go wrong with Prosciutto di Parma, sausage and oysters.  Right?

Let me caution: this stuffing is full bodied and full fat. It’s a go big or go home type stuffing. Everyone who has tried this stuffing in either high carb or low carb form have raved about it. Some people have declined to try it due to the ingredients.   Chicken livers and oysters can lead some to take a pass. More for me, honestly.

The technique I use is really rather unique. I was making the stuffing and decided to take a short cut. I didn’t want whole oysters or pieces of chicken livers in my stuffing for texture reasons, so I figured I would just chop them for a bit in the processor, because, well, isn’t that what it’s for? I quickly learned there’s no level of “a bit” that doesn’t turn the livers or oysters into liquid. So, instead of minced shellfish or livers, I had a lovely red puree.  However, I wasn’t wasting my money by not using the livers or oysters, so I included them in the stuffing. Because these overtly odd ingredients didn’t appear in the stuffing, people were more inclined to try it. And, by extension, love it! Huzzah!  I just got back from Williamsburg, so that celebratory phrase stays!

So, dear reader, I am giving you my famous stuffing recipe. My kids cried that I was using a recipe from the secret family recipe book.  But I will share this one.  Kick the boxed stuffing habit and make your own stuffing.  It will be miles better than anything from a box.  You can make it ahead too! And, depending on the version below you choose, you can actually label this a vegetable side.  You’ll get the joke when you read the ingredients.

Sausage and Oyster Stuffing
Serves: Thanksgiving Crowd (10 or so, easily doubled if you need more)
Prep Time: 15-25 minutes, depending on version made
Cook Time: 30-40 minutes

Note: Low carb/Gluten free version requires cooked cauliflower, see Cuban Rice and Beans for full prep instructions.

5 chicken livers
6 oysters, shucked
1/3 cup bacon drippings, lard or other high temperature suitable oil
1/2 pound Prosciutto (parma ham), medium dice
1 pound sage sausage
2 cups finely chopped onion
1 cup finely chopped celery
1 cup sliced mushrooms
2 cloves of garlic, minced
1 teaspoon sage, rubbed
4 tablespoons unsalted butter

Low Carb/Gluten Free Version:
1 large head of cauliflower, cut into florets, roasted at 375 degrees for about 15 minutes until soft and slightly brown, chopped fine

“Regular Version”:
4 cups bread crumbs (gluten free, if needed)

2 hard boiled eggs, coarsely chopped
Salt and Pepper to taste

Place chicken livers and oysters in the container of the food processor and process thoroughly. Cover and set aside in the refrigerator.

Heat fat over medium heat in a large skillet. And prosciutto and sausage and cook until the sausage is cooked through and both are rendered of fat. Add the onions, celery and mushrooms and cook until the onions and celery are translucent and the mushrooms have lost some of their liquid. Add the garlic and saute until soft. Add the sage and liver mixture. Cook until the mixture is no longer reddish. Add the butter, cauliflower or bread crumbs, eggs and salt and pepper. Place in an oven dish, cover and refrigerate. To serve, heat in a 350 degree oven until the top is brown and the stuffing is warmed through.

Follow Parma Ham on Twitter for a chance to win $50 worth of the world’s most famous ham. Click on the banner below to participate. This post is a collaboration between the blogger and Parma Ham. 

Win Parma Ham

Pass the Prosciutto

Pass the Prosciutto

Pass the Prosciutto

Pass the Prosciutto