Category Archives: Main Dishes

Hungarian Chicken- Pressure Cooker Edition

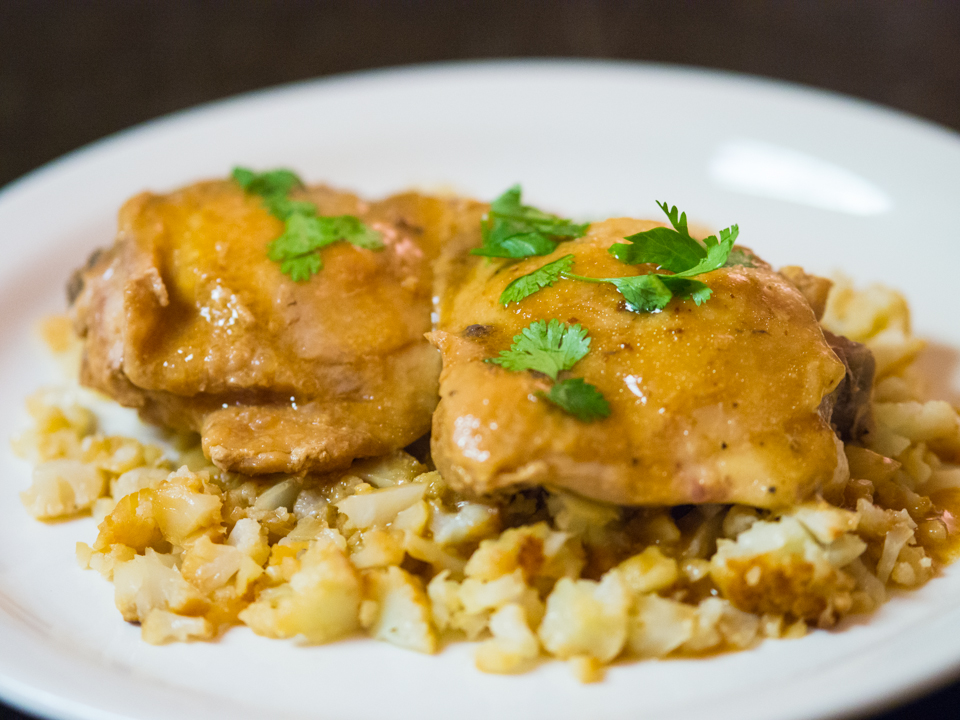
One of my favorite dishes growing up was Hungarian Goulash. I LOVED the sauce, even if the tough little pieces of meat were rather off-putting.  The sauce was not really spicy, but super creamy and just plain good.  I work, so I don’t really have time to make rather complicated dishes during the week, especially if they involve meat or sauces that need a long time to cook. However, if a recipe can be quickly made in a pressure cooker, I’m golden. When I googled “pressure cooker chicken” one night as I was staring at 4 leg quarters,  a really interesting recipe came up on Food.com (http://www.food.com/recipe/pressure-cooker-hungarian-chicken-170094)- Hungarian Chicken. I’ve never had goulash with chicken, but have to say it’s much better!  The sauce really pairs well with chicken, there aren’t any complicated ingredients, and it’s a snap to make. Seriously, very easy, but good eats. The classics rarely disappoint. I’ve made a few changes from the inspirational recipe because I love to tinker. Mushrooms really add another layer of flavor and texture to the dish and the creme fraiche isn’t as assertive as the sour cream.   Also I have also served this dish with “zoodles” (zucchini noodles) as well as cauliflower rice and it’s worked well both ways.

While I still have my “old fashioned” pressure cooker, I have to admit that I bought the famed InstantPot when it was on sale at Amazon over Black Friday. If you are queasy about using a pressure cooker, this one is really no different than an other kitchen gadget. Very, very easy to use.

This whole dish comes together in no time and makes a fantastic weeknight dinner.

Hungarian Chicken- Pressure Cooker Edition

  • Servings: 4-6
  • Difficulty: easy
  • Print

A hearty weeknight dish, perfect for a cold winter's day.

Ingredients


Oil to coat the bottom of the pressure cooker
4 chicken leg quarters
1 onion, finely chopped
2 teaspoons paprika
1/2 cup water or chicken broth
15 ounce can of crushed tomatoes
1 teaspoon salt
1/2 cup creme fraiche or sour cream
Pint of white or baby portabella mushrooms, quartered
Oil to coat the bottom of a skillet
8 ounces extra wide egg noodles, cooked, drained.

Directions

  1. Bring to boil one pot of salted water, enough to cook the noodles.
  2. In the pressure cooker, heat the oil until hot, add two of the chicken quarters, skin side down. Just before the skin starts to brown, turn the chicken over. Cook until golden. Remove to a plate.
  3. Add the onion, paprika, and water. Stir to combine. Return the chicken to the pot, add the other two pieces of chicken and the crushed tomatoes. Do not stir.
  4. Lock the lid and set the pressure to high for 12 minutes.
  5. While the chicken is cooking, oil a large skillet. Over medium heat, saute the mushrooms until they are dark brown.
  6. Cook the noodles as directed on the package.
  7. 10 minutes after the pressure cooker has stopped cooking on high heat, release any remaining pressure in a direction not near your face, twist the lid, and open the lid with the lid blocking any steam from your face.
  8. Remove the chicken from the pot. Whisk the creme fraiche until loose and add it to the pot, along with the mushrooms. Drain the noodles. Serve the chicken, covered in sauce, on the noodles.

Lobster Mac and Cheese featuring Castello Aged Havarti Cheese

Sponsored Post

OLYMPUS DIGITAL CAMERA

Food trends are endlessly fascinating to me.  The Tunnel of Fudge Cake was a Pillsbury Bake Off Winner in 1966.  This is a chocolate cake with a molten center of fudge.  Sound familiar?  In the mid 1980s, molten chocolate cake became a staple on every dessert menu.   Items somehow surface, peak and slowly fade. Some fade forever (fondue, anyone?), others just become menu staples, like calamari or spinach artichoke dip.  The New York Times did an excellent article on the trend of food trends.  Of course, being the New York Times, they insisted the most trends start off in metropolitan cities and then spread elsewhere.  If you take the time to read the article and are from Maryland or Louisiana, you will laugh out loud at the idea that crab cakes originated in a metropolitan area.

I mention food trends because somewhere along the way “lobster mac and cheese” became a thing. I find this combination of lobster, pasta and cheese sauce odd.  One, it’s lobster.  Lobster is awesome.  Lobster is perfection with melted, clarified butter.   Why mess with this exquisitely simple recipe? Two, in this era of low carb, gluten free anything, how is this dish even surviving, much less thriving?

From a restaurant’s point of view, I see the appeal.  Charge a premium for mostly a pasta dish with a few chunks of lobster with a cheese sauce.  I regularly see this dish around $20 and marvel at the price of something that is essentially a $2 box of pasta with a few nuggets of lobster and a bechamel sauce.   I’ve tried various incarnations of the dish, as others of my party have ordered it.  Mostly, I seem to miss the “lobster” of the dish.  I taste the cheese and the pasta, but little in the way of lobster.  I would imagine this result explains the general food rule of no cheese with seafood.  The cheese just overwhelms the delicate lobster.

I got to thinking about this dish when I was selected to promote Castello Aged Havarti Cheese. Honestly, when I got this cheese, I really just wanted to eat it as is.  The cheese is really good and has these really interesting crystals dispersed throughout that occur due to aging.  If you look really closely, you can see small sparkles in the cheese.  I’m not professional cheese tester.  Really.  But here’s what I love about this cheese, it’s got real depth.  It’s not one dimensional. Also, the Havarti melts superbly.

dawnoffood.com


I know this because we’ve used it to stuff jalapenos and make awesome grilled cheese sandwiches.  Plus, it’s a well known fondue cheese.  After tasting the cheese, I decided that it just might be the perfect cheese for lobster mac and cheese.

Creating a recipe with the internet is a bit overwhelming.  You are inundated with ideas. Chefs want to make things so complicated. It can feel like a conspiracy designed to keep people from cooking.  Make easy things ridiculously complicated and discourage people from trying.  In the alternative, you just have some rather, um, interesting ideas.  Why would anyone add Chipotle to lobster mac and cheese?  Why bother putting lobster in the dish if you add that strong spice? Or bacon? Again, lobster isn’t really supposed to have competition. So, I got my inspiration from one of my favorite lobster dishes:  lobster bisque.  Velvety smooth, rich, creamy and most of all, lobster-y.

This dish is everything you want in comfort food:  rich, thick and sinful.  It combines the best of lobster bisque and macaroni and cheese.  You will not be disappointed!

Note: To make the lobster broth, save the lobster shells and simmer them in water as you are making the pasta. Super easy, but key to this dish.  Without this touch of broth, the lobster taste can be overwhelmed by the rich and cheesy sauce.

Lobster Mac and Cheese
Serves: A Crowd

Salt, to taste
12 oz. hollow pasta, preferably elbow macaroni
4 tbsp. unsalted butter
¼ cup flour
4 cups milk
11 oz. grated Castello Aged Havarti (about 4 cups), divided
8 oz. mascarpone (about 1 cup)
3 tbsp. lobster or fish broth
3 tbsp. Dry Sherry
1 tsp. hot sauce
¼ tsp. freshly grated nutmeg
Freshly ground black pepper, to taste
8 oz. cooked lobster meat, cut into 1″ chunks

Heat oven to 375° fahrenheit. Spray 9×13″ baking pan with cooking spray, set aside.

Cook pasta in salted, boiling water for half of the recommended cooking time (about 3 minutes). Drain and set aside.

Melt butter in a heavy bottomed, 4 quart saucepan over medium heat. Add flour and whisk constantly until smooth. Add milk, and whisk often, until sauce has thickened and coats the back of a spoon. About 10 minutes. Remove pan from heat and stir in 2 cups Castello Aged Havarti, along with the mascarpone, broth, sherry, hot sauce, and nutmeg. Adjust seasoning as needed with salt and pepper. Add reserved pasta to cheese sauce. Stir in half of the lobster.

Pour mixture to the 9″ x 13″ baking dish and sprinkle with remaining Havarti. Bake until golden brown and bubbly, about 30 minutes. Let cool for 10 minutes. Garnish with remaining lobster.

Inspired by a recipe found in Saveur.

OLYMPUS DIGITAL CAMERA


Chicken with a Thai Peanut Sauce

http://dawnoffood.com

I am really struggling with posts.  I love finding interesting recipes from yesteryear; however, when I post such recipes, my page views go down.  But post something like Pizza Fondue or  Chocolate Chip Waffles and watch my page views skyrocket. Not really shocking, I know.  I want to put mostly healthy fare out in the world, but I’d also like people to actually read my blog.  So, I’ll keep plodding away hoping that for every Chicken Marengo that is a bit of a dud views-wise, but is awesome history wise, there’s a Maryland Fried Chicken that does pretty well.

I have pulled out my trusty pressure cooker again to make this recipe, which was inspired by a recipe I saw at Pressure Cooking Today.  First, I love the simplicity.  Sure, you can brown the chicken thighs, because that is what we are told “adds depth of flavor”, but you could skip it and the 20 minutes it takes to brown the thighs before you pressure cook them. Chicken thighs are just the best. Cheap and they can withstand a bit of overcooking and the rigors of the pressure cooker.  To make this dish low carb, instead of rice, I used finely chopped cauliflower roasted with toasted sesame oil and soy sauce.  My husband loved it.

Chicken with a Thai Peanut Sauce
Serves 4-6

1 – 2 tablespoon toasted sesame oil (or canola)
2 lbs. boneless, skinless chicken thighs, trimmed (about 8)
1/2 cup chicken broth or water
1/4 cup smooth peanut butter
1/4 cup soy sauce (or tamari)
2 tablespoons lime juice
1 tablespoon fish sauce
2 teaspoons grated ginger
1 1/2 teaspoons Sriracha Sauce
1 tablespoon corn starch
2 tablespoons water
Fresh chopped cilantro for Garnish
Salt and Pepper to taste

Heat oil in pressure cooker over medium high heat. Brown chicken in batches. Place browned chicken aside on plate. Drain liquid or oil, leaving about 1 tablespoon behind.

Add broth, peanut butter, soy sauce, lime juice, fish sauce, ginger, and Sriracha Sauce to pressure cooker. Whisk together until well combined. Return Chicken to pressure cooker. Cook chicken for 9 minutes at high pressure. It will take about 10 minutes for your pressure cooker to reach high pressure. After 9 minutes at high pressure, remove pressure cooker from heat. After pressure has fallen significantly, use the quick pressure release. Please consult your pressure cooker instructions, if you have any concerns or questions. Each cooker is different.

In a small bowl, whisk together cornstarch and water. Once the pressure is released, open the pressure cooker carefully (lid facing away from you!) and remove chicken to a plate and cover. Whisk cornstarch mixture into the peanut sauce. Bring sauce to a slight boil. Return chicken to pot to coat with sauce and serve over rice or cauliflower “rice”.

If you don’t have a pressure cooker, you can find a slow cooker version of this recipe here.

Tuna Salad


http://dawnoffood.com

I’m not a tuna fan.  Opening a can of tuna is one of my least favorite things to do in the kitchen.  My husband, however, is a huge fan.  HUGE.   We have very different tastes, to put it mildly.  One day he came home with tuna salad from the Whole Foods deli.  He remarked about how amazing it was and how I should try it.  I did.  For tuna salad, it was pretty good.  Then I saw the price.

$10,99 a pound.  Seriously!?!?  Are there gold flakes in it?  I pay less for steak! That’s right, you can go to the meat counter and get a nice steak for less money.  And I’m paying more for tinned tuna?  Consider the gauntlet thrown.  Can I make this cheaper?  Yes, I can! Even using dolphin safe, pole caught, made in America tuna. Although, this recipe would be much, much cheaper using less expensive tuna.  Not that I would.  I’m all for made in America.

First, I had to deconstruct the Whole Foods salad.  Corporate espionage, if you will.  The tuna was definitely higher end, and the salad was studded with olives.  Where go olives, there are usually capers.  The usual suspects of onion and celery were there in the salad as well.  Seriously, this was no big deal.  And, I got to customize it.  My husband likes a wet salad, so I added lemon.  I also added garlic powder.  I’m not a fan of biting into raw garlic.  Finish the whole thing off with some mayo, salt and pepper, and….. mission accomplished!

These measurements are relative.  It’s not like you can really mess this salad up.  If you like more onion or celery, by all means you more!

Tuna Salad
Makes about 2-3 Servings

2 5 ounce tins of tuna, drained
1/2 stalk celery, chopped fine
1/4 onion, chopped fine
1/4 cup olives, medium chop
1 tablespoon capers, drained
2 teaspoons lemon juice
1/4 teaspoon garlic powder
1/3-1/2 cup of mayonnaise (to taste)
Salt and Pepper to taste

Combine the tuna, celery, onion, olives, capers and garlic powder in a bowl. Break up the chunks of tuna if they are too large.  Add mayonnaise until you reach your preferred consistency. Sample the salad and salt and pepper to taste.

http://dawnoffood.com

Lamb Shanks

http://dawnoffood.com

At some point during the 1990s, lamb shanks were “it”.  Long simmered with a dark, rich sauce and usually served with white beans.  The dish was everywhere.  Until it wasn’t.  Going through lots of cookbooks from the 1800s and 1900s, I don’t really find this dish until around the 1990s.  Not that it couldn’t have existed, but it wasn’t really wide spread.

The most popular cuts of lamb are “leg” and “chop”.  I am rather partial to the “shoulder” as well, but that’s fairly hard to come by in the regular grocery store.  Chops are crazy expensive, so I usually don’t buy them and truly hate when they are listed on a menu as “lollipop”.  Ugh.  Just no.  The leg is very nice and I cook with this often.  Today, however, I focus on the “shank”.

The shank is part of the animal’s lower leg.    As a result, it does a lot of work making the meat very, very tough.  There are a variety of ways to tackle toughness.  Long, low braising and pressure cooking.  This recipe is adaptable to both.  What I love about this recipe is that there is very little active time.  Most of the time you are hanging out waiting for either heat or pressure to do its thing.  Homework, bill paying and all the rest can be done, which is great for this working mom.  Lamb shanks can be on the table in less than an hour with the pressure cooker, or if I get home early, I can start dinner then set about doing my other mom duties.

As a bonus, lamb shanks also give the impression that someone with extreme culinary skills made the dish, when truly, they are not required.  You can’t really overcook this meat and it’s a very low maintenance recipe.

Lamb Shanks
Serves 4
Prep Time: 15 minutes
Cook Time: 1 ½ hours in conventional oven, 35 minutes, pressure cooker

¼ cup lard, duck fat or bacon drippings (vegetable oil would be fine too)
4 lamb shanks
Salt and Pepper
1 onion, medium dice
3 stalks of celery, medium dice
1 teaspoon salt
¼ teaspoon ground black pepper
4 ounces of mushrooms, sliced
1 teaspoon thyme
2 teaspoons rosemary
4- 5 medium carrots, peeled, large dice.
2 cups chicken broth (brown is preferred)
1 cup red wine (Cabernet -like)

Conventional Oven Instructions:
Preheat oven to 350 degrees Fahrenheit.

In a dutch oven, heat oil over medium high heat. Sprinkle the lamb shanks liberally with salt and pepper. Place heated oil and brown, about 2 minutes a side. Remove to a plate and set aside.

Add onions and celery to the dutch oven. Cook until onions are translucent and celery is soft.  Scrape up any brown bits left over from the meat browning when the onions start to let off some liquid. Add mushrooms, thyme, rosemary and carrots. Cook until the mushrooms have given up some of their liquid. Add the chicken broth and wine and simmer until the alcohol is cooked out. Return the lamb shanks to the pot. Cover the pot and place in the oven to cook for 90-120 minutes, until tender.

Pressure Cooker Instructions:

Please follow your pressure cooker instructions for using your pressure cooker.

As above, heat the cooking fat in the pressure cooker, salt and pepper the shanks and brown them for about 2 minutes on each side.  Add onions and celery to the dutch oven. Cook until onions are translucent and celery is soft. Add mushrooms, thyme and rosemary. Cook until the mushrooms have given up some of their liquid.

Add the chicken broth and wine and simmer until the alcohol is cooked out. Return the lamb shanks to the pot. Make sure the shanks are at the appropriate height level for your pressure cooker. Add the lid to your pressure cooker and cook the shanks on high pressure for 25 minutes. Remove the pressure cooker from the heat and allow to cool down. When safe, remove the lid, add the carrots and return to the heat for another 10 minutes. Remove from heat and allow the pressure to cool down again. When safe, remove the lid and serve.

http://dawnoffood.com

New England Clam Chowder

OLYMPUS DIGITAL CAMERA

As a kid I LOVED Campbell’s New England Clam Chowder.   As I began cooking more for myself, there’s no comparison between canned soup and homemade.  Gumbo is the biggest example of this disparity.  Canned gumbo and actual gumbo are two entirely different species.  Would homemade New England Clam Chowder be that much better?  I had to find out.

I also vividly remember the moment when I, as a child,  ordered Clam Chowder at a restaurant and something very much not New England Clam Chowder was put in front of me:  Manhattan clam chowder.    For the longest time, I just thought it was me who found the Manhattan version awful.  When searching for a recipe to try for New England Clam Chowder, I came across James Beard’s opinion on the Manhattan Version.  In his introduction to Miss Farmer’s Recipe for Rhode Island Clam Chowder his American Cookery:

This is the closest bridge I have found to that rather horrendous soup called Manhattan clam chowder.  It is a sensible recipe and takes away the curse of the other, which resembles a vegetable soup that accidentally had some clams dumped in it.

Pretty much sums up my feelings on the non-New England version.

Now, I am usually all about using the traditional old recipes.  But in this case, a slightly more modern version ended up being more simple and easily done.  Traditional clam chowder has the following narrative:

Cook clams, chop clams, reserve cooking liquid.  Render fat from salt pork, sauté onions in salt pork fat.  Parboil potatoes for 5 minutes.  Arrange onions in the bottom of a heavy sauce pan and top with a layer of half of the potatoes.  Add the salt pork pieces, chopped clams, second layer of potatoes and salt and peppers.  Cover with boiling water and cook.  Add scaled milk, bring to a boil, add crackers soaked in milk and the reserved clam liquid.  Lastly, add a bit of flour and butter that have been kneaded together, return to the boiling point and serve.

You can find the above version in Fannie Farmer and other famous New England cookbooks.  I agree with James Beard that it appears this recipe allows the clams to cook for too long.  Plus, I would worry the onions would burn.  I’m sure they wouldn’t, but didn’t see the point of testing it out.

So, I came across a little recipe in Beard’s American Cookery that seemed easy, yet captured the spirit of the New England Clam Chowder.  As a plus, it is cracker (and gluten) free!  As an extra bonus, this recipe is shockingly cheaply made.  At Whole Foods, I grabbed a pound of frozen clam meat for $6.99.   Heavy Cream was an additional $4.99 for a quart (I don’t use it all), add a couple of potatoes, an onion, few stalks of celery, and a few strips of bacon and you are good to go!    The recipe below was inspired by Beard’s “My favorite Clam Chowder” recipe from American Cookery.  The family loved it and I’ll never eat canned chowder again.  It was really, really good!! It also makes a great weeknight dinner!

New England Clam Chowder
Serves 4
Prep Time: 10 minutes
Cook Time: 25 minutes

3 slices of thick slab bacon
1 medium onion, finely chopped
2 stalks of celery, finely chopped
2 cups of water, salted
2 medium potatoes, thinly sliced
Salt and Pepper
1 pound frozen clam meat with frozen clam juice (or cooked clam meat with juice)
3cups heavy cream (may substitute half and half)
Butter
Thyme
Chopped parsley

Cook the bacon in a sauté pan over medium heat, until fat is rendered and bacon is crisp. Remove bacon and add the onion and celery and sauté until translucent, or just slightly brown and remove from heat. In a 4 quart sauce pan, bring the salted water to a boil. Add the potatoes, cooking until just tender. Add the bacon, onion, celery, salt and pepper to taste, and the clams and heavy cream, simmering until the clams are no longer frozen. Bring to a boil and remove from the heat. Correct the seasoning. According to Mr. Beard, serve with a “dollop of butter, merest pinch of thyme, and a bit of chopped parsley”.

Clam Chowder

Clam Chowder

Wild Goose

Wild Goose

My husband has taken up waterfowl hunting, and he loves it.  He brings home at least one goose every time ventures out.  Unlike the geese in the grocery store, these come in slightly battered and scarred by shot.  Also, unlike farmed geese, these are “working geese”.  These aren’t farm animals standing around all day.  These are flying geese!   As a result, the meat tends to be a bit tough and there’s no awesome leftover goose fat.   His hunting buddies relayed to him that the goose legs and thighs were inedible and most of them just use the breast meat.  I determined that this was a personal challenge to me to see if I could make them edible.

About the same time, my wonderful friend Pam gave me a pressure cooker.  There are many kitchen appliances I have used, but a pressure cooker just isn’t one of them.  They’ve always intrigued me.  It’s the opposite of a slow cooker, but with the same result!  You want tender pot roast in an hour?  The pressure cooker is your device.  The price, however, is this slight, remote chance that there could be an explosion if something goes wrong with the cooker.   Besides burns and cuts, we can add explosions to the dangers of cooking!!

So, I thought this my fortuitous acquisition of a pressure cooker at the same time my husband started to come home with these tough little birds couldn’t be a coincidence.

A few years ago, I made a goose recipe from Epicurious.com with Armagnac and Prunes and it was amazing. I know, I know. Prunes. I get it.   But, the pressure cooker dissolves these suckers into nothing and they leave behind a slightly sweet and distinct taste. Really. It is good. No one will know you put prunes in this dish, they will just know it’s awesome. As mentioned above, this goose was too tough to roast outright, so I just could draw flavor inspiration from that recipe for this one.  The prunes and red wine were an amazing combination with the rich goose meat, so I used that part of the recipe to create this one.

The pressure cooker wasn’t nearly as scary as I thought it would be.  I didn’t fill it up too high, made sure the steam was escaping and didn’t let the pressure get too high and we got this amazing goose dish!  The thighs and legs were completely tender, as was the breast.  Mission accomplished!!!  So, if you are faced with game meat, I would seriously consider a pressure cooker to make game meat tender and amazing!  This recipe was incredibly easy to execute!

As a disclaimer, please follow your own pressure cooker instructions to ensure the safe cooking of this dish.

Goose in Red Wine and Prunes
Prep Time: 25 minutes
Cook Time: 75 minutes

¼ cup duck or goose fat, or vegetable oil or clarified butter
1 onion, medium dice
1 cup of diced celery
3 carrots, peeled and roughly chopped
1 teaspoon salt
1 teaspoon pepper
1 teaspoon dried thyme
8-10 prunes, sliced in half
1 cup full bodied red wine
1 cup water or chicken broth
1 Wild Goose (5-6 pounds), skinned and quartered (2 breasts, 2 leg quarters)

Heat duck fat in pressure cooker over medium heat. Add onion, celery and carrots and cook until the onion is translucent. Add salt, pepper, thyme and prunes. Sauté for a minute. Add wine and chicken broth. Simmer for about 5 minutes, stirring occasionally. In a pressure cooker, the alcohol does not boil off. Obviously, we need to do that before beginning to pressure cook the goose. Add the goose parts, legs first, breasts on top. Add the lid of the pressure cooker and, following your pressure cooker’s instructions, bring the pressure cooker to high pressure for 60 minutes. For my cooker, I need to lower the temperature to medium low to maintain a safe pressure level after the ideal pressure level is reached. At the end of the 60 minutes, remove from the heat and allow pressure cooker to cool until the lid can be safely removed.

Wild Goose

Hunted by my husband, butchered and skinned by me. Very primal.

Wild Goose

Lobster Newburg

Lobster NewburgWe have a small football pool in our house.  We pick for winners only.  The winner of the weekly pool gets to pick either a special dinner or a special dessert.  My kids, being rather awesome.  They “saved” their wins and pooled them so they got a special dinner and dessert on the same night.

Now, my kids don’t eat the same, at all.  I never thought in a million years they would agree on anything dinner-wise.  So, imagine my surprise when they did.  Want to guess what they picked?  Lobster.  Yup.  One’s never had it, but wanted to try it.  The other one has had it once.

Lobster.

At the same time, I haven’t really done a historical recipe for a while.   So, the first one that came to mind was Lobster Newburg (or Newberg).  What’s not to love?  Lobster, cream, sherry, some kind of wonderful bread.  Sheer Nirvana.  I could eat a sherry cream sauce everyday.  Love it.

But, the kids didn’t want a “recipe”, they wanted plain lobster with butter.   So, two of the lobsters were steamed “plain” and two were turned into Newburg.  For dessert, they requested a banana split.  Odd pairing, but given it’s ease to make, I’ll take it!!

Lobster Newburg has a fascinating story, depending on which one you believe, if any of them.  The dish originated in the late 1800s in America, believe it or not!   All renditions of the origin story are tied to Delmonico’s, a very famous restaurant in New York City at the time.  One version has a French chef departing Delmonico’s to open an inn in Pennsylvania.  He wanted to serve very continental cuisine and came up with Lobster Newberg to serve at the Hotel Fauchere in Millford, Pennsylvania.

The traditional story is a bit more colorful.  Ben Wenburg was an avid traveler, successful businessman, and reliably regular customer at Delmonico’s.  To boot, he was a favorite diner of Delmonico’s owner, Charles Delmonico.  One version has Ben swooping in and, with great showmanship,  making his new favorite dish over a chafing dish in the middle of the dining room and serving it to Delmonico.  Delmonico loved the dish and added it to the menu, naming it Lobster Wenburg.  Delmonico and Wenburg subsequently had a falling out and the item was removed from the menu.  However, as it’s delicious, there was a great cry to bring it back.  So, the Delmonico transposed the W and the N and renaming Lobster “Newburg”.  Other versions have the Delmonico naming the dish in honor of Wenburg, and Wenburg politely declining to have his name on the menu.  Wenburg then suggests the N and W swap to disguise his name.

No matter what the story, the dish was an amazing success.  When you see how simple this is, you will be amazed. It is an awesome romantic dinner. You know, when the kids are eating their steamed lobsters next to you and everything.  Ah, romance.

Lobster Newburg
Serves 2-3

1 sheet of Puff Pastry, divided
1 1/2 cups heavy cream
3 egg yolks, beaten well
3 Cups Cooked Lobster Meat*
1 tablespoon butter
1 tablespoon sherry

Preheat oven to 400 degrees Fahrenheit. Place pastry on a baking sheet lined with parchment paper or a silicone baking sheet. Bake for 15-20 minutes until the pastry has risen and is golden.

While the pastry is cooking, turn your attention to the sauce. Ok, you may want to use a double boiler if you are skittish about heating a high fat milk product, but if you promise to use a heavy bottomed pan and cook the cream over medium low heat, you may be fine. I was. I hate using a double boiler, too many pans!  Slowly heat the cream in a larger sauce pan, stirring frequently, but don’t let it boil. When it is moderately hot (like hot chocolate hot), temper the egg yolks (add a tiny bit of the hot cream to the yolks incrementally until the yolks are rather warm), and add the yolks back to the cream. Return the pan to the heat and allow to simmer gently, again with frequent stirring. Add the lobster to the pan and continue to cook until the lobster is warmed through, about 5 minutes. Add the butter and sherry and stir until the butter is melted, about 1 minute. Serve over puff pastry (can also use rice or toast made from great French bread).

Wasn’t that easy?

*You can have your market steam your lobster. You can boil the lobster yourself in a deep kettle of boiling water for 5 minutes for the first pound, and 3 minutes for each additional pound until the lobsters are done. You can steam the lobsters until they are a bright red. However you cook your lobsters, you just need to shell them afterwards. As a Marylander and a voracious crab eater, picking lobsters is a walk in the park compared to crabs. This step should not be a deterrent!!

Dead Lobster Walking So Red!! Puff Pastry

Pulled Pork and Carnitas- Slow Cooker

Slow Cooker Pulled Pork

My husband and I work. We have two kids that like to do stuff. Our weeknight schedules are crazy and I have to tape (how old am I that I still use the word “tape”!!)  DVR The Daily Show and The Colbert Report because the thought of being awake at 11 o’clock is beyond hysterical.  I’m laughing right now, just imagining trying to stay up that late.  I really belong in the central time zone.  If it wasn’t for my DVR, I would not see any shows with a 10 o’clock start time.

More importantly, getting dinner on the table before 7 pm is a herculean effort.  Between arguing about doing homework, arguing about correcting homework, and actually making the meal, the night flies by really fast!  So, any shortcut I can find is greatly appreciated.

I was in a large warehouse store the other day picking up my month supply of paper towels and toilet paper and decided to pick up a Boston Butt, also known as pork shoulder.  At $1.69 a pound, it’s a hard bargain to pass up.  I realize that it’s not pastured or otherwise “green”, but as we eat that way most of the time, once in a while being cheap isn’t awful.  Being a warehouse club, I ended up with 14 pounds of the stuff.  No mean feat to cook this hunk of pork.

Now, I’m pretty reluctant to pull out my slow cooker due to less than optimal results and the fact that my daughter hates anything “saucy”.   I find pot roasts and chicken either turn out “dry” or mushy.   Let’s face it, once you remove “sauce” as an option for a dish made in a slow cooker, you pretty much remove the slow cooker as an option.  Except for this recipe.  You can really cook this pork rather plain in the slow cooker, and the pork stands up pretty well to a long cook time.  I put half the package (about 7 pounds) in the slow cooker.  The first night, we had “pulled pork”- my husband asked that I put the quotation marks, as the pork was not smoked.  Then two nights later, I repurposed the leftovers into carnitas.   Cook one piece of meat in the slow cooker, get two awesome meals on the table before 7 pm!!

I pulled no punches with the meat.  I made it pretty much as you would any piece of pork that you would put in the smoker.   I start with a light glaze of mustard and then heavily season with traditional barbecue spices, but I did add some spices that had been smoked- like smoked paprika.  I would normally leave that out of any seasoning mix to go on the smoker.  Here, to give it a more smokey feel, the meat needs, well, smoke.

For my second night, I placed all the meat on a cookie sheet and baked it in a fairly hot oven to make the meat a little more dry and the end bits a touch crispy.   In a few minutes, I had the perfect pork carnitas meat and I served the carnitas with the traditional toppings.  I can’t stress how easy this made dinner time for the week, especially in a week when my husband was working late most nights!

Slow Cooker Pulled Pork

5-7 Pound Boston Butt or Pork Shoulder Roast
1/4 cup yellow mustard (enough to cover meat)
2 tablespoons chili powder
2 tablespoons dry mustard (love Coleman’s)
1 teaspoon cayenne pepper (more if you like it spicy!)
2 tablespoons coarsely ground black pepper
1 tablespoon ground white pepper
2 tablespoons onion powder
2 tablespoons granulated garlic
2 tablespoons kosher salt
1/2 teaspoon smoked paprika
1 onion, roughly chopped
1/4 cup water

Cover the Boston Butt with a thin layer of yellow mustard. In a small bowl, combine all the spices and rub over the pork. Add the onion and the water to the slow cooker. Add the pork. Cover and cook on low for about 8 hours.

Remove pork from slow cooker and pull apart with a couple of forks. Serve with Cole Slaw and barbecue sauce.  Seriously easy stuff!

Pork Carnitas

Pork Carnitas

Left over pulled pork
1/4 cup olive oil
Onions, cut into strips
Green peppers, cut into strips
Round tortillas, slightly warmed
Avocado, chopped
Salsa
Queso Fresca

Preheat oven to 375 degrees Fahrenheit.

Heat oil over medium heat in a sauté pan.

While the oil is heating, spread pork in an even layer over a cookie sheet. Place in oven and cook until less moist with some crispy bits, about 15-20 minutes.

Sauté onions and peppers until slightly caramelized, about 20 minutes.

Serve with your favorite toppings.

Slow Cooker Pulled Pork and Carnitas

My best Jackson Pollock inspired work!

Slow Cooker Pulled Pork

Slow Cooker Pulled Pork

When I came home, the house smelled amazing!

Slow Cooker Pulled Pork

So moist and ready to be pulled!!

Slightly dried and ready to go!

Slightly dried and ready to go!

Beef Shanks

Beef Shanks "osso bucco"

Have you ever walked by something in the store and just thought to yourself:  gotta cook that!!  It happened to me the other day.  Beef shanks.  Just look at them:

Beef Shanks

I couldn’t walk by these babies.  Awesome, meaty, lots of marrow.  If you eat meat, what’s not to love?    I looked at similar veal shanks and comparing $16.99 a pound for veal and $5.99 a pound for beef, well, that’s a no brainer.  Beef it was.  So, it’s not really Osso Buco, but it’s not far off.

My first time having osso buco was at Chiapparelli’s in Little Italy in Baltimore.  My sister had just graduated college and my parents took her out to celebrate.   Chiapparelli’s is a very old world Italian restaurant.  Dark and cozy and dripping with Italian charm. It was an amazing meal from beginning to end, but the osso buco was unforgettable.  When I began to learn how to cook, this was among my wish list items I wanted to learn how to make.

I wanted to be gluten free and lower carb, so I omitted the flour step.  Look, meat browns without flour.  I think this is kind of an antiquated step that everyone does just because it’s always been done.  So, I just salt and peppered these babies and browned them in my dutch oven.  No change difference in flavor.

See, they can brown without flour!

See, they can brown without flour!

 I know, somehow this little bit of flour is supposed to thicken the sauce.  I never find that to be the case.  I always have to add thickener or reduce forever anyway. Frankly, I don’t care if my sauce is thin or thick, I just care how it tastes.  And with this dish, the meat is so moist and tender, the sauce is really a bonus.  

Also, you may notice a distinct lack of gremolata that some recipes add.  First of all, I’m serving a 10 year old and an 8 year old.  I’m pushing it with beef shanks.  I’m not a fan of gremolata.   It’s not cheap, it adds a room temperature taste layer to a warm comforting dish that I just don’t see as necessary.  This dish is packed with flavor.

So, for a greatly reduced price, compared to the veal, I was able to make an amazing dinner that seems so fancy!  Yet, as you will see, so easy!

“Osso Buco” (or, Braised Beef Shanks)

Serves: 4 generously
Total Cook Time: 2 hours

1/4 cup olive oil
Salt and Pepper
4 beef shanks, about 3/4 lb-1 lb each
1 medium onion, medium dice
1 small carrot, medium dice
2 ribs of celery, medium dice
4 ounces mushrooms, sliced
1 tablespoon of tomato paste
1 teaspoon dried rosemary
1 teaspoon dried thyme
1 bay leaf
1 cup red wine (I used a zinfandel)
3 cups chicken stock or water
1 can cannellini beans

Preheat oven to 350 degrees Fahrenheit.

In a dutch oven, heat the olive oil over medium high heat. Liberally salt and pepper the shanks. Brown in batches in the dutch oven, about 3 minutes a side. Remove and set aside.

Turn the heat to medium. Add the onions, carrots, celery and mushrooms. Sweat the vegetables until wilted, stirring the bottom of the pan to loosen any brown bits. Add the tomato paste and rosemary, thyme, and bay leaf to the vegetables. Cook until fragrant, about 2 minutes. Add the red wine, cook and stir for about 2 minutes. Add the chicken stock. Bring to a boil. Cover and bake for 1 1/2 hours. If you are using enamel cast iron, the lid should be heavy and tight enough to maintain moisture throughout cooking. If not, you may need to check the dish occasionally to make sure you have adequate liquid. 20 minutes before the end of the cook time, add the beans and stir to make sure they are submerged. Check salt and pepper levels prior to serving and adjust as needed.