Monthly Archives: October 2013

Buffalo Hot Wings

Mild and Hot Wings, ready for dipping!

Mild and Hot Wings, ready for dipping!

I am not a fan of spicy foods.   I especially loathe the race to ever spicier foods.  Whole shows dedicated to making people eat foods that will likely lead to those foods making a return appearance later in the show, well, seem stupid.

Food is to be enjoyed.  Not designed to tear a hole in your stomach.

Which brings me to hot wings.  Buffalo hot wings.  Simple.   The origin story involves spare, cheap parts being repurposed for a quick meal.    Fast forward a few decades and now these cheap parts, the chicken wings, are actually quite a bit more expensive than the chicken thighs!!  Given the meat to bone ratio, the price for wings is rather ridiculous.  However, the idea of buffalo thighs is just an anathema.  Sacrilege!  So, I shall pay the outrageous price as an homage to tradition.  Granted, it’s a rather recent tradition, but tradition nonetheless.

Most hot sauces have lots of vinegar to punctuate the sensation of eating a hot food.  So, I figured why not use the same enhancement on my wings?  There are rumors a certain chicken fast food restaurant marinates their chicken in a pickle brine.  As luck would have it, I actually had some.  We love Clausen’s Dill Pickles.  They are crisp, not too tart, with the perfect level of dill.  After we recently finished a large, warehouse sized container of said pickles, I had a ton of pickle brine sitting around.  Since the price was right, and I wanted to try this technique, this brine served as my marinade.

The result?  Tender wings with a really complex flavor profile.  They didn’t taste like pickles, which was no small concern, but you could tell the influence of the brine was there.   My husband’s smoking hot wings were made more intense and my milder wings were really great without being crazy hot.

I would totally make this again.  It’s easy.  Cheaper than take out wings, and definitely better!

Buffalo Hot Wings, half really, really spicy, half “normal” spicy.
Serves: A Crowd
Prep Time: 2-3 hours (marinating)
Cook Time: 25-30 minutes

Wing Base

2 1/2 – 3 pounds chicken wings
Brine from 80 ounce package of Clausen’s Pickles

Add chicken wings to a closable plastic freezer bag. Pour brine into freezer bag, careful not to overfill. Close bag and marinate in refrigerator for 2-3 hours.

Preheat Oven to 370 degrees Fahrenheit

Super Hot Wings Sauce
4 Tablespoons melted bacon drippings, lard, or vegetable oil
2 Tablespoons cayenne
2 teaspoons granulated garlic
2 teaspoons salt

Combine well melted or liquid fat and spices, divide into two portions, three quarters and one quarter (reserved). In a small bowl, place three quarters of the liquid and half of the chicken wings. Toss wings with sauce. Alternatively, you could brush the sauce directly on the wings. Place a grate on a half sheet pan to elevate the wings. Place wings on grate.

Regular Hot Wings Sauce
1/3rd cup melted Ghee or clarified butter or vegetable oil
1/3rd cup favorite Hot Sauce

Combine well melted butter or ghee and hot sauce, divide into two portions, three quarters and one quarter (reserved). In a small bowl, place three quarters of the liquid and half of the chicken wings. Toss wings with sauce. Alternatively, you could brush the sauce directly on the wings individually.  Place wings on grate, next to spicy wings.

Bake wings for 25-30 minutes until completely cooked through, turning once during the cook time. At the end of the cooking, lightly brush the remaining sauce on the wings.

Serve with blue cheese dressing and any other accompaniments.

Buffalo Hot Wings

Had to see if they would all fit, which they did! Note the pickle brine pieces.

Buffalo Hot Wings

Buffalo Hot Wings

So spicy!!

Lobster Newburg

Lobster NewburgWe have a small football pool in our house.  We pick for winners only.  The winner of the weekly pool gets to pick either a special dinner or a special dessert.  My kids, being rather awesome.  They “saved” their wins and pooled them so they got a special dinner and dessert on the same night.

Now, my kids don’t eat the same, at all.  I never thought in a million years they would agree on anything dinner-wise.  So, imagine my surprise when they did.  Want to guess what they picked?  Lobster.  Yup.  One’s never had it, but wanted to try it.  The other one has had it once.

Lobster.

At the same time, I haven’t really done a historical recipe for a while.   So, the first one that came to mind was Lobster Newburg (or Newberg).  What’s not to love?  Lobster, cream, sherry, some kind of wonderful bread.  Sheer Nirvana.  I could eat a sherry cream sauce everyday.  Love it.

But, the kids didn’t want a “recipe”, they wanted plain lobster with butter.   So, two of the lobsters were steamed “plain” and two were turned into Newburg.  For dessert, they requested a banana split.  Odd pairing, but given it’s ease to make, I’ll take it!!

Lobster Newburg has a fascinating story, depending on which one you believe, if any of them.  The dish originated in the late 1800s in America, believe it or not!   All renditions of the origin story are tied to Delmonico’s, a very famous restaurant in New York City at the time.  One version has a French chef departing Delmonico’s to open an inn in Pennsylvania.  He wanted to serve very continental cuisine and came up with Lobster Newberg to serve at the Hotel Fauchere in Millford, Pennsylvania.

The traditional story is a bit more colorful.  Ben Wenburg was an avid traveler, successful businessman, and reliably regular customer at Delmonico’s.  To boot, he was a favorite diner of Delmonico’s owner, Charles Delmonico.  One version has Ben swooping in and, with great showmanship,  making his new favorite dish over a chafing dish in the middle of the dining room and serving it to Delmonico.  Delmonico loved the dish and added it to the menu, naming it Lobster Wenburg.  Delmonico and Wenburg subsequently had a falling out and the item was removed from the menu.  However, as it’s delicious, there was a great cry to bring it back.  So, the Delmonico transposed the W and the N and renaming Lobster “Newburg”.  Other versions have the Delmonico naming the dish in honor of Wenburg, and Wenburg politely declining to have his name on the menu.  Wenburg then suggests the N and W swap to disguise his name.

No matter what the story, the dish was an amazing success.  When you see how simple this is, you will be amazed. It is an awesome romantic dinner. You know, when the kids are eating their steamed lobsters next to you and everything.  Ah, romance.

Lobster Newburg
Serves 2-3

1 sheet of Puff Pastry, divided
1 1/2 cups heavy cream
3 egg yolks, beaten well
3 Cups Cooked Lobster Meat*
1 tablespoon butter
1 tablespoon sherry

Preheat oven to 400 degrees Fahrenheit. Place pastry on a baking sheet lined with parchment paper or a silicone baking sheet. Bake for 15-20 minutes until the pastry has risen and is golden.

While the pastry is cooking, turn your attention to the sauce. Ok, you may want to use a double boiler if you are skittish about heating a high fat milk product, but if you promise to use a heavy bottomed pan and cook the cream over medium low heat, you may be fine. I was. I hate using a double boiler, too many pans!  Slowly heat the cream in a larger sauce pan, stirring frequently, but don’t let it boil. When it is moderately hot (like hot chocolate hot), temper the egg yolks (add a tiny bit of the hot cream to the yolks incrementally until the yolks are rather warm), and add the yolks back to the cream. Return the pan to the heat and allow to simmer gently, again with frequent stirring. Add the lobster to the pan and continue to cook until the lobster is warmed through, about 5 minutes. Add the butter and sherry and stir until the butter is melted, about 1 minute. Serve over puff pastry (can also use rice or toast made from great French bread).

Wasn’t that easy?

*You can have your market steam your lobster. You can boil the lobster yourself in a deep kettle of boiling water for 5 minutes for the first pound, and 3 minutes for each additional pound until the lobsters are done. You can steam the lobsters until they are a bright red. However you cook your lobsters, you just need to shell them afterwards. As a Marylander and a voracious crab eater, picking lobsters is a walk in the park compared to crabs. This step should not be a deterrent!!

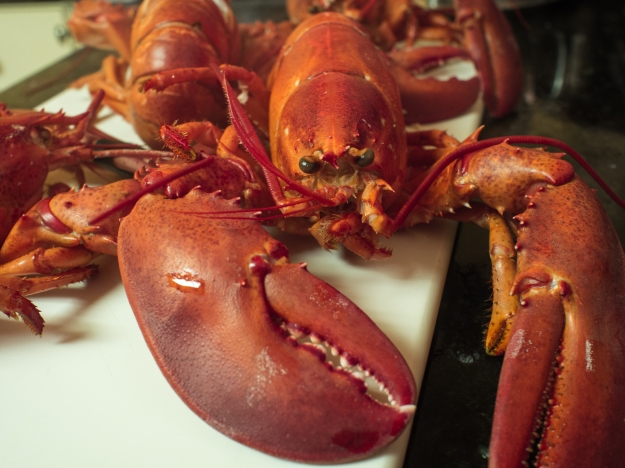
Dead Lobster Walking So Red!! Puff Pastry

Pulled Pork and Carnitas- Slow Cooker

Slow Cooker Pulled Pork

My husband and I work. We have two kids that like to do stuff. Our weeknight schedules are crazy and I have to tape (how old am I that I still use the word “tape”!!)  DVR The Daily Show and The Colbert Report because the thought of being awake at 11 o’clock is beyond hysterical.  I’m laughing right now, just imagining trying to stay up that late.  I really belong in the central time zone.  If it wasn’t for my DVR, I would not see any shows with a 10 o’clock start time.

More importantly, getting dinner on the table before 7 pm is a herculean effort.  Between arguing about doing homework, arguing about correcting homework, and actually making the meal, the night flies by really fast!  So, any shortcut I can find is greatly appreciated.

I was in a large warehouse store the other day picking up my month supply of paper towels and toilet paper and decided to pick up a Boston Butt, also known as pork shoulder.  At $1.69 a pound, it’s a hard bargain to pass up.  I realize that it’s not pastured or otherwise “green”, but as we eat that way most of the time, once in a while being cheap isn’t awful.  Being a warehouse club, I ended up with 14 pounds of the stuff.  No mean feat to cook this hunk of pork.

Now, I’m pretty reluctant to pull out my slow cooker due to less than optimal results and the fact that my daughter hates anything “saucy”.   I find pot roasts and chicken either turn out “dry” or mushy.   Let’s face it, once you remove “sauce” as an option for a dish made in a slow cooker, you pretty much remove the slow cooker as an option.  Except for this recipe.  You can really cook this pork rather plain in the slow cooker, and the pork stands up pretty well to a long cook time.  I put half the package (about 7 pounds) in the slow cooker.  The first night, we had “pulled pork”- my husband asked that I put the quotation marks, as the pork was not smoked.  Then two nights later, I repurposed the leftovers into carnitas.   Cook one piece of meat in the slow cooker, get two awesome meals on the table before 7 pm!!

I pulled no punches with the meat.  I made it pretty much as you would any piece of pork that you would put in the smoker.   I start with a light glaze of mustard and then heavily season with traditional barbecue spices, but I did add some spices that had been smoked- like smoked paprika.  I would normally leave that out of any seasoning mix to go on the smoker.  Here, to give it a more smokey feel, the meat needs, well, smoke.

For my second night, I placed all the meat on a cookie sheet and baked it in a fairly hot oven to make the meat a little more dry and the end bits a touch crispy.   In a few minutes, I had the perfect pork carnitas meat and I served the carnitas with the traditional toppings.  I can’t stress how easy this made dinner time for the week, especially in a week when my husband was working late most nights!

Slow Cooker Pulled Pork

5-7 Pound Boston Butt or Pork Shoulder Roast
1/4 cup yellow mustard (enough to cover meat)
2 tablespoons chili powder
2 tablespoons dry mustard (love Coleman’s)
1 teaspoon cayenne pepper (more if you like it spicy!)
2 tablespoons coarsely ground black pepper
1 tablespoon ground white pepper
2 tablespoons onion powder
2 tablespoons granulated garlic
2 tablespoons kosher salt
1/2 teaspoon smoked paprika
1 onion, roughly chopped
1/4 cup water

Cover the Boston Butt with a thin layer of yellow mustard. In a small bowl, combine all the spices and rub over the pork. Add the onion and the water to the slow cooker. Add the pork. Cover and cook on low for about 8 hours.

Remove pork from slow cooker and pull apart with a couple of forks. Serve with Cole Slaw and barbecue sauce.  Seriously easy stuff!

Pork Carnitas

Pork Carnitas

Left over pulled pork
1/4 cup olive oil
Onions, cut into strips
Green peppers, cut into strips
Round tortillas, slightly warmed
Avocado, chopped
Salsa
Queso Fresca

Preheat oven to 375 degrees Fahrenheit.

Heat oil over medium heat in a sauté pan.

While the oil is heating, spread pork in an even layer over a cookie sheet. Place in oven and cook until less moist with some crispy bits, about 15-20 minutes.

Sauté onions and peppers until slightly caramelized, about 20 minutes.

Serve with your favorite toppings.

Slow Cooker Pulled Pork and Carnitas

My best Jackson Pollock inspired work!

Slow Cooker Pulled Pork

Slow Cooker Pulled Pork

When I came home, the house smelled amazing!

Slow Cooker Pulled Pork

So moist and ready to be pulled!!

Slightly dried and ready to go!

Slightly dried and ready to go!

Beef Shanks

Beef Shanks "osso bucco"

Have you ever walked by something in the store and just thought to yourself:  gotta cook that!!  It happened to me the other day.  Beef shanks.  Just look at them:

Beef Shanks

I couldn’t walk by these babies.  Awesome, meaty, lots of marrow.  If you eat meat, what’s not to love?    I looked at similar veal shanks and comparing $16.99 a pound for veal and $5.99 a pound for beef, well, that’s a no brainer.  Beef it was.  So, it’s not really Osso Buco, but it’s not far off.

My first time having osso buco was at Chiapparelli’s in Little Italy in Baltimore.  My sister had just graduated college and my parents took her out to celebrate.   Chiapparelli’s is a very old world Italian restaurant.  Dark and cozy and dripping with Italian charm. It was an amazing meal from beginning to end, but the osso buco was unforgettable.  When I began to learn how to cook, this was among my wish list items I wanted to learn how to make.

I wanted to be gluten free and lower carb, so I omitted the flour step.  Look, meat browns without flour.  I think this is kind of an antiquated step that everyone does just because it’s always been done.  So, I just salt and peppered these babies and browned them in my dutch oven.  No change difference in flavor.

See, they can brown without flour!

See, they can brown without flour!

 I know, somehow this little bit of flour is supposed to thicken the sauce.  I never find that to be the case.  I always have to add thickener or reduce forever anyway. Frankly, I don’t care if my sauce is thin or thick, I just care how it tastes.  And with this dish, the meat is so moist and tender, the sauce is really a bonus.  

Also, you may notice a distinct lack of gremolata that some recipes add.  First of all, I’m serving a 10 year old and an 8 year old.  I’m pushing it with beef shanks.  I’m not a fan of gremolata.   It’s not cheap, it adds a room temperature taste layer to a warm comforting dish that I just don’t see as necessary.  This dish is packed with flavor.

So, for a greatly reduced price, compared to the veal, I was able to make an amazing dinner that seems so fancy!  Yet, as you will see, so easy!

“Osso Buco” (or, Braised Beef Shanks)

Serves: 4 generously
Total Cook Time: 2 hours

1/4 cup olive oil
Salt and Pepper
4 beef shanks, about 3/4 lb-1 lb each
1 medium onion, medium dice
1 small carrot, medium dice
2 ribs of celery, medium dice
4 ounces mushrooms, sliced
1 tablespoon of tomato paste
1 teaspoon dried rosemary
1 teaspoon dried thyme
1 bay leaf
1 cup red wine (I used a zinfandel)
3 cups chicken stock or water
1 can cannellini beans

Preheat oven to 350 degrees Fahrenheit.

In a dutch oven, heat the olive oil over medium high heat. Liberally salt and pepper the shanks. Brown in batches in the dutch oven, about 3 minutes a side. Remove and set aside.

Turn the heat to medium. Add the onions, carrots, celery and mushrooms. Sweat the vegetables until wilted, stirring the bottom of the pan to loosen any brown bits. Add the tomato paste and rosemary, thyme, and bay leaf to the vegetables. Cook until fragrant, about 2 minutes. Add the red wine, cook and stir for about 2 minutes. Add the chicken stock. Bring to a boil. Cover and bake for 1 1/2 hours. If you are using enamel cast iron, the lid should be heavy and tight enough to maintain moisture throughout cooking. If not, you may need to check the dish occasionally to make sure you have adequate liquid. 20 minutes before the end of the cook time, add the beans and stir to make sure they are submerged. Check salt and pepper levels prior to serving and adjust as needed.