Category Archives: Barbecue Competition

Sun Dried Tomato Ketchup

http://dawnoffood.com

I’ve been working on my little blog for almost a year.  It’s really unbelievable how fast time flies.  I have enjoyed every post and all of the feedback I’ve received.  Among the various forms of feedback received, I managed to wrangle a free sample of Traina’s California Sun Dried Tomato Ketchup.  I love free.  I really, really do.

But, with free comes great responsibility.  I will not tell you, dear readers, that I like something when I don’t.  I’ll do a fair review of the item and let you know what I think of the product.

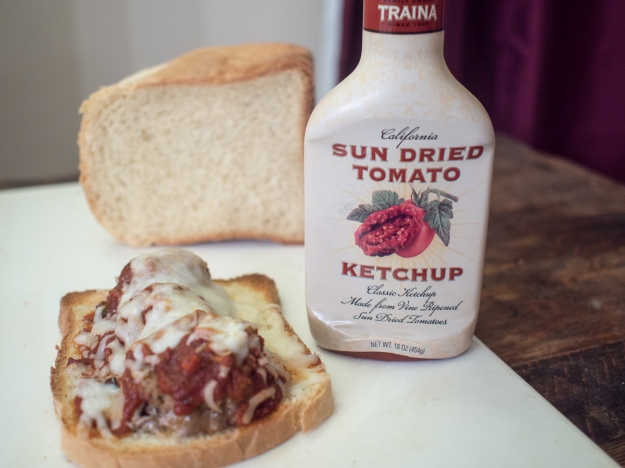
This is a thick, rich and savory ketchup made by the folks at Traina using sun dried tomatoes.  For the kids, the ketchup was a disappointment because they were looking for the very sweet Heinz ketchup.   For the adults, it was just a world of possibilities.  My husband can’t wait to use this in his barbeque sauce.  I believe it will be an amazing addition to this recipe for barbeque sauce, just use it in place of the regular ketchup.   But for this post, I wanted to do something different.

This is a rich and savory ketchup and I immediately wanted to use it in a thick, tomato based sauce.  My husband was working late, and I had the kids by myself, so I took some meatballs out of the freezer, made a quick sauce using the ketchup as a base, and had meatball sandwiches.  Very easy weeknight meal!

http://dawnoffood.com

Making a sauce out of the sun dried tomato ketchup was a breeze.  Added a touch of water until about 2 cups of sauce was a bit loose and more of a sauce than a ketchup.  Added a bit of salt, pepper, and oregano to taste.  Super, duper easy!!!

Overall,  this is adult ketchup that is incredibly thick and savory.  A great take on a classic American condiment!

Pulled Pork

Smoker Chimney

Of all of the meats involved in barbecue, pulled pork is by far my favorite.   When done right, it’s moist, tender and sweet.   When done wrong, it’s dry and stringy. On the plus side, it’s pretty hard to do wrong.  Unless you are some large, BBQ chain restaurants.  I don’t know how, but some of them manage to turn this perfect meat into a mass of dry strings with sauce.

My husband was practicing his pulled pork when he indulged me in my blogging venture.  He’s a very patient hand model, so I want to profusely thank him for his participation in my blog this week.

The meat involved in pulled pork is a pork shoulder roast, or “Boston Butt”.  Now, you could skip the smoking, place the butt (hee hee) in a crock pot with a bit of water and a chopped onion, slow cook on low for 8 hours and presto, tender pulled pork.  Drain and add a smoky barbecue sauce and it’s pretty awesome.   Is it the same?  No.  But, it’s pretty darn good for doing pretty much nothing more than dumping a few ingredients in a container and flipping a switch.

But, smoking the Boston Butt brings the pork to a whole different level.  First, there’s the injection, piercing flavors deep within the meat.  Then there’s the lovely rub and smoke infusing the meat with even more flavor.  Top it with barbecue sauce and you have pork nirvana.  Truly, the pork is just so amazing.

You can make an ugly drum smoker (google that!) or use a weber bullet (we have both) for an affordable smoker.  They are an endless source of entertainment and amazing food for us.  Top with an amazing Barbecue Sauce and serve with Cole Slaw.

Pulled Pork

1/2 Boston Butt, trimmed

Pork Butt Rub
1 cup light brown sugar (packed)
2 tablespoons chili powder
2 tablespoons dry mustard (love Coleman’s)
2 teaspoons cayenne pepper (more if you like it spicy!)
2 tablespoons coarsely ground black pepper
1 tablespoon ground white pepper
2 tablespoons onion powder
2 tablespoons granulated garlic
2 tablespoons kosher salt

Pork Injection
1 quart apple juice
1/2 pint distilled white vinegar
3 cups sugar
1/2 cup table salt (not iodized)

Directions for the rub: Thoroughly combine all the ingredients in a large bowl. Set aside.

Directions for the pork injection: In a 4 quart saucepan, combine the juice and the vinegar over medium heat. Once the juice is warm, add the sugar and the salt and stir constantly. Without bringing the juice to a boil, stir until the salt and sugar are dissolved. Remove from heat and cool.

Bring the smoker to 275 degrees. How you smoke the meat depends on your smoker, so I won’t give you directions as each one is slightly different. While the smoker is heating, thoroughly inject the butt with the injection. Massage the rub into the meat, wrap in plastic wrap and return to the refrigerator until the smoker is at temperature. Smoke the meat until a nice bark is formed, the meat is thoroughly cooked, and tender enough to be pulled, about 6-8 hours. Longer, if you prefer to cook at a lower temperature.

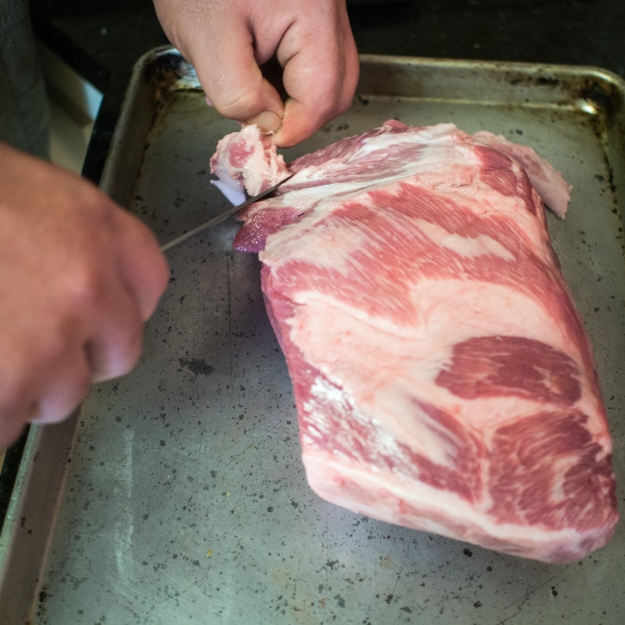
Pork Butt Trimming

Trimmed Pork Butt

Pork Butt Injections

Pork Butt with Rub

Pork Butt on Smoker

Smoked Pork Butt

Not burnt, just bark!!

Pulled Pork Plate

Homemade Hot Sauce

Spicy hot sauce

Yes, we actually “canned” it!

I went to graduate school in New Orleans, Louisiana “pre-Katrina”. I love that city. New Orleans inspired my mom and I to cook. To go “all in” and “kick it up a notch”. Emeril’s Creole Christmas Cookbook changed our Christmas dinners forever. Our appetizers went from humdrum shrimp dip and crackers to Corn Cakes with Christmas Caviar Sauce. We learned how to make gumbo and jambalaya and all things étouffée. And the desserts. My goodness, bread pudding is simply amazing and so incredibly easy!

While in New Orleans, I met Emeril Lagasse, just as he was becoming the superstar. Yes, he actually cooked in his restaurant, and the food was amazing. My friends and I would try to get a seat at the tables overlooking the kitchen to watch him cook! Emeril wasn’t the only game in town, however. Paul Prudhomme’s restaurant was really hard to get into and the food was well worth the wait! Local dives that would likely fail health codes elsewhere were serving up traditional New Orleans favorites. And the crawfish. Being from Maryland, crawfish were way easier to pick than crabs!! A very refreshing change of pace.   Last, but not least, there are not enough nice things to say about Commander’s Palace.  Truly an amazing place.

And here is where I found Crystal Hot Sauce. I never cared for Tabasco (gasp!), but Crystal actually tasted like something other than “hot” and vinegar. My husband is the type that loves hot sauce and crazy spicy foods. Crystal doesn’t do it for him. He also LOVES to make things himself. So, on a day when I was a bit under the weather, my husband and my son made hot sauce. I asked him if he would do a guest blog, but he said he’d take “a few pictures, they won’t be great” and that I could write it. So, here we are. We went to the farmer’s market and gathered a bunch of peppers that were labeled “hot”.

Farmer's Market Peppers

See that little red one at the top?  That’s something the farmer called really, really hot.  She wouldn’t sell it to my son unless we were there and said it was ok.  Yeah, it’s hot.

Now, if you want a red sauce, you need to pretty much use red peppers.  Our sauce is a bit “muddy” because of all the green colored peppers.  You could use red food coloring to make it the color you want, if you have a lot of green peppers you want to add to the sauce.  Also, if you are expecting something crazy hot, we’ve come to the conclusion that people must be adding capsaicin directly for the super hot sauces.  We’ve made sauces from habaneros and as the seeds are all strained out, the sauce was good, but not super hot.  The “hot” part of the pepper is contained within the seeds and white parts, and those are generally strained out.  What you will get is a sauce that’s spicy and complex with several layers of amazing flavor.

Hot sauce first appears in the United States appeared in the early 1800s in New England. In the 1860s, Edmund McIlhenny invented Tabasco sauce on Avery Island in Louisiana as a way to spice up food after Reconstruction period left southern food decidedly bland. By the 1870s, the sauce was widely available and even shipped ot England. To this day, the sauce is still made on Avery Island, over 140 years later.

Hot Sauce
Makes 1 Quart, 1 Pint

3-4 pounds of various hot peppers (stemmed)
1.5 liters of white vinegar (5% acidity)
1 1/2 teaspoons of kosher salt
1 teaspoon granulated garlic
1 teaspoon onion powder
1/4 teaspoon thyme
4 ounces tomato paste
1 tablespoon sugar
1 bay leaf

Roughly chop up peppers. Place peppers, vinegar, salt, and spices in a non-reactive sauce pan. Our 4 Quart stainless steel sauce pan was big enough. Simmer for 2 hours in a well ventilated area.

Remove peppers from vinegar and place in a food processor. Strain vinegar and set aside. Process the peppers until smooth, then press through a fine sieve.

Return processed pepper pulp to the sauce pan and add 1/2 of the vinegar mix, tomato paste, sugar and bay leaf. Adjust coloring and salt if desired. Simmer over low heat for an hour. Pour into sterilized jar or bottle and secure with an airtight lid. Let age at least two weeks before using. Maybe stored up to 6 months in the refrigerator.

Baked Beans

OLYMPUS DIGITAL CAMERA

Very few things complete a hot dog and hamburger cook out like baked beans.  Which, to me, is odd.  I mean, it’s clearly hot outside.  Nearly all the other sides are cold, like coleslaw, potato salad, lettuce based salads, sliced fruit, etc.  Drinks like beer, soda, margaritas, and mojitos are cold.  And inevitably there will be baked beans somewhere on the table spread.  The beans are baked in a supremely sugary and molasses infused sauce for a fairly long time, given their small size. How does that fit with coleslaw and potato salad?  It’s like “which of these things do not belong here”.  Yet, it does.  And great beans can be sublime.  Sweet, smokey, salty all in one bite. Try to top that potato salad!!

Boston Baked Beans are the quintessential historical bean dish.  The beans used for this dish were indigenous to the North American and transported to the “old world” in the 16th century. French Cassoulet was developed quickly there after.   In the colonies, the beans were cooked with salt pork, molasses, sugar and water.  The beans were baked for many hours in an earthen pot. “Beantown” (aka Boston) was aptly named due to the popularity of “Boston Baked Beans”.

Now?  Pop open a can and warm it up in a sauce pan.  Done.  “Baked beans”.    And why not?  Who wants to have a hot oven going for hours during the summer?   Who wants to soak beans for hours on end (if you can remember to, I forget that step and have to do the “quick soak”)? I care!!

There are many variations of doctored canned baked beans.  But, no matter how much you doctor a recipe for baked beans, the earthiness seems to get lost to a wan can taste.  I think it has something to do with the sauce in the beans.  It lacks spice.  Oomph.  Body.  My mom has a recipe that she got from somewhere called “Braggin’ Baked Beans”.  This recipe is the best of the doctored bean recipes I have tasted. I’ve tried making traditional baked beans. No one really likes those anymore. I’ve tried and tried. So, I decided to do a hybrid. My recipe combines historical ingredients with decidedly newer ingredients.  I wanted to add spice to the sweetness.  I wanted bold flavors in what could otherwise be a blandish dish. Also, I try to avoid BPA and bean cans and baked bean cans can contain a lining that uses BPA. BPA is a chemical that is suspected of causing hormone disruption in humans. I have two small humans and don’t want their hormones disrupted at all. By substituting plain beans for baked beans, I can use beans from manufacturers that avoid BPA.

Baked Beans

2-3 tablespoons of olive oil
1 pound chorizo sausage, removed from its casing (or any other hot pork sausage)
1 large Vidalia Onion, chopped
1 jalapeño pepper, minced
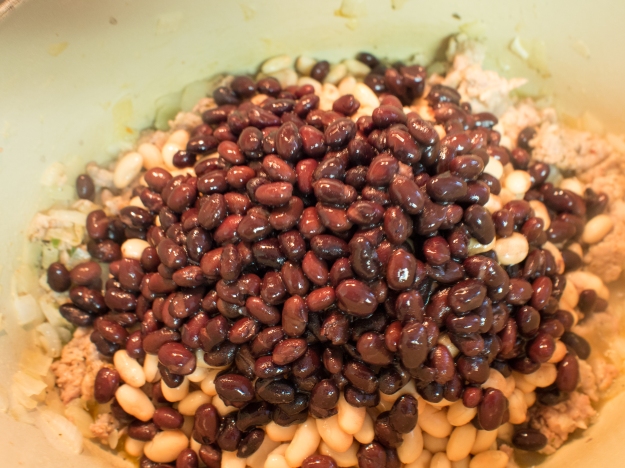
2 cans of navy beans, rinsed and drained (about 15-16 ounces, can sizes tend to vary)
1 can of black beans, rinsed and drained (about 15-16 ounces, can sizes can vary)
1 cup ketchup
1/3 cup molasses
1/3 cup course grained mustard
1 teaspoon chili powder
1/2 cup firmly packed brown sugar
Salt and pepper
4 thick slab slices of bacon

Preheat the oven to 350 degrees fahrenheit.

Heat the oil in a dutch oven (I used my handy 5 quart) over medium heat. Cook the sausage, onion, and jalapeño pepper, until the sausage is cooked through. If there is a lot of liquid, drain. If not, add the beans, ketchup, molasses, mustard, chili powder, and brown sugar. Stir until well combined. Adjust seasonings, as needed, with salt and pepper. Place bacon on top. Bake covered for 30 minutes and uncovered until desired thickness (30 minutes or so). As you can see above, I like a really thick sauce, you can certainly leave it thinner with no loss of taste.

OLYMPUS DIGITAL CAMERA

OLYMPUS DIGITAL CAMERA

OLYMPUS DIGITAL CAMERA

OLYMPUS DIGITAL CAMERA

DIY- Coleslaw

OLYMPUS DIGITAL CAMERA

Coleslaw, as we know it in all of its creamy goodness is a mid 18th century invention, as this is when mayonnaise was invented.  Fannie Farmer recommends coleslaw in her cookbook Food and Cookery for the Sick and Convalescent (1904).  The recipe was simple:  select a heavy cabbage, remove the tough outer leaves, quarter the cabbage, slice thinly, soak in cold water, drain, dry and mix with cream salad dressing.  James Beard devotes nearly 4 whole pages to various coleslaw recipes in his American Cookery.  Now?  Coleslaw is relegated to a plastic container on a shelf surrounded by other picnic salads.  So, so sad.

What barbecue feast would be complete without this accompaniment? It’s simultaneously cool, crunchy, creamy, sweet and sour. It hits all the high notes of summer outdoor eating fare. Most people just pick up a tub from the deli or supermarket. But why? Why?!?!

Walk away from the deli counter. Go over to the vegetable section of the store. I believe it’s called the “produce” section. I have always wondered why. Anyway, grab a nice looking head of cabbage. Splurge on a carrot or two. Want more crunch? Add celery. Want more color? Add red cabbage (I didn’t in the recipe below, but you totally could). You are now three ingredients away from coleslaw and you likely have the other three ingredients at home: Italian Dressing, mayonnaise, and sugar. Slice the cabbage and celery, peel the carrots and mix. Done. Coleslaw.

It’s that easy. And, I firmly believe what you make will taste better and be cheaper per pound than what you would buy at the deli counter! Again, it’s completely customizable. Want onion? Add it. Want less mayo more vinegar? Add more dressing, less mayo. Like less dressing? Cut it down. Coleslaw, your way!!! No more buyer’s remorse on coleslaw. And the veggies will be crisp!! Not limp and, well, awful.

Coleslaw
Serves 4-6 people

1 head of cabbage
2 carrots, peeled into ribbons or strands
2 stalks of celery, sliced thin (optional)
1/2 cup of your favorite mayonnaise
1/4 cup of your favorite Italian dressing
1-2 tablespoons sugar (to taste)
Cracked pepper (optional)

Remove the tough outer leaves of the cabbage.  Quarter and slice thin.  If you would like really crisp cabbage, place in cold water and soak for 30 minutes or until crisp.

Put the cabbage, carrots and celery in a large bowl. In a separate bowl, combine the mayonnaise and Italian dressing. Add one tablespoon of the sugar to the mayonnaise mix. Taste and adjust the ratio of mayonnaise to dressing as needed. Add the remaining sugar if needed. Pour the mayonnaise mixture into the cabbage mixture and combine. Add pepper, if desired. Refrigerate until needed. Take care not to refrigerate too long, as the cabbage will go limp.

One caveat, if you decide to use purple cabbage, mixing ahead will lead to a purple colored dressing. Leave it out of the mix until closer to serving time.

OLYMPUS DIGITAL CAMERA

BBQ Sauce

OLYMPUS DIGITAL CAMERA

Can you have a good barbecue with barbecue sauce from a jar? I suppose. Will you pay an arm and leg for it? Yes.

I am cheap. I prefer the more positive terms like “frugal” or “fiscally conservative” when it comes to food. If I can make it myself with better ingredients, for less money, I totally will. You think you are getting organic, high fructose corn syrup free sauces made with the finest ingredients? Probably not. And if you are, you are certainly paying for it. You can make this sauce in no time with ingredients you likely have on hand. Seriously.

What is barbecue sauce? Depends on the type you like. Generally barbecue sauces fall into two categories. I like tomato based “Kansas City” style sauce. I realize being from a mid-Atlantic state, I should be partial to South Carolina’s mustard based sauce, but I’m just not. I like the thick mahogany tomato based sauces. These sauces are not complicated. At all. Barbecue sauce is….ready? Ketchup (I don’t accept Catsup as an option, sorry Catsup crowd). Molasses. Vinegar. Mustard. Brown Sugar. Spices. Done. You think you can put these items in a pan and simmer for a bit? Then you can make your own barbecue sauce! The exact amount you need. No more half used bottles of sauce clogging up valuable real estate in your fridge, waiting to be tossed because you forgot how old they are. No more running to the store because that is the one ingredient you forgot. You will be set free from the tyranny of bottled barbecue sauce!! The best is you can customize it. Want it blazing hot? Add hot sauce or more cayenne. Want it sweeter? Add more brown sugar and leave out the cayenne. You can make the sauce exactly the way you want it! The following is a template of very basic and balanced sauce. Feel free to experiment!

Barbecue Sauce

1 cup (dry measure) ketchup
1 tablespoon molasses
1 tablespoon brown sugar
1 tablespoon apple cider vinegar (or white vinegar)
1/2 tablespoon mustard (I used French’s, whatever kind is handy)
2 tablespoons chili powder
1 teaspoon ground cumin
1/2 teaspoon ground black pepper
1/2 teaspoon salt
1/2 teaspoon crushed oregano
1/2 teaspoon granulated garlic (or powder)
1/2 teaspoon onion powder
1/4 teaspoon cayenne pepper

Combine all the ingredients in a small saucepan. Bring to a simmer and simmer until the flavors combine, about 5-10 minutes. Remove from heat and apply to your favorite barbecue item.

OLYMPUS DIGITAL CAMERA

Rib Trimmin’

OLYMPUS DIGITAL CAMERA

No, we are not discussing some plastic surgery that people in Hollyweird may or may not have done.  We are discussing trimming ribs so that they look their best on your barbecue.  As part of my continuing series on our barbecue competition aspirations, I wanted to share some behind the scenes magic.  Using a knife is dangerous stuff, please be careful and take all necessary precautions.

My husband has graciously (and patiently) decided to teach me and my camera the art of rib trimming.  First, please make sure you have a very sharp knife and a great cutting board.  Then, you need a bowl to keep those trimmings!  Don’t throw them away.  I’ll have a post on what to with the trimmings that will seriously blow you mind.  It’s awesome.

Most of you will start with this crazy hunk of meat:

OLYMPUS DIGITAL CAMERA

Kind of intimidating and not very “rack of rib” like.

With the ribs facing away from you, remove the top flap of meat with your sharp knife.

OLYMPUS DIGITAL CAMERA

Flip the ribs over and cut through the cartilege so that the extra triangle you see below is removed.  The rack should appear more rectangular now.

OLYMPUS DIGITAL CAMERA

OLYMPUS DIGITAL CAMERA

To me, the next step is crucial.  Turn your rack of ribs back over.  You’ll see a membrane covering the boney rib part.   That sucker has to go.  If you don’t remove it, the ribs are tough and your rub can’t penetrate into the meat as effectively.  You want to gently insert your knife (or a butter knife, depending on the strength of the membrane) and wriggle a starting piece free.  Once you get a decent sized starting piece, the whole membrane will pull free.

OLYMPUS DIGITAL CAMERA

Flip the ribs over and carefully remove any excess fat on the top.

OLYMPUS DIGITAL CAMERA OLYMPUS DIGITAL CAMERA

Your ribs should now look amazing and of uniform size and ready for the rub!!

OLYMPUS DIGITAL CAMERA

Generously apply the rub of your choice.

OLYMPUS DIGITAL CAMERA

Make sure you have your charcoal and wood chips/blocks are ready to go, and your smoker is at temperature.

OLYMPUS DIGITAL CAMERA OLYMPUS DIGITAL CAMERA

Place the ribs on a rack and smoke for a few hours (2-3) over 250 degrees fahrenheit.

OLYMPUS DIGITAL CAMERA

Ready to wrap!

Wrap the ribs in foil and return to the smoker for another hour until perfect!

OLYMPUS DIGITAL CAMERA

Getting ready for the Barbecue Competition

OLYMPUS DIGITAL CAMERA

See my beautiful smoke ring!

Barbecue. Few things smell sweeter in the summer than fruity wood chips slowing giving up their flavor in plumes of smoke over low heat. The act of slow smoking renders rather unappealing and tough cuts of meat into tender, smokey nirvana. For those who have had ribs at a chain restaurant where you don’t smell smoke when you walk up to it, realize you have been cheated.

I bought my husband his first smoker as a birthday present one year. A Weber Smokey Mountain smoker, or “bullet”. This is a vertical water type smoker. Very budget friendly (compared to the thousands people can spend on other rigs), as well as beginner friendly. The concept is simple: heat on the bottom, water in the middle as a shield, meat on the top. Smoke from the heat rises to the top to flavor the meat and the meat is slow cooked over low temperatures (225-300 degrees fahrenheit depending on the meat) for a long time.

We smoked briskets, chicken, ribs, pork shoulder or Boston Butt. After our first homemade smoked ribs, we swore we would never eat barbecue out again. Tender with an authentic smoke flavor. You could actually see a smoke ring! The ribs weren’t drowning in sauce or desert dry.  The brisket wasn’t rubbery and, well, dry.  And the chicken wasn’t, you guessed it, dry.  Everything was just amazing.

There’s no one recipe for barbecue. There are no lists of ingredients that make or break a rub or sauce. It’s about the cooking process and letting the meat shine. These are really tough pieces of meat. They are from the hardest working areas of their respective animals. If you can conquer brisket and make it tender and moist, you can cook anything!

Some things I can pass along: if you are making ribs, take off the silverskin. It’s the tough membrane on the underside of the ribs. There are books that say that the low and slow cooking method will “dissolve” the membrane. You can try that approach, but if you’ve ever had ribs that are tough to pull off the bone, chances are the silver skin was left intact.

Watch your temperature.  Just because it’s been sitting beautifully at 250 for 4 hours, doesn’t mean it will stay there.  If you run out of water in a vertical water smoker, your temperature can skyrocket without warning.   You don’t have to stare at it for hours, and you can buy fancy equipment that will email you when there’s a deviation.  I just prefer to keep a watchful eye on it.

Make your own rub and sauce. It’s fun. For Kansas City style sauce, it’s just ketchup (mostly), molasses (or brown sugar), mustard, vinegar, chili powder, cayenne (if you like heat), salt and pepper. Like more cumin flavor? Add it. Like it spicer? Change it. Smokier? Add smoked paprika. Really fun and if you mess up, add more ketchup. That almost always fixes anything. Plus, you won’t have MSG or high fructose corn syrup in your sauce, unless you want them there, of course.

If you ruin your meat, there’s no amount of sauce or rub that will make up for it.  Fortunately, it’s fairly difficult to completely mess it up.

We are doing our first competition in August, so we are practicing. Our neighbors are getting lots of barbecue and will be getting more. We have to practice Boston Butt, ribs, brisket and chicken.

OLYMPUS DIGITAL CAMERA

Yesterday was ribs and chicken. I’m partial to the chicken. Smoked chicken is really good and something very different than the usual baked/roasted/braised chicken I usually do. I do like ribs as well, but everyone has a favorite of something, right?

OLYMPUS DIGITAL CAMERA

So, if you want to join the really slow food movement, invest in a smoker. We’ve had a ton of fun with it and the neighbors definitely know when you are cooking!!  I’ll update everyone as we get closer to the competition!!