Monthly Archives: December 2013

Hot Cocoa

Hot Cocoa

Hot Cocoa.  For my chocolate milk loving daughter, this is her favorite drink.  The temperature could be 65 degrees at night in July and that would be cold enough to inspire her to declare that “this would be a perfect night for hot cocoa”.   She needs very little in the way of excuses to ask for the rich, chocolatey drink.

There are two phrases that are used interchangeably:  hot chocolate and hot cocoa.  Technically, hot chocolate is literally chocolate that is melted and added to warmed milk.    Hot cocoa is a warm milk drink made with cocoa powder and sugar.   Both drinks are particularly delicious, but would you consider killing someone for access to such a drink?  In Chiapas, Mexico, during the 1600s, the ladies of Chiapas drank hot chocolate during mass.  According to Thomas Gage, the bishop (rumored to be Bishop Bernardino de Salazar y Frias) threatened to excommunicate the women if they continued to disrupt services with their chocolate drinking.  The ladies found other places to worship, but shortly thereafter, the bishop perished, allegedly from poisoned hot chocolate, but not before uttering:  “Beware the Chocolate of Chiapas!”

Hot chocolate is a very old drink.  Brought over to Europe from Mexico by explorers, it was praised for its medicinal qualities.   It was also a handy medium for poisoning, as show above.  Hot chocolate was rumored to be used to attempt to poison everyone from Napoleon to Frederick the Great.  Chocolate was heavily spiced and frequently considered medicinal, so it wouldn’t taste the same every time it was served.  Very handy quality for a poisoning medium. What an ugly side to such a truly enjoyable drink!!!

Today, when most people make hot cocoa, they use a packet of cocoa mix.   Many years ago,  I used the ubiquitous packet.  I don’t have the original list of ingredients, but here is the modern day list of ingredients for Swiss Miss (source):

Ingredients

Sugar, Corn Syrup, Modified Whey, Cocoa (Processed with Alkali), Hydrogenated Coconut Oil, Nonfat Milk, Calcium Carbonate, Less than 2% of: Salt, Dipotassium Phosphate, Mono- and Diglycerides, Carrageenan Acesulfame Potassium, Sucralose, Artificial Flavor.

I really wouldn’t have expected to see the milk so far down the list.  I also wouldn’t expect to see Splenda in what is packaged as a “regular” packet of hot cocoa.   Overall, another scary rendition of a processed food item.

Also, I’m not really sure I’m getting my money’s worth here.  Sugar, whey, and corn syrup aren’t exactly high dollar items.  The cocoa isn’t likely high quality cocoa, as it needs to be boosted by “artificial flavor”.

But, when you just throw cocoa into milk, you just get a clumpy, powdery mess.  Many of those unpronounceable ingredients are designed to encourage a smoother incorporation of the dry ingredients into the liquid.    If we are going to make our own hot cocoa, we need to overcome this particularly nettlesome issue.

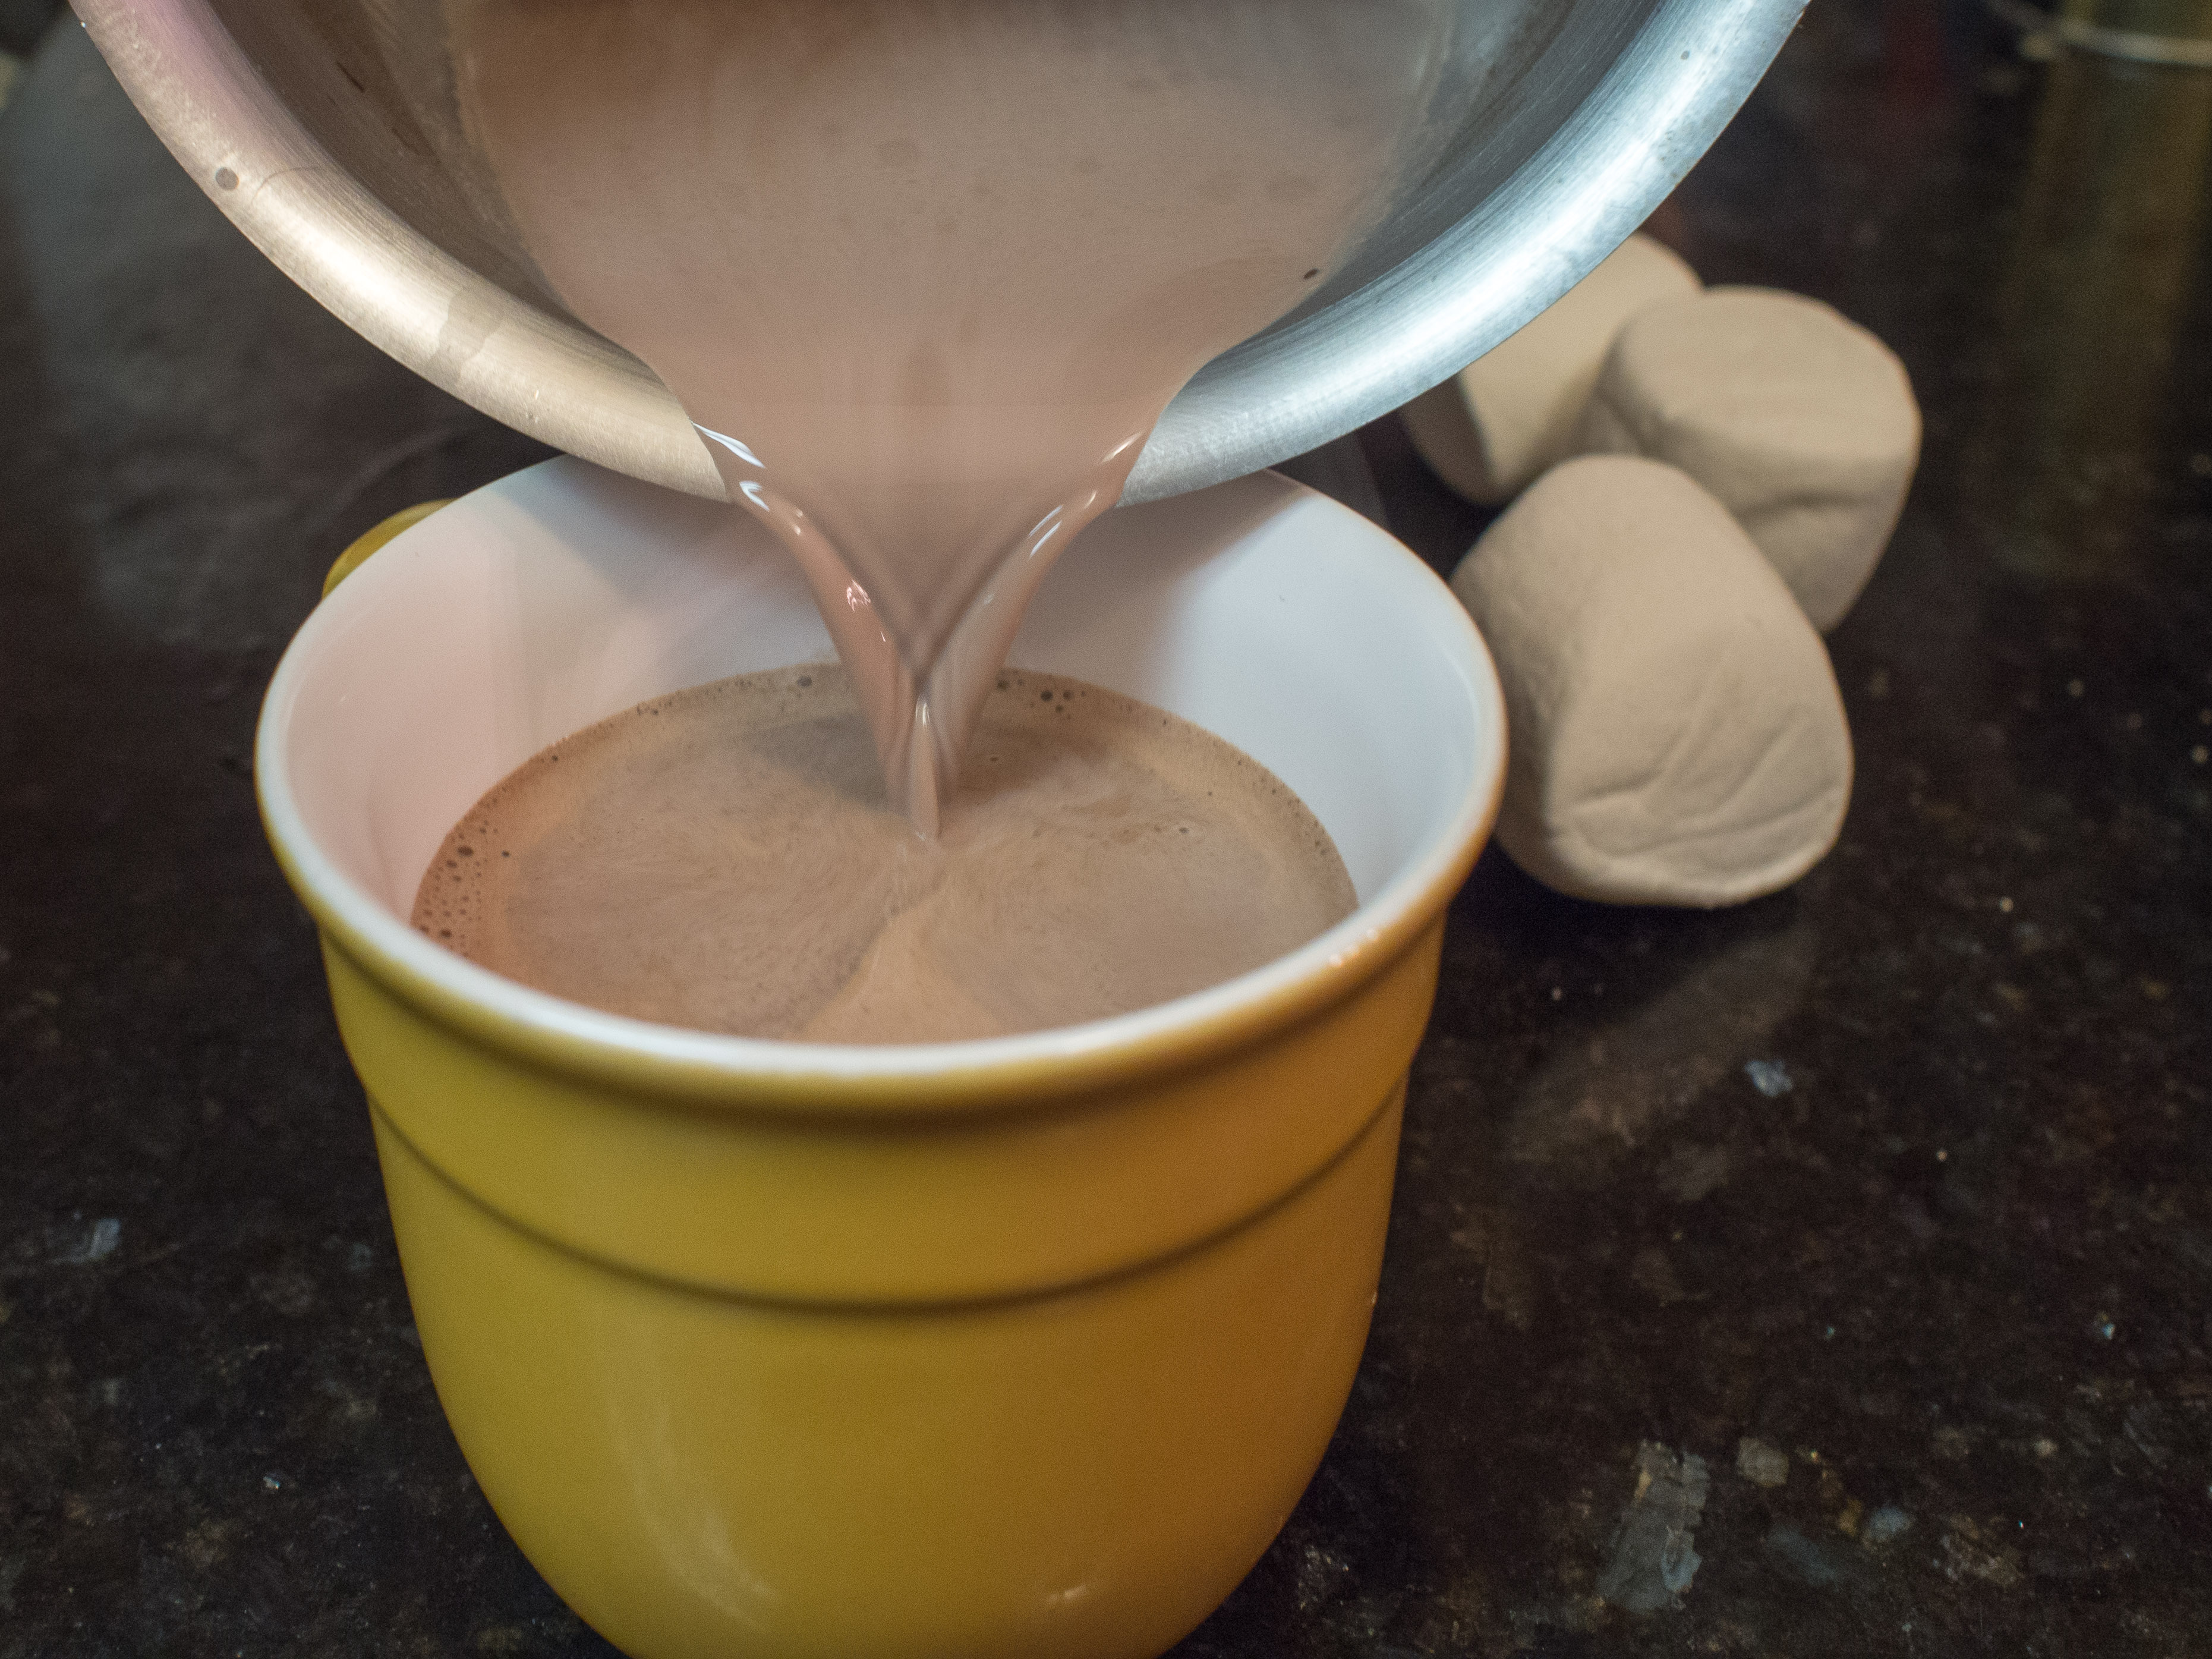
When I mix cornstarch or flour into something liquid, I have to make a paste with water first.  So, I used this particular logic and made a paste by adding water to my homemade cocoa mix.  I then added the paste to warmed milk and miraculously had smooth, hot cocoa.  No chemicals needed to keep the cocoa from lumping!  As a bonus, the paste is amazing on its own.  Sort of like a raw brownie.

Hot Cocoa
Serves 1

6 ounces whole milk
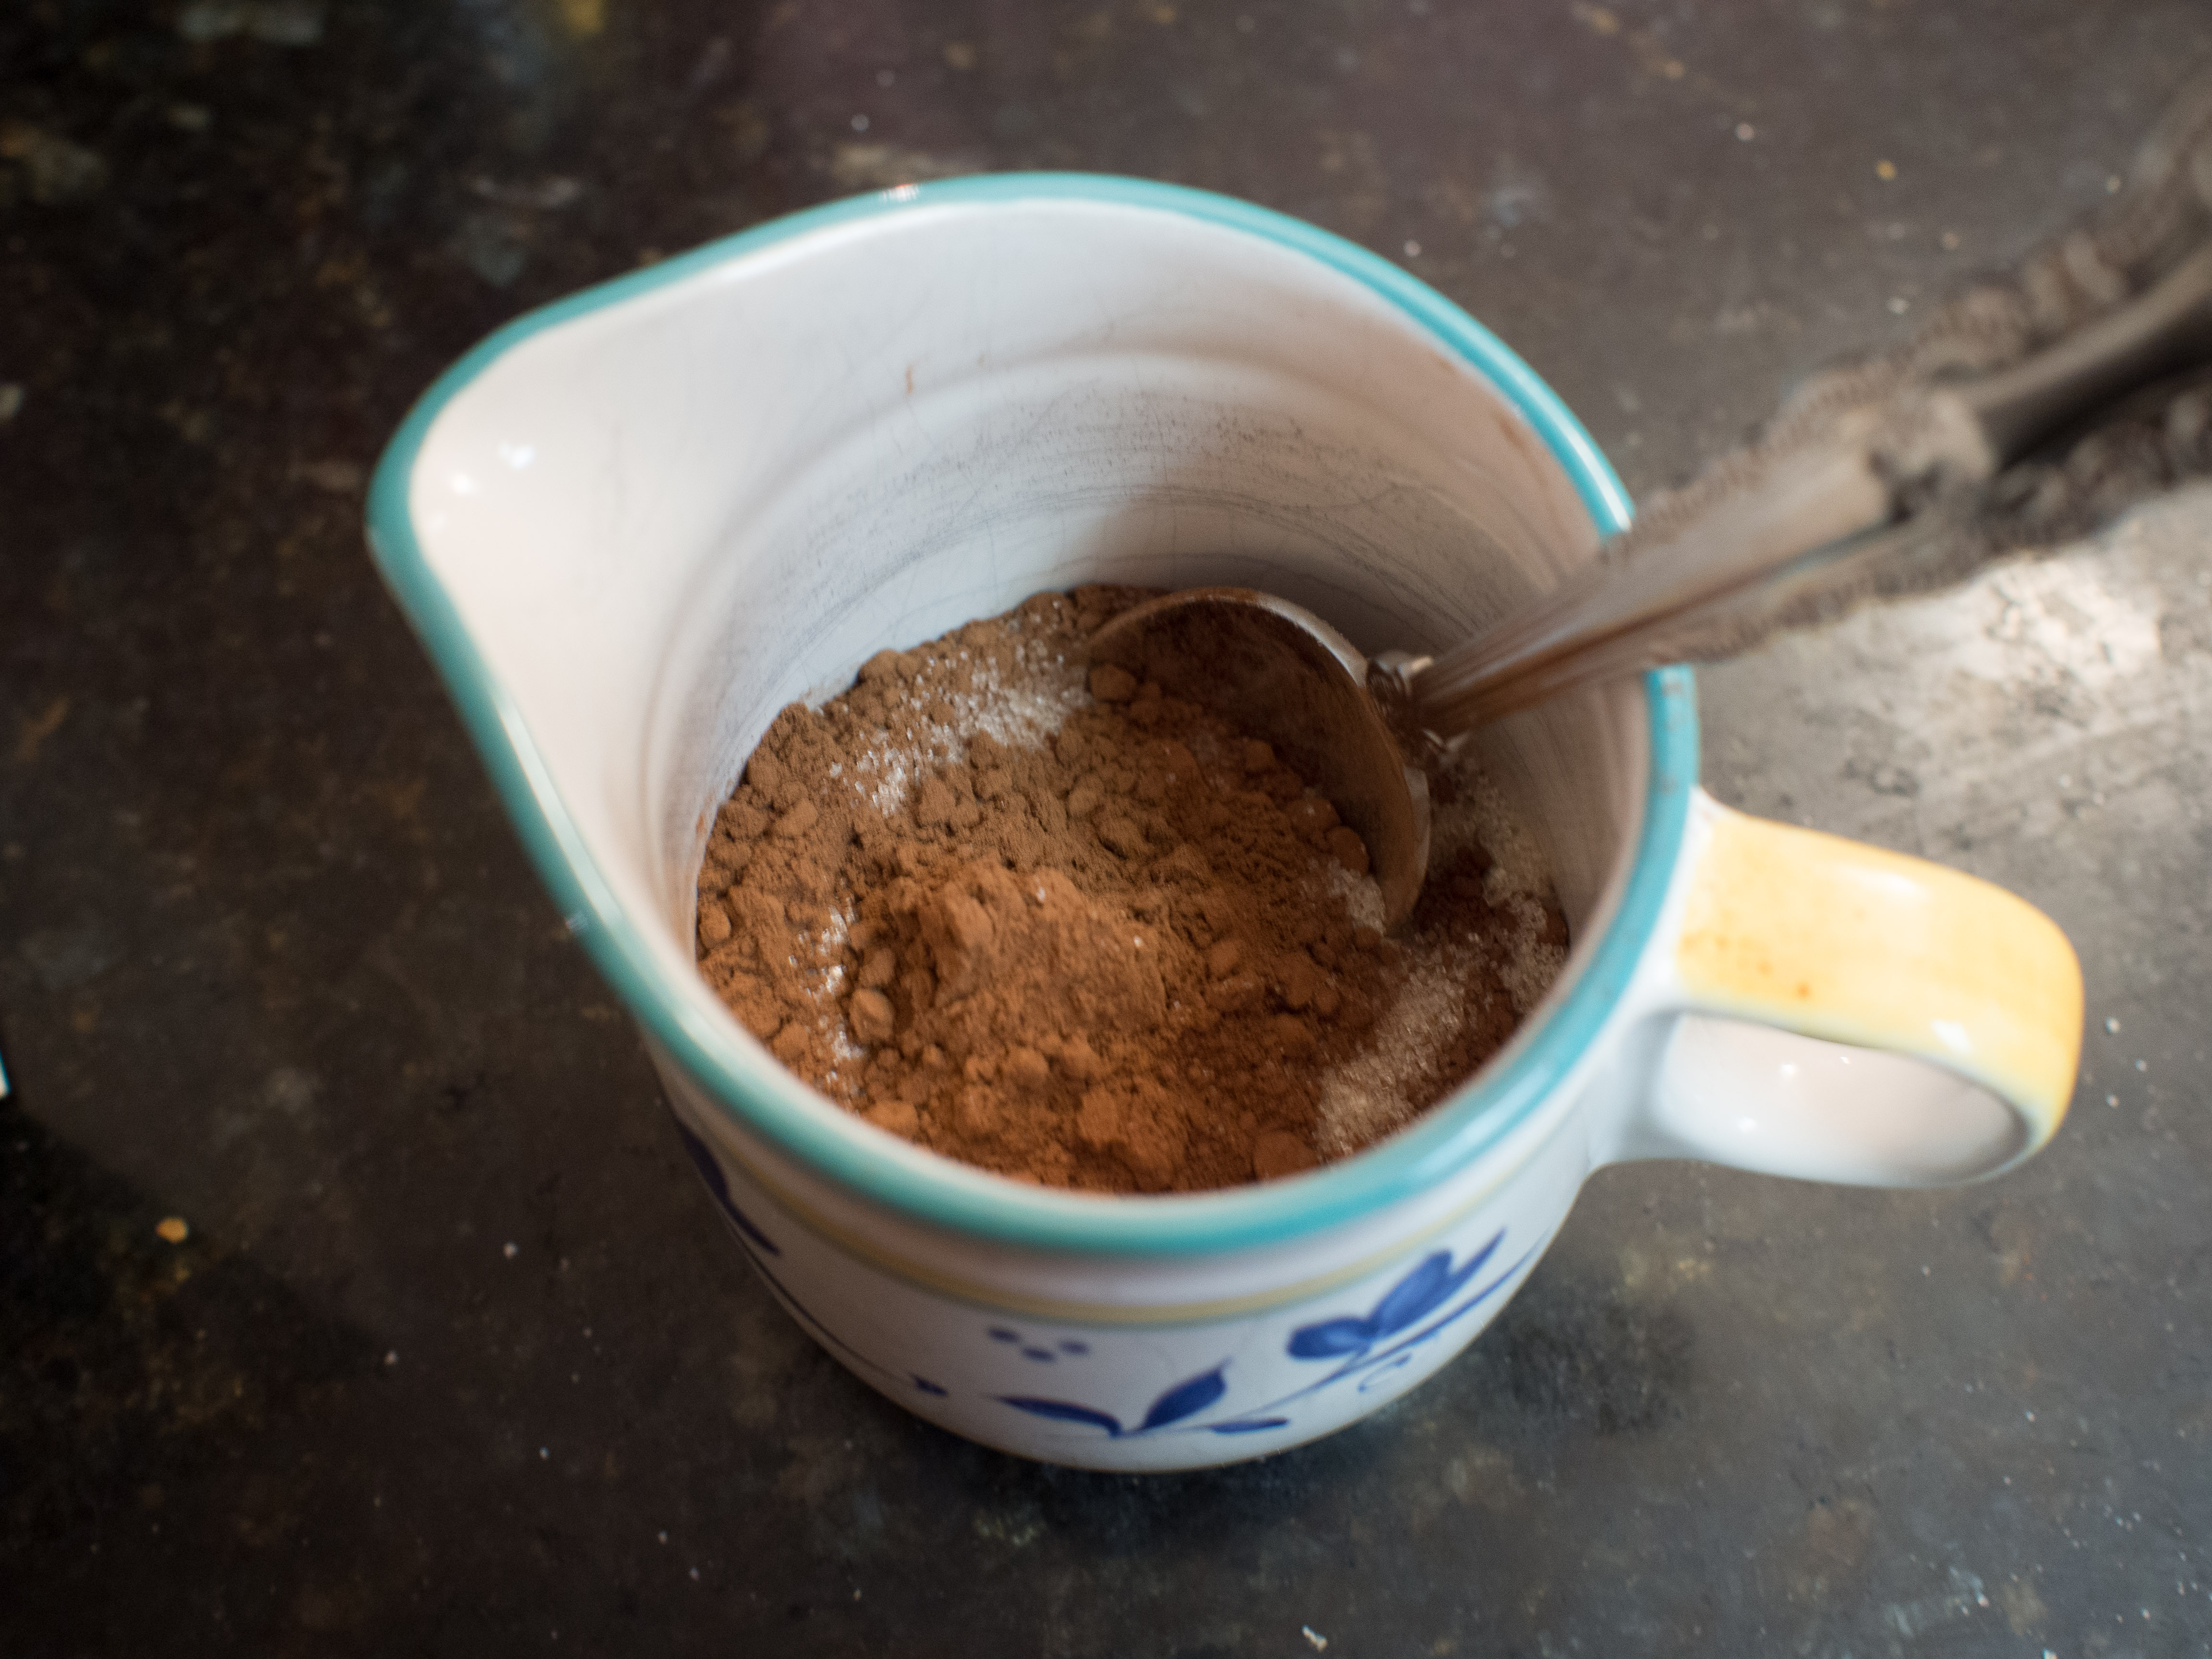
3 tablespoons high quality unsweetened cocoa powder
3 tablespoons sugar
pinch of cinnamon (optional)
pinch of salt
2 tablespoons of water (may need more)
Marshmallows (optional)

Heat milk in a heavy bottomed sauce pan over medium low heat. Stir occasionally to avoid burning.

In a small bowl, combine the cocoa, sugar, cinnamon (if used), and salt. Slowly stir in water until the cocoa mixture is thoroughly moistened. There should be no dry cocoa remaining. Add more water, if needed.  Whisk the cocoa mixture into the warming milk. Heat the milk to the desired drinking temperature. Pour into mug, top with a marshmallow, and enjoy!

Hot Cocoa

Hot Cocoa

OLYMPUS DIGITAL CAMERA

Peanut Butter Blossoms

Peanut Butter Blossoms

I remember making Peanut Butter Blossoms when I was a kid.  Sure, it was a trans fat nightmare way back then.  But, what wasn’t?  Now, I look at the recipe for Peanut Butter Blossoms helpfully provided on the back of the package of Hershey’s Kisses and think:  I can do better.  Shortening?  No thanks.    I don’t have anything against vegetable shortening, per se, I’m just skeptical.  Vegetable shortening is pure white and kind of waxy.  What vegetable has this kind of fat?  If it’s soy, I’m out.  Too many GMO issues.  Ditto corn.  I’m just at a loss to explain how a vegetable has fat that is pure white.  So, I don’t use it.

Reese’s Peanut Butter?  Eek!  Have you seen the ingredients list?

ROASTED PEANUTS; SUGAR; CONTAINS 2% OR LESS OF: HYDROGENATED VEGETABLE OIL (RAPESEED, COTTONSEED, AND SOYBEAN OILS); SALT; PEANUT OIL; MONOGLYCERIDES; MOLASSES; CORNSTARCH

Pass.  So, I subbed out lard and butter for the shortening and a “no stir” natural peanut butter for the Reese’s brand.  Jif Natural Peanut Butter has Palm Oil for the stabilizer and while that particular ingredient has environmental issues, it’s not hydrogenated.  Every ingredient can’t be completely perfect!

The result?  Well, I was really nervous.  As much as trans fat is bad for you, it does serve a purpose in the baking world.  There are entire cookies that are based on trans fats because of their specific mouth feel.  I avoid them like the plague, but was concerned with what would happen with my little cookie.  Would they crumble?  Be too dry?  Not hold the blossom?

The cookies didn’t make it more than a few days in the house.  They were actually better than the normal recipe!  The cookies were crispy on the outside, tender on the inside.  My husband, who is not a peanut butter cookie person loved these.  The kids were  scarfing these down.  Lastly, the blossom stayed in place!!  Success!!!

By using old world ingredients, I remade this cookie to be not so lethal.

Peanut Butter Blossoms
Makes 34-48 Cookies (depends on side of cookie created)

48 HERSHEY’S KISSES Brand Milk Chocolates, unwrapped (mileage may vary here, I got about 34 cookies)

¼ cup unsalted butter
¼ cup lard
¾  cup Natural, No Stir (I used Jif) Peanut Butter
1 teaspoon baking soda
⅓  cup granulated sugar
⅓  cup packed light brown sugar
1 egg
2 tablespoons whole milk
1 teaspoon vanilla extract
1-½  cups all-purpose flour
½  teaspoon salt
Additional granulated sugar

    Preheat oven to 375 degrees Fahrenheit.
    In a mixing bowl, combine the butter, lard and peanut butter.  Mix until well combined.  Add the sugars and the baking soda.  Mix well until fluffy.   Add the egg and mix.  Add the whole milk and mix again.  Add the vanilla extract and mix until all ingredients are incorporated.
    In a separate bowl, whisk together the flour and the salt.   In 3 separate additions, add the flour to the sugar mix, mixing well between additions.
    Shape dough into roughly 1 inch balls.  Roll the balls in granulated sugar and placed on a baking sheet lined with parchment paper or a silicone mat.  Bake 8-10 minutes until lightly brown.
    Upon removal from the oven, immediately press a chocolate kiss in the center of the cookie.  Expect the cookie to crack.
    Remove cookies from the pan and let cool on a wire rack.
Peanut Butter Blossoms

Careful not to burn yourself while you put the kiss in the screaming hot cookie!

Peanut Butter Blossoms

Gingerbread Cookies

Gingerbread Cookies

I tell people my kids decorate the cookies.

I’ve pretty much always hated gingerbread, in all forms, until about 2 years ago.   Maybe I had bad gingerbread in the past.  Maybe I didn’t want to waste the calories on a non-chocolate cookie.  Who knows.  I had no interest in gingerbread.  Plus, my attempts at icing a cookie would probably get me a star spot on a pinterest fail website.  In other words, while I can cook, I cannot decorate.  I don’t think I have the fine motor skills required for such precision work.  So, these cookies were never on my “to make list” because they lacked chocolate and required decoration.  One day I was looking at traditional Christmas fare and, well, gingerbread is pretty traditional and old.  It should be something I tried.   I tried making it, and… it was awesome, for a non-chocolate cookie!!  While I still can’t decorate them well (see above), poor optics is a small price to pay for good cookies.

Despite all the grand varieties of Christmas cookies I am willing to make (and eat!!), the kids request this cookie first every year!

Gingerbread is a rather old food, some think as many as a thousand years old.    It can be a crisp cookie or a thick bread.  It can be dark in color or light.  There’s really no one gingerbread.  What I love about these cookies is that they aren’t particularly sweet, but very crisp and are bursting with traditional Christmas spices.  Also, no mixer is used in the making of these cookies, allowing multiple cookie doughs to be prepared at one time!

As this is a very old fashioned recipe, it lacks a certain level of fussiness.  No need to refrigerate the dough for an hour (or overnight).  The dough is incredibly easy to roll out.  It’s not sticky at all.  It won’t mess up your hands or completely coat your dough roller.  It doesn’t need to rise.  You make it, you bake it.    I cannot speak highly enough about this recipe.

Typically, I try to use historical recipes for my blog.  However, when I looked through all of my historical recipe books for a really old gingerbread cookie recipe, the measurements were a bit scary.  A peck of flour.  Um, say again?  A dozen eggs.  How many cookies are we making?!?!  So, I found a recipe on epicurious.com that used traditional methods but had actual measurements I could follow.  I tweaked it and came up with the one below.  I cannot stress how easy these are to make, but more importantly, how awesome they are to eat.

Having made this recipe lots of times, you really need to Martha Stewart the prep work and have it all done and ready to go before you begin. The recipe moves very fast. Again, it’s not hard, just fast.

Gingerbread Cookies
Yield: Depends on size of cookie cutters
Prep Time: 20 minutes
Cook Time: 9-10 minutes per batch (turn cookie sheet halfway through at the 4 minute mark)

2/3 cup molasses (not robust)
2/3 cup packed dark brown sugar (I used light brown with no adverse consequences)
2 tablespoons ground ginger
1 tablespoon ground cinnamon
1 teaspoon ground allspice
1 teaspoon ground cloves
2 teaspoons baking soda
2 sticks (1 cup) unsalted butter, cut into tablespoon pieces
1 large egg, lightly beaten
3 3/4 all-purpose flour
1/2 teaspoon salt

Preheat oven to 325 degrees Fahrenheit.

In a heavy bottomed 4 quart sauce pan, bring molasses, brown sugar, ginger, cinnamon, allspice and cloves to a boil over medium heat, stirring frequently. Once a boil is reached, remove pan from the stove and add the baking soda. The mixture will foam and “grow” at this point, as well as lighten in color slightly. If you have kids, this part is really cool. After the baking soda is incorporated, add the butter 2-3 pieces at a time. Butter should be completely incorporated prior to the next addition. Add the egg and combine well. Stir in the flour and salt.

Turn the dough out on a lightly floured surface. Knead until the dough is soft and easy to handle. You may need to add some flour if the dough is too wet (no more than ¼ cup). I’ve never really had to add much more than an obligatory sprinkle on top, no where near the ¼ cup. Unfortunately, this isn’t an exact science, so I can’t give you a precise amount.

Divide the dough in half. Wrap half of the dough in plastic wrap and set aside. Roll the remaining dough out on a lightly floured surface to 1/8th of an inch. Use your favorite cookie cutters and cut shapes. Transfer the cookies to a lined baking sheet (with a silicone liner or parchment paper, etc.), and bake about 9-10 minutes. The directions of the original recipe advise to bake “until the edges are slightly darker”. Well, the cookies are really dark to begin with, so I never see much of a difference. They just look done at somewhere around the 9 to 10 minute mark.

Cool on wire racks and decorate. I use cookie icing products that have the tips built in. I know, it’s processed “food” and bad. I’m already eating a cookie loaded with gluten and sugar. We are beyond bad at this point. Besides, these products don’t taste that much different than homemade and are so much easier to clean up!!

Gingerbread Cookie Spices

Gingerbread Cookies

Gingerbread Cookie Dough

GIngerbread Cookie dough

Soft and ready to roll!!

Red Velvet Cake

Red Velvet Cake

My son LOVES red velvet cake and asked for his birthday cake to be red velvet.  As a person who is rather opposed to artificial flavors and colors, red velvet cake presents a conundrum.  It’s a really good cake with my favorite cream cheese icing.  But… the dye.   It’s a horrible ingredient.  The birthday boy picks his cake, of course, but can I make it without the dye?  Red velvet red just isn’t a natural color.  All over the internet there were recipes with beets or pomegranate used in place of the dye.  Neither one is really going to wow my son.  However, I thought beets might add some moisture and deep color, so maybe that was a better choice if it needed to be a really red cake.

I looked for red velvet recipes in my older cookbooks and found plenty of “velvet” cakes, but nothing specifically “red”.  Across the internet, there are various origin stories for the red velvet cake.  One is that it became popular when Adam’s Extract included a recipe for the “red” velvet cake in order to promote the sale of various extracts and dyes.  The original recipe from Adam’s Extract can be found here.  If I’m hesitant about using red dye, the artificial butter extract and vegetable shortening wasn’t too appealing in this recipe.  Other stories said the “red” was really more of a reddish brown and only recently came to mean food color red.  So, the old cookbooks were of little help, because my son wanted “red” red velvet cake.

I came across several recipes for red velvet that used beets and had no artificial ingredients, which was exactly what I was looking for!  My son gave his ok to use beets for the coloring, but I had to guarantee that if it was terrible I would make a “regular” red velvet cake.  A money back guarantee, if you will.

I found a very simple recipe from Domino Sugar and tweaked it ever so slightly.   The cake came out rich and extremely moist.  It’s a deep red and simply divine.

Red Velvet Cake
Makes:  two 9 inch layers or 24 cupcakes
Prep Time: 30 minutes
Cook Time: 35 minutes

1 ¼ cup – Granulated Sugar (Domino recommends Domino’s)
¾ cup – (1 ½ sticks) unsalted butter, softened
3 – large eggs
1 ¾ cup – cake flour or all purpose flour
¾ cup – unsweetened cocoa powder (NOT dutch processed)
1 ½ tsp. – baking powder
½ tsp. – baking soda
1 tsp. – salt
1 cup – buttermilk
1 tsp. – white vinegar
2 tsp. – vanilla extract
2 cups pureed roasted beets or canned beets*

*Beets: Preheat oven to 375 degrees. Wash 6 medium beets and trim off the tops. Roast beets for 75-90 minutes until soft. Cool and then remove outer skin. Puree in food processor until completely smooth. I can’t speak to how well this recipe works with drained, canned beets that are pureed. I’ve only used fresh roasted beets.

Preheat oven to 350°F.

Grease two 9-inch cake pans with butter and coat with flour. If you would prefer to make cupcakes, line two cupcake tins with paper cups and set aside.

In a large mixing bowl, cream the sugar and butter until fluffy and lightened. Add each egg, one at a time, beating well after each addition.

In a medium bowl, sift flour, cocoa powder, baking powder, baking soda, and salt.

In another medium bowl, combine buttermilk, vinegar, and vanilla. Whisk to blend well. Fold pureed beets into buttermilk mixture.

Add sifted dry ingredients and buttermilk-beet mixture alternately to creamed butter, scraping down the sides of the bowl and mixing well after each addition. Pour into prepared cake pans or cupcake tins. (Fill cupcake tins 2/3 to 3/4 full.)

Bake about 25 minutes (cupcakes) to 30 minutes (cake layers), or until a toothpick inserted into the center of the cupcake or cake comes out clean.

Remove from oven and allow to cool completely before frosting with Cream Cheese Frosting, without the cocoa powder!!

Red Velvet Cake Red Velvet Cake

Red Velvet CakeRed Velvet CakeRed Velvet Cake

Red Velvet Cake Red Velvet Cake