Buttermilk Pie

Buttermilk Pie

I read with great sadness that the Hominy Grill closed in Charleston, South Carolina. I’ve never actually been to the Hominy Grill, but always wanted to go there because food publications frequently featured its chef, Robert Stehling, for his lowcountry inspired cooking. As a bit of a tribute, I looked to see what some of the famous Hominy Grill dishes were and Buttermilk Pie was mentioned quite a bit in a wide variety of publications. Buttermilk pie intrigued me, and only me because there wasn’t a single person in the house who wanted me to make the pie because to them the name sounded awful. The kids side-eye nearly dessert proposal lacking a chocolate component.

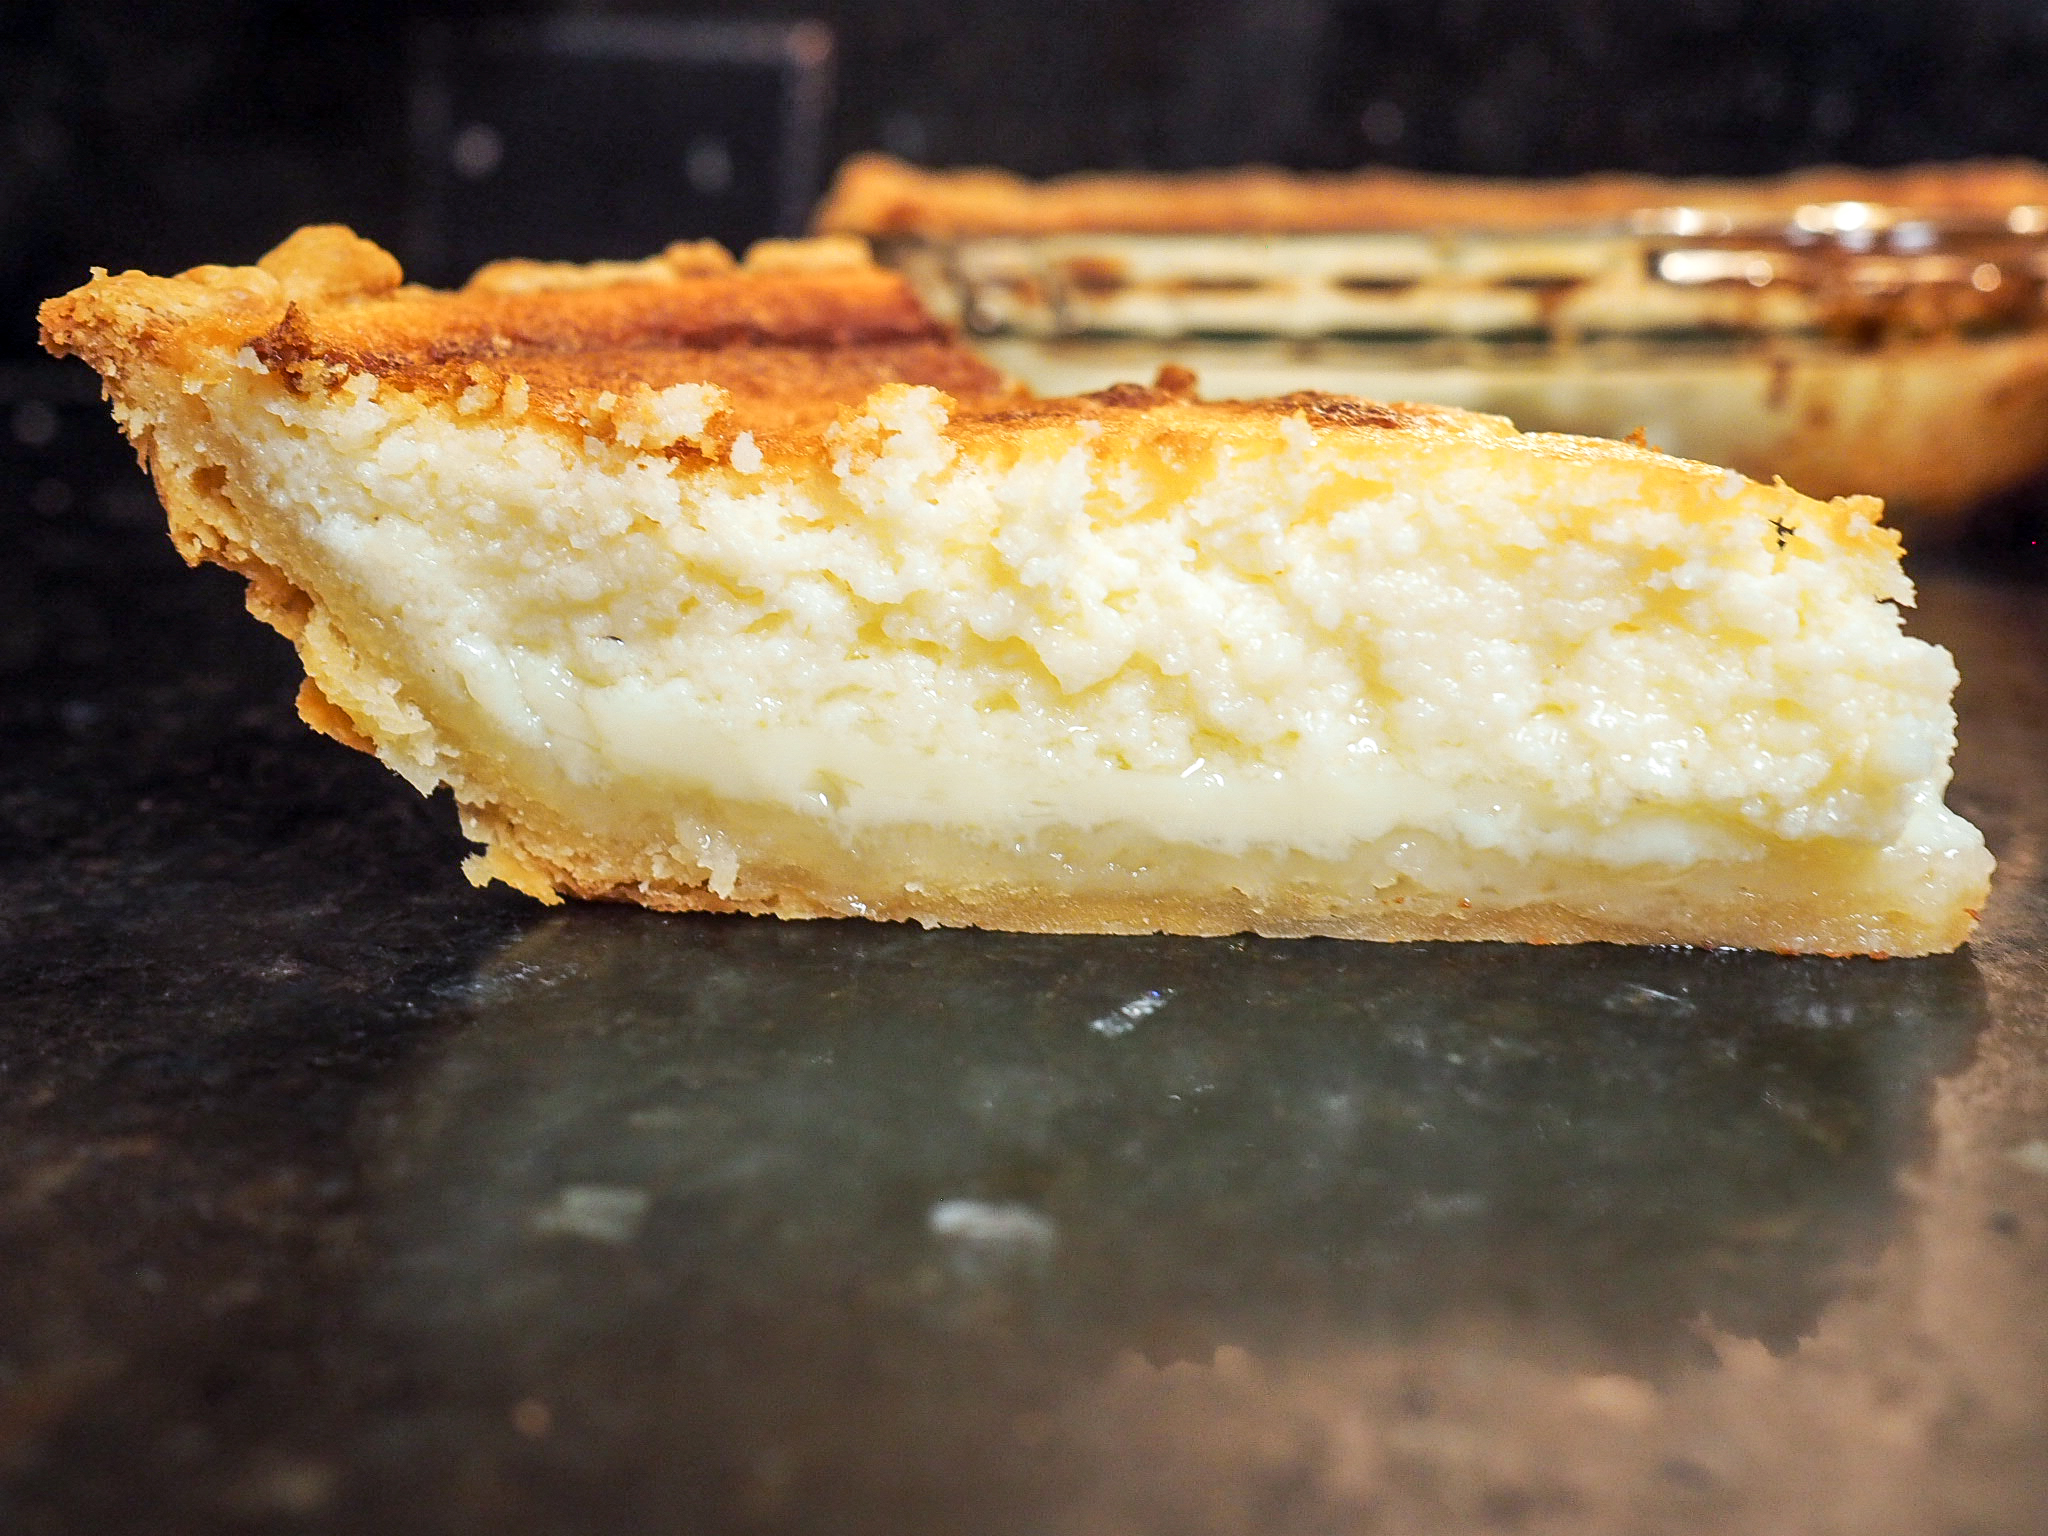
Despite many, many people’s misgivings, this pie turned out great. It’s a sweet, layered custardy pie with lots of lemon flavor. The pie was promptly devoured and everyone admitted they may have been judging poor ol’ buttermilk pie a bit harshly. This dessert would be a fantastic ending to a savory or barbecue-type meal with brisket or ribs. The recipe is very easy to make because there are no taxing double boiling or melting steps.

I loved this pie, as it is emblematic of what makes lowcountry cooking great. Simple, local, fresh ingredients that come together and create something greater. This pie creates three gorgeous layers with little effort or expense.

Mr. Stehling modified this recipe over time, so I picked one version that I think tastes the best and slightly tweaked it. If lemon isn’t your thing, I would think vanilla would be equally appealing in this recipe.


Buttermilk Pie

  • Servings: 6-8
  • Difficulty: Easy to Moderate
  • Print

A fantastic custardy pie.

Ingredients

  • 1 basic pie crust, blind baked with pie weights for 10 minutes at 400 degrees Fahrenheit, and 10 minutes at 375 with the crust edge covered. Or store bought
  • 1 stick unsalted butter, softened
  • 1 1/2 cups sugar
  • 3 large eggs, separated
  • 1/4 cup all-purpose flour
  • 2 cups buttermilk, room temperature
  • 1 teaspoon lemon zest
  • 1 tablespoon fresh lemon juice
  • 1/2 teaspoon freshly grated nutmeg

Directions

  1. Preheat oven to 350 degrees Fahrenheit.
  2. Combine sugar and butter in a mixing bowl and mix on medium speed until fluffy.
  3. Add the egg yolks and flour to the butter until combined.
  4. Add the buttermilk, lemon zest and juice, and nutmeg and beat on medium or medium-low speed until combined.
  5. Add the egg whites to a separate mixing bowl and beat until the peaks are stiff, but the egg whites do not appear dry.
  6. Fold the egg whites in three parts into the buttermilk mixture until the eggs whites are incorporated and there are no white streaks.
  7. Pour the pie mixture into the prepared pie crust, protect the edge of the crust and place pie in the preheated oven. Cook until the custard has risen and is golden, about 45-50 minutes. Unlike most custard pies, this one will be a bit more wobbly than expected.


Quiche

Mushroom Gruyere Quiche

I am an unabashed fan of cooking. There’s something so satisfying about providing a great dish to someone. Hosting two great friends was the inspiration for this dish. I needed something easy, but impressive. I also didn’t want to be cooking or cleaning while they were watching! I wanted to be enjoying their company! The perfect dish is quiche. I made the crust (using only 1 tablespoon of sugar) and sauteed the vegetables in the filling the day before. I also adapted the crust recipe by using all butter due to dietary restrictions of my guests. The only thing I had to do on brunch day was whisk the eggs, milk, cheese and vegetables together and bake!

With quiche you use pretty much anything you have leftover and the end result will be amazing. Partial bag of frozen broccoli? Great. Leftover shredded cheese from taco night? Throw it in! Quiche transforms leftovers into a sublime brunch dish.

Broccoli Cheese Quiche

The basic recipe consists of 6 eggs, a cup of whole milk and salt and pepper to taste. Add a cup of anything you like along with cheese and you are set! For the mushroom quiche, I sauteed 6 ounces of mushrooms along with 2 medium shallots. Added a cup of grated gruyere (or fontina would be good) and a teaspoon of thyme. For the broccoli cheese quiche, I added a cup of frozen broccoli that had been microwaved for 30 seconds and patted dry and a cup of shredded Mexican blend cheese. It’s really that easy. Bake at 350 degrees until the center isn’t wobbly- about 45 minutes.


Base Quiche Recipe

  • Servings: 4-6
  • Difficulty: easy
  • Print

An easy, inexpensive and impressive brunch dish.

Ingredients

  • 1 basic pie crust (made with 1 tablespoon of sugar instead of 3), blind baked with pie weights for 10 minutes at 400 degrees Fahrenheit, and 10 minutes at 375 with the crust edge covered. Or store bought
  • 6 eggs, slightly beaten
  • 1 cup of whole milk. Or any combination of heavy cream, half and half or whole milk adding up to a cup.
  • salt and pepper to taste

For Mushroom Quiche:

  • 2 tablespoons butter
  • 6 ounces of mushrooms, sliced
  • 2 medium shallots, finely chopped
  • 1 teaspoon dried thyme
  • 1 cup of grated gruyere or fontina cheese

Directions

  1. Preheat oven to 350 degrees Fahrenheit.
  2. Melt butter in a medium saute pan.
  3. Saute mushrooms and shallots until the mushrooms are brown and the shallots are soft. Add the dried thyme and saute until fragrant.
  4. In a large bowl, add the eggs, milk, cheese, mushroom mixture and salt and pepper. Stir until well combined.
  5. Place the prepared pie crust on a sheet pan.
  6. Pour the egg mixture into the prepared pie crust, protect the edge of the crust and place pie in the preheated oven. Cook until the center of the quiche is no longer wobbly and cooked through, about 45 minutes.

Hungarian Chicken- Pressure Cooker Edition

One of my favorite dishes growing up was Hungarian Goulash. I LOVED the sauce, even if the tough little pieces of meat were rather off-putting.  The sauce was not really spicy, but super creamy and just plain good.  I work, so I don’t really have time to make rather complicated dishes during the week, especially if they involve meat or sauces that need a long time to cook. However, if a recipe can be quickly made in a pressure cooker, I’m golden. When I googled “pressure cooker chicken” one night as I was staring at 4 leg quarters,  a really interesting recipe came up on Food.com (http://www.food.com/recipe/pressure-cooker-hungarian-chicken-170094)- Hungarian Chicken. I’ve never had goulash with chicken, but have to say it’s much better!  The sauce really pairs well with chicken, there aren’t any complicated ingredients, and it’s a snap to make. Seriously, very easy, but good eats. The classics rarely disappoint. I’ve made a few changes from the inspirational recipe because I love to tinker. Mushrooms really add another layer of flavor and texture to the dish and the creme fraiche isn’t as assertive as the sour cream.   Also I have also served this dish with “zoodles” (zucchini noodles) as well as cauliflower rice and it’s worked well both ways.

While I still have my “old fashioned” pressure cooker, I have to admit that I bought the famed InstantPot when it was on sale at Amazon over Black Friday. If you are queasy about using a pressure cooker, this one is really no different than an other kitchen gadget. Very, very easy to use.

This whole dish comes together in no time and makes a fantastic weeknight dinner.

Hungarian Chicken- Pressure Cooker Edition

  • Servings: 4-6
  • Difficulty: easy
  • Print

A hearty weeknight dish, perfect for a cold winter's day.

Ingredients


Oil to coat the bottom of the pressure cooker
4 chicken leg quarters
1 onion, finely chopped
2 teaspoons paprika
1/2 cup water or chicken broth
15 ounce can of crushed tomatoes
1 teaspoon salt
1/2 cup creme fraiche or sour cream
Pint of white or baby portabella mushrooms, quartered
Oil to coat the bottom of a skillet
8 ounces extra wide egg noodles, cooked, drained.

Directions

  1. Bring to boil one pot of salted water, enough to cook the noodles.
  2. In the pressure cooker, heat the oil until hot, add two of the chicken quarters, skin side down. Just before the skin starts to brown, turn the chicken over. Cook until golden. Remove to a plate.
  3. Add the onion, paprika, and water. Stir to combine. Return the chicken to the pot, add the other two pieces of chicken and the crushed tomatoes. Do not stir.
  4. Lock the lid and set the pressure to high for 12 minutes.
  5. While the chicken is cooking, oil a large skillet. Over medium heat, saute the mushrooms until they are dark brown.
  6. Cook the noodles as directed on the package.
  7. 10 minutes after the pressure cooker has stopped cooking on high heat, release any remaining pressure in a direction not near your face, twist the lid, and open the lid with the lid blocking any steam from your face.
  8. Remove the chicken from the pot. Whisk the creme fraiche until loose and add it to the pot, along with the mushrooms. Drain the noodles. Serve the chicken, covered in sauce, on the noodles.

Chocolate Ice Cream

http://dawnoffood.com

For Mother’s Day, my children got me an ice cream maker. How very nice of them! With the gift, I also got an ice cream mix. According to the directions, I just add half and half and cream and process.  Twenty-five minutes later– Chocolate Ice Cream. Well, yeah, it was chocolate ice cream. But gritty. Definitely not Ben & Jerry’s New York Super Fudge Chunk. So, I researched how to make chocolate ice cream and avoid the horrid grittiness. Recipes included ingredients that varied from heavy cream to half and half to whole milk to cream cheese. Sugar was always in the mix with eggs or cornstarch offered as thickeners. But what explained the “gritty” texture?

According to various experts, the heart of the problem lies with water. There’s water in the milk or half and half. The more water, the grittier the ice cream. Some bloggers use sweetened condensed milk or cream cheese to avoid the use of liquid milk products and their dreaded water. With every substitution, there is usually a downside.  So, what’s the downside of using cream cheese or sweetened condensed milk? Some reviews criticized these recipes as not really “feeling” like ice cream in their mouths. Or not really melting. Say what now? Ice cream pretty much has to melt.

So, I ran across David Lebovitz’s recipe on Brown Eyed Baker for chocolate ice cream and he pretty much followed the standard 5 egg yolk recipe, but added admonitions to keep the water to a minimum.  In other words, simmer the milk base and let the water evaporate.  Cover the ice cream base after it’s cooled off, then watch for condensation and wipe it off so that it doesn’t end up back in the ice cream. Little steps that add up to some completely wonderful ice cream. I made only a few minor alterations. This recipe produces a very rich and intensely chocolate ice cream.  Truly amazing.

First, some warnings. Making your own ice cream isn’t something you do because it’s cheaper. It’s really not. It’s fun, sure! You can make your own combinations.  But cheaper? No. However, you control the ingredients. You can make it GMO free or organic.You can use pastured dairy products, which taste amazing!! Additionally, you can omit ingredients that may not be particularly good for you, like emulsifiers. Emulsifiers are added to make commercial mouthfeel “creamier”. You’ve seen them in the best of ice creams: polysorbate 80, soy lecithin, guar gum, and carrageenan are but a few. Recent studies have indicated that these emulsifiers may play a part in metabolic syndrome and increase inflammation by interacting with gut flora. (http://www.foodnavigator.com/Science/Food-emulsifiers-linked-to-gut-bacteria-changes-and-obesity) Lovely, I know. Who doesn’t love a good “gut flora” discussion while making ice cream? The emulsifiers are needed to keep the ice cream smooth during its trip from the factory to the store and your house when temperatures are so variable and melting and refreezing occurs. When you make your own ice cream, there is no travel time, so no need for emulsifiers!!

Get out your ice cream maker and give this a go.  I promise, you won’t be disappointed and you’ll be making ice cream on your terms.

Chocolate Ice Cream

Makes about 1 quart

2 cups heavy cream
3 tablespoons unsweetened Dutch-process cocoa powder (I used regular cocoa powder)
5 ounces bittersweet chocolate, chopped (I used Ghiradelli bitterwseet)
1 cup whole milk
¾ cup granulated sugar
Pinch of salt
5 large egg yolks
1/2 teaspoon vanilla extract
1/2 teaspoon chocolate extract

1. Warm 1 cup of the cream and the cocoa powder in a medium saucepan, over moderate heat, whisking constantly to incorporate the cocoa into the cream. Bring to a boil, then reduce the heat and simmer at a very low boil for 30 seconds, whisking constantly. Remove from the heat. Add the chopped chocolate to the cream mixture, stirring until smooth. Add the remaining cream and stir well. Pour the mixture into a large bowl, scraping the saucepan as thoroughly as possible, and set a mesh strainer on top of the bowl.

2. Using the same saucepan, combine the milk, sugar, and salt and place over medium low heat. In a separate medium bowl, whisk together the 5 egg yolks. Temper the yolks by slowly pouring the warm milk into the egg yolks, while whisking constantly. Once the egg yolks are warmed, pour them back into the saucepan.

3. Stir the custard mixture constantly over the medium heat with a heatproof spatula, scraping the bottom as you stir, until the mixture thickens and coats the spatula (170°F on an instant-read thermometer). Pour the custard through the strainer. Make sure to squish (technical term) all the yolk mixture through the strainer and scrape the bottom of the strainer into the chocolate mixture. Once the custard is through the strainer, stir it into the chocolate mixture until smooth. As the mixture cools, the stir in the vanilla and chocolate extracts. Cool completely and place, covered, in the refrigerator. Check periodically for condensation and wipe off the lid and sides of the storage container.

4. Chill the mixture thoroughly (up to 8 hours), then freeze it in your ice cream maker according to the manufacturer’s instructions. (If the cold mixture is too thick to pour into your machine, whisk it vigorously to thin it out.)

http://dawnoffood.com

Grilled Vegetables

http://dawnoffood.com

I shop at a variety of venues:  farmer’s markets, Whole Foods, and local chain grocery stores.  During my shopping trips, I am constantly amazed at the prices in the prepared food section.   Pasta salads and cooked vegetables boggle my mind.  I realize that the stores are charging for the labor, but around $8 a pound for “grilled” vegetables?  From the prepared food aisle, I can see the produce aisle where the same vegetables are $1.99 a pound!!! Zucchini and Squash are sometimes even less. It’s not like the prepared food aisle is selling organic, free range, pastured eggplants, right? Who’s on the grill?  Bobby Flay?!?! And, is there really a grill in the grocery store?  Or are we dealing with “grill pan” vegetables?

So many questions, but honestly, I don’t care.  For way less than the prepared food aisle grocery store would charge, grilled vegetables are seriously, no big.  So, the next time you are contemplating buying these in the store, just stop.  Don’t be that person.  Seriously, it may take 10-15 minutes out of your life, but it will taste better and cost you much less.

Our grill had been out of commission after what we affectionately call “fire #2”.  The gas tubing had rusted through in a few minor spots and when combined with particularly fatty pork chops, well, let’s just say there’s a reason to keep the fire extinguisher close at hand while cooking.  We cleaned everything up, got new tubing and recommissioned our amazing grill.  During Spring, Summer and Fall, if it can be grilled, it will be grilled. Cooking is quick and clean up is relatively easy (assuming a fire free experience, of course!).

The key to great grilling is to preheat the grill for a bit.  I usually preheat for about 5-10 minutes at high, then turn down the heat to medium to cook. I know, I use propane.  Gasp.  The horror!! Not PROPANE!!!  There is something very effortless about flipping a knob and instantly having heat. I just don’t have time during the week for charcoal. Do I think charcoal is better?  Yes. But, I’m not cooking for the Michelin guide reviewers. I’m cooking for my husband and two kids. They can deal with propane.

Grilling vegetables should be big enough to not fall through the grates. If you have smaller vegetables, you’ll need a wire grate type contraption. Eggplants, squash and peppers are rather perfect for the grill, but you have to cut them thick enough and wide enough to avoid fall through. I leave the skin on because it seems to keep everything in place pretty well. The skin also doesn’t really taste bad when grilled.  You or your guests can remove the skin if they do not feel like eating it.

http://dawnoffood.com

Grilled Vegetables
Serves approximately 4 as a side

2 pounds Eggplant, sliced longways (may use other vegetables)
olive oil
Salt and Pepper to taste

Preheat grill to about 500 degrees.

Generously coat slices with olive oil on both sides. Salt and Pepper to Taste.

Turn heat down slightly. Place eggplant slices on grill for about 3 minutes. Check to make sure there is no burning. Flip vegetables over (I use tongs) for another 3-4 minutes, until the eggplant is cooked through with grill marks. Check occasionally to avoid burning. Remove from grill and serve.

Seriously.  It’s that easy.

Cauliflower Pizza Crust

http://dawnoffood.comI’ve had a few readers ask me about Cauliflower Pizza Crust.  To be honest, it took me a while to look into this because I was kind of like, meh.  Cauliflower is everywhere.  Rice, buffalo wings, and now pizza crust.  Seriously.  How much more can we torture one little plant?  We don’t do this to broccoli, do we?  What exactly was cauliflower’s crime?  Being bland?  Yup.  That’ll teach ’em, now douse it with hot sauce and say it’s the same as wings.

With paleo this and whole 30 that, people are trying to replicate dishes they like, but can’t have because of dietary restrictions.  I totally get it.  My husband has some health issues and truly needs to find alternatives to high carb, low nutrient dishes that he loves.  But cauliflower crust?  I put it up there with chocolate pudding made with avocados.  We are jumping the shark here people. Nonetheless, I decided to look into it.  I’m not a huge pizza fan to begin with, but everyone else is, so what could it hurt to give it a go?

So, I searched the internet high and low and came across a wide variety of recipes.  The general “how” of the recipe is that you pulverize the cauliflower, boil the pulverized bits and squeeze every last drop of scalding water out of the cauliflower by hand (natch!), combine the bits with cheese, egg, and spices and form into a crust and bake.  Dry cauliflower “flour” is the goal here, with egg as binder and the cheese as a bit of substance.  I suppose the spices are to try to trick you into liking it.

So I made it.  There is something so very first world about taking a lovely head of cauliflower and pulverizing it into useless mush to make a quintessentially unhealthy fast food substitute.

http://dawnoffood.com

This kind of reminds me of wet grits.  Anyway, you boil these lovely bits for a few minutes.

OLYMPUS DIGITAL CAMERAI’m not the only one, grits, amirite?  Ignore the obviously fogged picture.  Sorry!!

So, then you take about 7 minutes to aggressively squeeze the life out of the grits cauliflower.  Damn the burned hands and hot water.  Squeeze like your life depends on it, because dinner certainly does!!

Cauliflower Pizza Crust

At the end of the squeezing, I got this sad little pile of cauliflower bits.  I added an egg, cheese and spices and was able to mold a pizza-like shape out of it.

http://dawnoffood.com

I then baked it naked for a bit, topped it and re-baked it.  The plusses, no one in a million years believed there was no flour in the recipe.  Not my husband, nor the kids who watched me make it.   I could cut the pieces and eat them by hand, remarkable considering there’s no flour in this recipe. The inside of the crust was a bit “droppy”, but the outside was fine. I think a smaller pie might have made the whole crust more crispy, as would placing it on a pre-heated pizza stone for the baking portion of the recipe.

The kids loved it! My daughter considered it a wild success.  This is huge, as her menu is rather limited. My son eats anything, so while I value his opinion, hers is much harder to win over. My husband said it was really good for what it was.  Keep back, ladies, he’s all mine.

The crust was really spot on, nicely spiced, fairly substantial.  No clue whatsoever you were eating cauliflower and goat cheese.  Truly.  Was it pizza?  It is a wonderful substitute if you are dying for pizza, but really want to stick to a low carb or gluten free option.  You will, however, fool no one into thinking there’s isn’t something amiss with the crust.

The minuses?  Ugh, the work.  The squeezing and the scalded hands.

My recipe was inspired by The Detoxinista’s version of the crust.

Cauliflower Pizza Crust
Serves about 4

4 cups raw cauliflower rice (about 2 heads of cauliflower, pulverized)
1 egg, beaten
1/3 cup soft goat cheese (chevre)
1 teaspoon dried oregano
1/2 teaspoon powdered onion
1/2 teaspoon granulated garlic
1/4 teaspoon salt

Preheat oven to 400 degrees Fahrenheit.

Boil the raw cauliflower rice in salted water for 4-5 minutes. Drain. Place the boiled cauliflower in a clean dish towel and twist and squeeze all the water out of the “rice”. Squeeze until there is really no more water left. It will take a lot of time.  If you decide to skimp on this part, you will be eating the pizza with a fork and knife.  The horror!!

Place the “rice” in a medium mixing bowl and combine well with egg, cheese and spices. On parchment paper, or silicone sheet, form the “dough” into your desired pizza-like shape. I would not make it any thinner than 1/3rd to 1/2 an inch thick. The thinner the crust, the more likely it will be “firm”. However, make it too thin, and you’ll get holes in the crust.  1/3rd of an inch would be as thin as I would go.  Bake the crust for 30-35 minutes, until the crust starts to brown and is fairly firm.

At this point, top the crust with your favorite pizza sauce and toppings. Return to the oven and remove when the cheese is bubbling.

Lobster Mac and Cheese featuring Castello Aged Havarti Cheese

Sponsored Post

OLYMPUS DIGITAL CAMERA

Food trends are endlessly fascinating to me.  The Tunnel of Fudge Cake was a Pillsbury Bake Off Winner in 1966.  This is a chocolate cake with a molten center of fudge.  Sound familiar?  In the mid 1980s, molten chocolate cake became a staple on every dessert menu.   Items somehow surface, peak and slowly fade. Some fade forever (fondue, anyone?), others just become menu staples, like calamari or spinach artichoke dip.  The New York Times did an excellent article on the trend of food trends.  Of course, being the New York Times, they insisted the most trends start off in metropolitan cities and then spread elsewhere.  If you take the time to read the article and are from Maryland or Louisiana, you will laugh out loud at the idea that crab cakes originated in a metropolitan area.

I mention food trends because somewhere along the way “lobster mac and cheese” became a thing. I find this combination of lobster, pasta and cheese sauce odd.  One, it’s lobster.  Lobster is awesome.  Lobster is perfection with melted, clarified butter.   Why mess with this exquisitely simple recipe? Two, in this era of low carb, gluten free anything, how is this dish even surviving, much less thriving?

From a restaurant’s point of view, I see the appeal.  Charge a premium for mostly a pasta dish with a few chunks of lobster with a cheese sauce.  I regularly see this dish around $20 and marvel at the price of something that is essentially a $2 box of pasta with a few nuggets of lobster and a bechamel sauce.   I’ve tried various incarnations of the dish, as others of my party have ordered it.  Mostly, I seem to miss the “lobster” of the dish.  I taste the cheese and the pasta, but little in the way of lobster.  I would imagine this result explains the general food rule of no cheese with seafood.  The cheese just overwhelms the delicate lobster.

I got to thinking about this dish when I was selected to promote Castello Aged Havarti Cheese. Honestly, when I got this cheese, I really just wanted to eat it as is.  The cheese is really good and has these really interesting crystals dispersed throughout that occur due to aging.  If you look really closely, you can see small sparkles in the cheese.  I’m not professional cheese tester.  Really.  But here’s what I love about this cheese, it’s got real depth.  It’s not one dimensional. Also, the Havarti melts superbly.

dawnoffood.com


I know this because we’ve used it to stuff jalapenos and make awesome grilled cheese sandwiches.  Plus, it’s a well known fondue cheese.  After tasting the cheese, I decided that it just might be the perfect cheese for lobster mac and cheese.

Creating a recipe with the internet is a bit overwhelming.  You are inundated with ideas. Chefs want to make things so complicated. It can feel like a conspiracy designed to keep people from cooking.  Make easy things ridiculously complicated and discourage people from trying.  In the alternative, you just have some rather, um, interesting ideas.  Why would anyone add Chipotle to lobster mac and cheese?  Why bother putting lobster in the dish if you add that strong spice? Or bacon? Again, lobster isn’t really supposed to have competition. So, I got my inspiration from one of my favorite lobster dishes:  lobster bisque.  Velvety smooth, rich, creamy and most of all, lobster-y.

This dish is everything you want in comfort food:  rich, thick and sinful.  It combines the best of lobster bisque and macaroni and cheese.  You will not be disappointed!

Note: To make the lobster broth, save the lobster shells and simmer them in water as you are making the pasta. Super easy, but key to this dish.  Without this touch of broth, the lobster taste can be overwhelmed by the rich and cheesy sauce.

Lobster Mac and Cheese
Serves: A Crowd

Salt, to taste
12 oz. hollow pasta, preferably elbow macaroni
4 tbsp. unsalted butter
¼ cup flour
4 cups milk
11 oz. grated Castello Aged Havarti (about 4 cups), divided
8 oz. mascarpone (about 1 cup)
3 tbsp. lobster or fish broth
3 tbsp. Dry Sherry
1 tsp. hot sauce
¼ tsp. freshly grated nutmeg
Freshly ground black pepper, to taste
8 oz. cooked lobster meat, cut into 1″ chunks

Heat oven to 375° fahrenheit. Spray 9×13″ baking pan with cooking spray, set aside.

Cook pasta in salted, boiling water for half of the recommended cooking time (about 3 minutes). Drain and set aside.

Melt butter in a heavy bottomed, 4 quart saucepan over medium heat. Add flour and whisk constantly until smooth. Add milk, and whisk often, until sauce has thickened and coats the back of a spoon. About 10 minutes. Remove pan from heat and stir in 2 cups Castello Aged Havarti, along with the mascarpone, broth, sherry, hot sauce, and nutmeg. Adjust seasoning as needed with salt and pepper. Add reserved pasta to cheese sauce. Stir in half of the lobster.

Pour mixture to the 9″ x 13″ baking dish and sprinkle with remaining Havarti. Bake until golden brown and bubbly, about 30 minutes. Let cool for 10 minutes. Garnish with remaining lobster.

Inspired by a recipe found in Saveur.

OLYMPUS DIGITAL CAMERA


Orange Cranberry Sauce

http://dawnoffood.com

There are many holidays I love to host.  Thanksgiving? Not so much. The entire menu is set. Try having a Thanksgiving without Turkey. Stuffing. Mashed Potatoes. No go. Not happening. Entire episodes of comedy shows have been dedicated to the very idea of messing with the classic dishes. What makes the episodes funny is the absurdity. Serve salmon at Thanksgiving? Certainly not. Venison? Egads, no! Fail to provide a pumpkin pie? A blog post detailing that faux paus alone could go viral.  Despite the fact that game, seafood and different poultry were very likely part of the cuisine in early New England, and no one had likely made a pumpkin pie at that point, the menu is written in stone. Do not deviate or you will be mocked.

So, what can I add to your repetoire? How about actual cranberry sauce. Sure, cranberry sauce doesn’t make an appearance until much later in the American cooking repetoire. Sugar was expensive and scare in the early colonial times. But it is arguably a staple in the American Thanksgiving experience.

I know what you are thinking, you have no time. People love to glop out that stuff that comes in a can. You are already overcommitted making items. Well, this can be made days in advance and takes less than 15 minutes. Honestly, I had no idea it was as easy as it was to make this dish. And truthfully, it’s never been my favorite, until it was forced on me in a sandwich. I didn’t know it was on the sandwich until I bit into it.  I had to admit, it worked with the turkey and gravy and tasted good.

Is this a fussy dish? Nope, one pot. And how many ingredients?  4. Ok, 5 if you count orange zest and orange juice separately.  6 if you add a splash of port. Fine 7, if you count water. Although, you could make this recipe with just water, cranberries and sugar.

If you try this and think it’s too tart, feel free to add more sugar. This is not a recipe you can’t alter. Also, for the liquid, use whatever proportion of liquid you have, as long as the total liquid is 1 cup, you should be fine. I took a liquid measuring cup and juiced my orange, added a splash of port and enough water to equal one cup. The port is strictly optional. I happened to have a bottle open. I would not buy a bottle for this recipe.

Other recipes I’ll be using for Thanksgiving:

Pumpkin Pie
Cauliflower Mashed Potatoes
Stuffing

Have a great Thanksgiving!!!

Orange Cranberry Sauce

1 cup sugar (may need more if too tart)
1/4 cup orange juice
1 tablespoon port (optional)
3/4 cup water
cinnamon stick
3 cups fresh cranberries (about a quart)
1 tablespoon orange zest

In a heavy bottomed 4 quart sauce pan, bring sugar and liquids to a boil over medium heat. Add cinnamon stick. Simmer until sugar is dissolved. Add cranberries and orange zest and cook until berries pop and sauce thickens, about 10-15 minutes.

http://dawnoffood.com

Chicken with a Thai Peanut Sauce

http://dawnoffood.com

I am really struggling with posts.  I love finding interesting recipes from yesteryear; however, when I post such recipes, my page views go down.  But post something like Pizza Fondue or  Chocolate Chip Waffles and watch my page views skyrocket. Not really shocking, I know.  I want to put mostly healthy fare out in the world, but I’d also like people to actually read my blog.  So, I’ll keep plodding away hoping that for every Chicken Marengo that is a bit of a dud views-wise, but is awesome history wise, there’s a Maryland Fried Chicken that does pretty well.

I have pulled out my trusty pressure cooker again to make this recipe, which was inspired by a recipe I saw at Pressure Cooking Today.  First, I love the simplicity.  Sure, you can brown the chicken thighs, because that is what we are told “adds depth of flavor”, but you could skip it and the 20 minutes it takes to brown the thighs before you pressure cook them. Chicken thighs are just the best. Cheap and they can withstand a bit of overcooking and the rigors of the pressure cooker.  To make this dish low carb, instead of rice, I used finely chopped cauliflower roasted with toasted sesame oil and soy sauce.  My husband loved it.

Chicken with a Thai Peanut Sauce
Serves 4-6

1 – 2 tablespoon toasted sesame oil (or canola)
2 lbs. boneless, skinless chicken thighs, trimmed (about 8)
1/2 cup chicken broth or water
1/4 cup smooth peanut butter
1/4 cup soy sauce (or tamari)
2 tablespoons lime juice
1 tablespoon fish sauce
2 teaspoons grated ginger
1 1/2 teaspoons Sriracha Sauce
1 tablespoon corn starch
2 tablespoons water
Fresh chopped cilantro for Garnish
Salt and Pepper to taste

Heat oil in pressure cooker over medium high heat. Brown chicken in batches. Place browned chicken aside on plate. Drain liquid or oil, leaving about 1 tablespoon behind.

Add broth, peanut butter, soy sauce, lime juice, fish sauce, ginger, and Sriracha Sauce to pressure cooker. Whisk together until well combined. Return Chicken to pressure cooker. Cook chicken for 9 minutes at high pressure. It will take about 10 minutes for your pressure cooker to reach high pressure. After 9 minutes at high pressure, remove pressure cooker from heat. After pressure has fallen significantly, use the quick pressure release. Please consult your pressure cooker instructions, if you have any concerns or questions. Each cooker is different.

In a small bowl, whisk together cornstarch and water. Once the pressure is released, open the pressure cooker carefully (lid facing away from you!) and remove chicken to a plate and cover. Whisk cornstarch mixture into the peanut sauce. Bring sauce to a slight boil. Return chicken to pot to coat with sauce and serve over rice or cauliflower “rice”.

If you don’t have a pressure cooker, you can find a slow cooker version of this recipe here.

Tuna Salad


http://dawnoffood.com

I’m not a tuna fan.  Opening a can of tuna is one of my least favorite things to do in the kitchen.  My husband, however, is a huge fan.  HUGE.   We have very different tastes, to put it mildly.  One day he came home with tuna salad from the Whole Foods deli.  He remarked about how amazing it was and how I should try it.  I did.  For tuna salad, it was pretty good.  Then I saw the price.

$10,99 a pound.  Seriously!?!?  Are there gold flakes in it?  I pay less for steak! That’s right, you can go to the meat counter and get a nice steak for less money.  And I’m paying more for tinned tuna?  Consider the gauntlet thrown.  Can I make this cheaper?  Yes, I can! Even using dolphin safe, pole caught, made in America tuna. Although, this recipe would be much, much cheaper using less expensive tuna.  Not that I would.  I’m all for made in America.

First, I had to deconstruct the Whole Foods salad.  Corporate espionage, if you will.  The tuna was definitely higher end, and the salad was studded with olives.  Where go olives, there are usually capers.  The usual suspects of onion and celery were there in the salad as well.  Seriously, this was no big deal.  And, I got to customize it.  My husband likes a wet salad, so I added lemon.  I also added garlic powder.  I’m not a fan of biting into raw garlic.  Finish the whole thing off with some mayo, salt and pepper, and….. mission accomplished!

These measurements are relative.  It’s not like you can really mess this salad up.  If you like more onion or celery, by all means you more!

Tuna Salad
Makes about 2-3 Servings

2 5 ounce tins of tuna, drained
1/2 stalk celery, chopped fine
1/4 onion, chopped fine
1/4 cup olives, medium chop
1 tablespoon capers, drained
2 teaspoons lemon juice
1/4 teaspoon garlic powder
1/3-1/2 cup of mayonnaise (to taste)
Salt and Pepper to taste

Combine the tuna, celery, onion, olives, capers and garlic powder in a bowl. Break up the chunks of tuna if they are too large.  Add mayonnaise until you reach your preferred consistency. Sample the salad and salt and pepper to taste.

http://dawnoffood.com