Tag Archives: dessert

Buttermilk Pie

Buttermilk Pie

I read with great sadness that the Hominy Grill closed in Charleston, South Carolina. I’ve never actually been to the Hominy Grill, but always wanted to go there because food publications frequently featured its chef, Robert Stehling, for his lowcountry inspired cooking. As a bit of a tribute, I looked to see what some of the famous Hominy Grill dishes were and Buttermilk Pie was mentioned quite a bit in a wide variety of publications. Buttermilk pie intrigued me, and only me because there wasn’t a single person in the house who wanted me to make the pie because to them the name sounded awful. The kids side-eye nearly dessert proposal lacking a chocolate component.

Despite many, many people’s misgivings, this pie turned out great. It’s a sweet, layered custardy pie with lots of lemon flavor. The pie was promptly devoured and everyone admitted they may have been judging poor ol’ buttermilk pie a bit harshly. This dessert would be a fantastic ending to a savory or barbecue-type meal with brisket or ribs. The recipe is very easy to make because there are no taxing double boiling or melting steps.

I loved this pie, as it is emblematic of what makes lowcountry cooking great. Simple, local, fresh ingredients that come together and create something greater. This pie creates three gorgeous layers with little effort or expense.

Mr. Stehling modified this recipe over time, so I picked one version that I think tastes the best and slightly tweaked it. If lemon isn’t your thing, I would think vanilla would be equally appealing in this recipe.


Buttermilk Pie

  • Servings: 6-8
  • Difficulty: Easy to Moderate
  • Print

A fantastic custardy pie.

Ingredients

  • 1 basic pie crust, blind baked with pie weights for 10 minutes at 400 degrees Fahrenheit, and 10 minutes at 375 with the crust edge covered. Or store bought
  • 1 stick unsalted butter, softened
  • 1 1/2 cups sugar
  • 3 large eggs, separated
  • 1/4 cup all-purpose flour
  • 2 cups buttermilk, room temperature
  • 1 teaspoon lemon zest
  • 1 tablespoon fresh lemon juice
  • 1/2 teaspoon freshly grated nutmeg

Directions

  1. Preheat oven to 350 degrees Fahrenheit.
  2. Combine sugar and butter in a mixing bowl and mix on medium speed until fluffy.
  3. Add the egg yolks and flour to the butter until combined.
  4. Add the buttermilk, lemon zest and juice, and nutmeg and beat on medium or medium-low speed until combined.
  5. Add the egg whites to a separate mixing bowl and beat until the peaks are stiff, but the egg whites do not appear dry.
  6. Fold the egg whites in three parts into the buttermilk mixture until the eggs whites are incorporated and there are no white streaks.
  7. Pour the pie mixture into the prepared pie crust, protect the edge of the crust and place pie in the preheated oven. Cook until the custard has risen and is golden, about 45-50 minutes. Unlike most custard pies, this one will be a bit more wobbly than expected.


Chocolate Ice Cream

http://dawnoffood.com

For Mother’s Day, my children got me an ice cream maker. How very nice of them! With the gift, I also got an ice cream mix. According to the directions, I just add half and half and cream and process.  Twenty-five minutes later– Chocolate Ice Cream. Well, yeah, it was chocolate ice cream. But gritty. Definitely not Ben & Jerry’s New York Super Fudge Chunk. So, I researched how to make chocolate ice cream and avoid the horrid grittiness. Recipes included ingredients that varied from heavy cream to half and half to whole milk to cream cheese. Sugar was always in the mix with eggs or cornstarch offered as thickeners. But what explained the “gritty” texture?

According to various experts, the heart of the problem lies with water. There’s water in the milk or half and half. The more water, the grittier the ice cream. Some bloggers use sweetened condensed milk or cream cheese to avoid the use of liquid milk products and their dreaded water. With every substitution, there is usually a downside.  So, what’s the downside of using cream cheese or sweetened condensed milk? Some reviews criticized these recipes as not really “feeling” like ice cream in their mouths. Or not really melting. Say what now? Ice cream pretty much has to melt.

So, I ran across David Lebovitz’s recipe on Brown Eyed Baker for chocolate ice cream and he pretty much followed the standard 5 egg yolk recipe, but added admonitions to keep the water to a minimum.  In other words, simmer the milk base and let the water evaporate.  Cover the ice cream base after it’s cooled off, then watch for condensation and wipe it off so that it doesn’t end up back in the ice cream. Little steps that add up to some completely wonderful ice cream. I made only a few minor alterations. This recipe produces a very rich and intensely chocolate ice cream.  Truly amazing.

First, some warnings. Making your own ice cream isn’t something you do because it’s cheaper. It’s really not. It’s fun, sure! You can make your own combinations.  But cheaper? No. However, you control the ingredients. You can make it GMO free or organic.You can use pastured dairy products, which taste amazing!! Additionally, you can omit ingredients that may not be particularly good for you, like emulsifiers. Emulsifiers are added to make commercial mouthfeel “creamier”. You’ve seen them in the best of ice creams: polysorbate 80, soy lecithin, guar gum, and carrageenan are but a few. Recent studies have indicated that these emulsifiers may play a part in metabolic syndrome and increase inflammation by interacting with gut flora. (http://www.foodnavigator.com/Science/Food-emulsifiers-linked-to-gut-bacteria-changes-and-obesity) Lovely, I know. Who doesn’t love a good “gut flora” discussion while making ice cream? The emulsifiers are needed to keep the ice cream smooth during its trip from the factory to the store and your house when temperatures are so variable and melting and refreezing occurs. When you make your own ice cream, there is no travel time, so no need for emulsifiers!!

Get out your ice cream maker and give this a go.  I promise, you won’t be disappointed and you’ll be making ice cream on your terms.

Chocolate Ice Cream

Makes about 1 quart

2 cups heavy cream
3 tablespoons unsweetened Dutch-process cocoa powder (I used regular cocoa powder)
5 ounces bittersweet chocolate, chopped (I used Ghiradelli bitterwseet)
1 cup whole milk
¾ cup granulated sugar
Pinch of salt
5 large egg yolks
1/2 teaspoon vanilla extract
1/2 teaspoon chocolate extract

1. Warm 1 cup of the cream and the cocoa powder in a medium saucepan, over moderate heat, whisking constantly to incorporate the cocoa into the cream. Bring to a boil, then reduce the heat and simmer at a very low boil for 30 seconds, whisking constantly. Remove from the heat. Add the chopped chocolate to the cream mixture, stirring until smooth. Add the remaining cream and stir well. Pour the mixture into a large bowl, scraping the saucepan as thoroughly as possible, and set a mesh strainer on top of the bowl.

2. Using the same saucepan, combine the milk, sugar, and salt and place over medium low heat. In a separate medium bowl, whisk together the 5 egg yolks. Temper the yolks by slowly pouring the warm milk into the egg yolks, while whisking constantly. Once the egg yolks are warmed, pour them back into the saucepan.

3. Stir the custard mixture constantly over the medium heat with a heatproof spatula, scraping the bottom as you stir, until the mixture thickens and coats the spatula (170°F on an instant-read thermometer). Pour the custard through the strainer. Make sure to squish (technical term) all the yolk mixture through the strainer and scrape the bottom of the strainer into the chocolate mixture. Once the custard is through the strainer, stir it into the chocolate mixture until smooth. As the mixture cools, the stir in the vanilla and chocolate extracts. Cool completely and place, covered, in the refrigerator. Check periodically for condensation and wipe off the lid and sides of the storage container.

4. Chill the mixture thoroughly (up to 8 hours), then freeze it in your ice cream maker according to the manufacturer’s instructions. (If the cold mixture is too thick to pour into your machine, whisk it vigorously to thin it out.)

http://dawnoffood.com

Dark and White Chocolate Bread Pudding

http://dawnoffood.comThere are lots of people who claim not to be able to bake.  This dessert is so simple, anyone can make it.  Honest.  If you have never made dessert before because you don’t think you can bake, bread puddings can be your “thing”.  It is E.A.S.Y.  Not “easy as pie” easy, because those aren’t.  Like crazy easy.   So easy, my children (both under 12 years old)  have made it.  Why is bread pudding so simple?  Someone else has done the work!  Specifically, whoever made the bread.  You are just adding some milk and cream, sugar, and eggs, at the basic level.   If you can cut bread into squares and mix together a few ingredients, you can make a spectacular dessert.

And, unless they read this blog, no one will know how easy it is.

This dessert is my Christmas Eve dessert.  It serves a large crowd and requires little prep time or mess.    It can be an Irish dessert for St. Patrick’s Day if you flavor it with Bailey’s.  It can really be a great dessert for any occasion. The sauce can be made ahead and kept in the refrigerator.

The  recipe below is inspired by this recipe at epicurious.com.

Dark and White Chocolate Bread Pudding With Cream Sauce
Serves:  A crowd
Prep Time: 5 minutes and 30 minutes of soaking
Cook Time: 60 minutes

Sauce
2 cups whipping cream
3 tablespoons Frangelico liqueur (may substitute Irish Cream Sauce or any similar liqueur)
1/4 cup sugar
1 teaspoon vanilla extract
2 teaspoons cornstarch
2 teaspoons water

Bread pudding
12 ounces of Challah or Brioche Bread, cut in 1 inch cubes
6 ounces bittersweet (not unsweetened) or semisweet chocolate, chopped
6 ounces imported white chocolate, chopped
4 large eggs
1/2 cup plus 4 tablespoons sugar
2 teaspoons vanilla extract
2 cups heavy whipping cream, separated (1 1/2 cups and a 1/2 cup)
1/2 cup whole milk

For the sauce:
In a heavy saucepan, bring the first four ingredients to a slow boil over medium heat, stirring frequently. In a small cup, mix together the cornstarch and water well. Whisk into the cream mixture. Stir constantly until the mixture slightly thickens. About 3-5 minutes. Remove from heat and cool. Cover and refrigerate. Can be made up to 2 days ahead of time.

For the bread pudding:
Stir together the bread and chocolates in a large mixing bowl, set aside.
In a medium mixing bowl, whisk together the eggs, 1/2 cup and 2 tablespoons of the sugar, vanilla, 1 1/2 cups of cream and the milk. Add the cream mixture to the bread mixture and soak for about 30 minutes.

While the bread is soaking, preheat the oven to 350 degrees Fahrenheit. Grease a 13x9x2 baking pan (or any similarly sized vessel).

If during the soaking, you notice that the bread is dry-ish and there’s no more liquid in the bowl, add some additional milk or cream. You want your bread to be rather moist, not dry.

Add the bread and cream mixture to the baking pan. Add the remaining 1/2 cup of cream to the pan, distributing the cream evenly. Sprinkle the top of the pudding evenly with the two tablespoons of sugar.

Bake for about 60 minutes, or until the edges of the pudding are golden and the mixture is set in the center. For me, usually between 50-60 minutes.  Top with the cream mixture and serve.

It’s really that easy!

http://dawnoffood.com

http://dawnoffood.com

http://dawnoffood.com

http://dawnoffood.com

Brownies

Yes, my New Year’s Resolution is fading fast. I have kids and they want snacks. Pineapple, apples and blueberries aren’t cutting it anymore!

Brownies. I joke that there’s no point in cutting brownies because they just end up getting slivered to death in my house. A literal death by 1,000 cuts. It’s no secret that I eat the most. I do. I hide them from my husband and children. I am shameless. Truly. Note in the picture the lack of actual brownies. There’s might be seven there. Couldn’t make it to the picture stage.

dawnoffood.com

In addition to being a brownie addict, I am a bit of a brownie snob.  There is only one type of brownie: fudgey. Take your cakey brownie and go. Don’t try to cover the listless dryness with frosting, it’s a lost cause. People have made their entire careers off of one spectacular brownie recipe (see Maida Heatter). For the longest time I thought the only good brownie came from a mix. Recipe after recipe lead me to the dry, unsatisfactory cake-like brownies I despise. I was partially convinced by Alton Brown that super chemicals unavailable to a lowly home cook made the mix brownies deliciously moist. I held that belief until I came across Maida Heatter and James Beard. Maida’s Palm Beach Brownies are the stuff of legends, and rightly they should be. Crinkly top, moist middle and all over CHOCOLATE. James Beard held little affection for the lowly brownie, but pointed me to an issue I had not considered: eggs. In one sentence, he cleared up the cake vs. fudge issue I had been having. If you spot a brownie recipe with more than 2 eggs, they will be cakey. If not, fudgey. It’s just that simple, most of the time.

Maida Heatter’s recipe teaches that brownies are pretty much eggs, sugar and chocolate. Small amounts of flour for binding and extracts for flavor amp things up a bit, as does a shot of expresso. But, was really sets Heatter’s recipe apart is the amount of sugar. 3 ¾ cups! Holy Crap!   Which might explain how she gets away with 5 eggs and not having a cakey brownie.  But, then I thought of fudge, and pretty much, same thing. Sugar. Lots and lots of it.

So, for me, the perfect recipe will have lots of sugar, 2 eggs and lots of chocolate.  I can’t do so much sugar in a brownie.  I’m by no means a nutrition drill sergeant, I’m doing a blog on brownies, but I have to draw the line somewhere.  3 ¾ cups in 1 pan of brownies is my line.  The recipe is good, trust me.  Really, really good.  But it’s a tad much.

My mom used to make black bottom cupcakes when I was a kid and I loved them.  I’m not that big of a cupcake fan now (read: can’t sliver them and mentally eating a whole cupcake instead of slivers of that amount to the same mass seems gluttonous.).  So, I wanted to recreate the recipe with brownies.    You can make the brownies without the cheesecake topping and they are wonderful.  The cheesecake topping is great, if you like that.  Allegedly, my husband didn’t, but a suspicious number of brownies (whole, not slivered) are missing, indicating otherwise.

Brownies are a rather new invention, probably around the 1900s.   General thought has the creation coinciding with the rise in food science and ready availability of chocolate, refined flour and sugar.    Of course, there is the legend of the Palmer House Brownies, created when a patron asked for a dessert that could be packed up and taken to the Chicago Exposition.  Either way, the brownie is an easily made and transportable dessert.

This recipe was inspired by recipes on Epicurious.com

Black Bottom Brownies

Cream Cheese Topping:

8 ounces cream cheese, room temperature
1 egg
⅓ cup sugar
1 teaspoon vanilla
⅛ teaspoon salt
6 ounces chocolate chips

Brownie Layer:

6 ounces fine-quality bittersweet chocolate, chopped
2 ounces unsweetened chocolate, chopped
3/4 cup unsalted butter
1 1/2 cups sugar
2 teaspoons vanilla
4 large eggs
1 teaspoon salt
1 cup all-purpose flour
1 cup semisweet chocolate chips

Preheat oven to 350 degrees Fahrenheit.

Grease and flour a 8×8 or 9×9 baking pan. Set aside.

Put the cream cheese, egg, sugar, vanilla, and salt together in a mixing bowl. Mix together until well blended. Add the chocolate chips and set aside.

Over medium low heat, melt together the bittersweet chocolate, unsweetened chocolate and butter. The chocolate mixture will be glossy. Remove from heat and whisk in the sugar and vanilla. One by one, whisk in the eggs. After the eggs are incorporated, stir in the salt and flour until completely incorporated. Finally, stir in the flour.

Spread the brownie mix evenly into the baking pan. Top with the cream cheese topping. Bake until a toothpick inserted in the middle of a pan comes out with only a few moist crumbs, 35-45 minutes.

dawnoffood.com

dawnoffood.com

dawnoffood.com

Red Velvet Cake

Red Velvet Cake

My son LOVES red velvet cake and asked for his birthday cake to be red velvet.  As a person who is rather opposed to artificial flavors and colors, red velvet cake presents a conundrum.  It’s a really good cake with my favorite cream cheese icing.  But… the dye.   It’s a horrible ingredient.  The birthday boy picks his cake, of course, but can I make it without the dye?  Red velvet red just isn’t a natural color.  All over the internet there were recipes with beets or pomegranate used in place of the dye.  Neither one is really going to wow my son.  However, I thought beets might add some moisture and deep color, so maybe that was a better choice if it needed to be a really red cake.

I looked for red velvet recipes in my older cookbooks and found plenty of “velvet” cakes, but nothing specifically “red”.  Across the internet, there are various origin stories for the red velvet cake.  One is that it became popular when Adam’s Extract included a recipe for the “red” velvet cake in order to promote the sale of various extracts and dyes.  The original recipe from Adam’s Extract can be found here.  If I’m hesitant about using red dye, the artificial butter extract and vegetable shortening wasn’t too appealing in this recipe.  Other stories said the “red” was really more of a reddish brown and only recently came to mean food color red.  So, the old cookbooks were of little help, because my son wanted “red” red velvet cake.

I came across several recipes for red velvet that used beets and had no artificial ingredients, which was exactly what I was looking for!  My son gave his ok to use beets for the coloring, but I had to guarantee that if it was terrible I would make a “regular” red velvet cake.  A money back guarantee, if you will.

I found a very simple recipe from Domino Sugar and tweaked it ever so slightly.   The cake came out rich and extremely moist.  It’s a deep red and simply divine.

Red Velvet Cake
Makes:  two 9 inch layers or 24 cupcakes
Prep Time: 30 minutes
Cook Time: 35 minutes

1 ¼ cup – Granulated Sugar (Domino recommends Domino’s)
¾ cup – (1 ½ sticks) unsalted butter, softened
3 – large eggs
1 ¾ cup – cake flour or all purpose flour
¾ cup – unsweetened cocoa powder (NOT dutch processed)
1 ½ tsp. – baking powder
½ tsp. – baking soda
1 tsp. – salt
1 cup – buttermilk
1 tsp. – white vinegar
2 tsp. – vanilla extract
2 cups pureed roasted beets or canned beets*

*Beets: Preheat oven to 375 degrees. Wash 6 medium beets and trim off the tops. Roast beets for 75-90 minutes until soft. Cool and then remove outer skin. Puree in food processor until completely smooth. I can’t speak to how well this recipe works with drained, canned beets that are pureed. I’ve only used fresh roasted beets.

Preheat oven to 350°F.

Grease two 9-inch cake pans with butter and coat with flour. If you would prefer to make cupcakes, line two cupcake tins with paper cups and set aside.

In a large mixing bowl, cream the sugar and butter until fluffy and lightened. Add each egg, one at a time, beating well after each addition.

In a medium bowl, sift flour, cocoa powder, baking powder, baking soda, and salt.

In another medium bowl, combine buttermilk, vinegar, and vanilla. Whisk to blend well. Fold pureed beets into buttermilk mixture.

Add sifted dry ingredients and buttermilk-beet mixture alternately to creamed butter, scraping down the sides of the bowl and mixing well after each addition. Pour into prepared cake pans or cupcake tins. (Fill cupcake tins 2/3 to 3/4 full.)

Bake about 25 minutes (cupcakes) to 30 minutes (cake layers), or until a toothpick inserted into the center of the cupcake or cake comes out clean.

Remove from oven and allow to cool completely before frosting with Cream Cheese Frosting, without the cocoa powder!!

Red Velvet Cake Red Velvet Cake

Red Velvet CakeRed Velvet CakeRed Velvet Cake

Red Velvet Cake Red Velvet Cake

Pumpkin Cream Pie

Pumpkin Cream Pie

As I mentioned in my post on stuffing, I love Thanksgiving.  It’s a food extravaganza.  People aren’t shy about carbing it up.  Stuffings, breads, pies, and potatoes of all varieties grace the table.  Unfortunately, most of the time, pumpkin pies are either bought from the supermarket bakery or reheated from frozen.  Sad.  Why?  Because the hardest part of a pumpkin pie is deciding when it’s finished in the oven.  It’s a dump and bake proposition, otherwise.

Most people will make the Libby’s recipe for pumpkin pie on the back of the can of canned pumpkin.  While it’s perfectly fine, that’s kind of the problem, it’s fine.  I discovered this other pumpkin pie recipe several years ago and just found it to be so superior to the Libby’s version, I had to try it.  It’s from the New York Times Cookbook (the Craig Claiborne version). First, it had cream.  Real, heavy, cream.  NOT evaporated milk.  It had me at cream, really.  Then it had 3 cups of canned pumpkin, which is a LOT more than one 15 ounce can.  I was intrigued.  If you are familiar with the New York Times Cookbooks, there are no pictures, you are on your own.  I tried it and it changed our family’s pumpkin pies forever.  This is a rich pie with lots of creamy pumpkin flavor, not wan or thin.  It’s truly amazing.  Many people who didn’t like pumpkin pies, like this version.

This recipe just cannot be easier, for the amazing dessert you end up presenting.  Get a store bought crust (I prefer the frozen ones to the refrigerated roll out kind), and it’s super easy.  I like making my own crust, which presents a variety of challenges, all of which end up in deliciousness.

Now, the hard part:  when is the pie done.  Generally speaking, it’s done when the center jiggles just a little.  Helpful, no?  How much is a little?  When is a jiggle?  Why has my pie cracked open?  I avoid these issues with a low temperature baking.  This varies from Claiborne’s instructions.  If I follow his instructions, it comes out pretty cracked and sort of not done in the center.  Could be my oven.

Pumpkin Cream Pie
Serves: 8
Prep Time: 5 minutes
Cook Time 1 hour and 15 minutes (approx.)

Pie Crust
3 cups canned pumpkin
¾ cup sugar
½ teaspoon salt
½ teaspoon grated nutmeg
1 teaspoon cinnamon
½ teaspoon powdered ginger (or 1 teaspoon fresh grated ginger)
3 large eggs, lightly beaten
1 cup heavy cream

Preheat oven to 425 degrees Fahrenheit.

If using a homemade crust, roll out crust and place into pie dish. Prick holes in the crust all around with a fork to prevent bubbles. Add pie weights. Blind bake (bake with no batter) the crust for 10 minutes at 450. Remove the weights and reduce heat to 375 and bake for another 10 minutes. Remove from oven and set aside.

Preheat oven to 425 degrees Fahrenheit.

Combine remaining ingredients in a mixing bowl. Blend well over medium speed. Pour the mixture into the prepared pie shell and place in the oven.

Bake for 15 minutes. Reduce heat to 325 degrees Fahrenheit. Check crust for signs of browning, if brown, cover. Bake for 45-55 minutes more, or until the center is just slightly jiggles when the pie is slightly jostled. You may want to check often after the 40 minute mark, as oven temperatures vary.  Cool and serve.

Pumpkin Cream Pie

Pumpkin Cream Pie

Strawberry Lime Popsicles

Over the summer, I have the kids do “academic work” so that they stay sharp.  Yeah, I’m that mom.   In order to minimize the whining, I “incentivize” my children to complete these academic assignments.  Each assignment is worth a certain number of “points” and points can be cashed in for various and sundry items.  My daughter has been dying for a Zoku Quick Pop Maker.   She worked really hard this summer to earn enough points for one of them.  I spied a really easy recipe on Pinterest (http://www.theblackpeppercorn.com/2012/06/strawberry-paletas/) for a strawberry lime popsicle and a post was born, as my daughter LOVES strawberries.

Honestly, I was dreading this task.  The Zoku has to be frozen for 24 hours, so already there’s a delay, which is oh so popular with the elementary school set.  I then have to “blend” the ingredients together.  About 7 years ago, I broke the glass blender.  Never replaced it, and, as a bonus, have never heard the end of it.  My kids are 10 and 8, and somehow they know I busted the blender.  In my defense,  we really didn’t use it and I broke it moving it out of the way.    As a substitute, I would have to use the food processor, which can be a touch leaky.  Fun!

But, we persevered.  We blended the ingredients (no leaks!), chilled the mixture, used the Zoku and had popsicles in a fairly short amount of time!  It was really hot today, so they were definitely needed!

Strawberry Lime Popsicles
Total Time: about 1 hour and 20 minutes
Makes about 3 popsicles in a Zoku Pop Maker

1 cup halved strawberries
1 tablespoon lime juice
2 tablespoons sugar
1/4 cup water

Chill Zoku Pop Maker for 24 hours.

Place ingredients in a blender or food processor and blend until smooth. Refrigerate mixture for about an hour. Pour mixture into Zoku Pop Maker and in about 7 minutes remove the popsicle from the pop maker. When repeating for the final two popsicles, you may have to leave the mixture in the Zoku for longer periods of time.

OLYMPUS DIGITAL CAMERA

OLYMPUS DIGITAL CAMERA

OLYMPUS DIGITAL CAMERA

OLYMPUS DIGITAL CAMERA

OLYMPUS DIGITAL CAMERA

OLYMPUS DIGITAL CAMERA

Chocolate Hazelnut Cream Pie

Easy no bake chocolate hazelnut cream pie

My kids are with their aunt and grandparents this week.  Therefore, I have taken this rare opportunity to make things that have gotten the veto from the kids. Lemon Chicken was one. Chocolate Hazelnut Cream Pie was the other one. I’m not sure why the hate for this particular dish. I love the taste of hazelnut, but if you are thinking something will taste just like chocolate, hazelnut may not be a welcome flavor.

The inspiration for this dish came from my peanut butter cream pie experience. I thought, if a pie can be this awesome with peanut butter, what would it be like with Nutella? Also, I wanted to take the opportunity to say “Really!?!?” to those who sued Nutella because they were allegedly “deceived” by the commercials that said Nutella was healthy. Check out the news coverage here.

Let me start by saying the first ingredient is sugar. Yes, sugar. Read a label, people. Commercials make their products sound better than they are. Shocking, I know.

It was a small rant, but important one.

So, this pie is light and cold and completely easy. My elementary school kids made it easy. Great for summer entertaining or potluck!

Chocolate Hazelnut Cream Pie
Serves 8

8 ounces cream cheese, room temperature (Philadelphia brand tastes best)
1 cup Nutella
2 cups heavy cream, whipped to stiff peaks
1 chocolate wafer pie crust

Combine cream cheese and nutella in a mixing bowl and whip until well combined and fluffy. Fold in whipped cream one third at a time, until thoroughly combined. Pour mixture into pie crust. Cover in plastic wrap and freeze until solid. Remove from freezer about 10 minutes prior to serving. Melt a small amount of nutella to drizzle on top for “flair”.

OLYMPUS DIGITAL CAMERA

OLYMPUS DIGITAL CAMERA

OLYMPUS DIGITAL CAMERA

OLYMPUS DIGITAL CAMERA

OLYMPUS DIGITAL CAMERA

Strawberry Shortcake

OLYMPUS DIGITAL CAMERA

I have a love/hate relationship with Strawberry Shortcake.  I generally have a “no fruit”  dessert policy, save apple and pumpkin pie.    Why waste my few precious carb calories on a dessert with no chocolate?  Seems like madness, truly.

The other thing is, well, I thought shortcake sort of sucked.  It’s either made with that yellow spongy crap that I now realize is the yellow spongy cake that makes up a Twinkie.  Well played, Hostess.  Tell people that all they have to do is spray whipped cream into these yellow dimpled cake shells and top with strawberries.  Voilà!  Strawberry “shortcake”!  Or, it’s made with cut up store bought Angel Food Cake.  Ugh.

A few years ago I had a berry shortcake at a small restaurant in Annapolis called “O’Leary’s”.  Honestly, the other desserts looked terrible.  “Terrible” being defined as a dessert “containing chocolate that was contaminated with fruit”.   Is there a rule that raspberries must be in a chocolate dessert?  Anyway, it was an order of last resort.   My low expectations were exceeded when a lovely confection was placed in front of me.  A tender, yet crispy biscuit split and oozing thick whipped cream topped with berries of all colors.  What was this?  Where was the Angel Food or bland yellow cake?  Instead, I got an actual “shortcake” and it was amazing.  Despite it being really good, I had no desire at the time to make it because of the whole lack of chocolate thing.

So, I’m reading the Wall Street Journal the other day and come across an article about how the French are up in arms about whether an establishment can be called a “restaurant” when it doesn’t actually cook all of the food served.  Some of the food, gasp, is frozen and prepared off site.

http://online.wsj.com/article/SB10001424127887323398204578488990597549094.html0597549094.html

This article brought me back to my shortcake experience, and other brushes with mass produced food being used in a “restaurant”.  The “semi-homemade” take on strawberry shortcake is far removed from the real dessert.  The same could be said for dry chocolate cake or waxy “New York Style” cheesecake.  Most desserts at restaurants are so lackluster.  They pretty much taste like they came from Costco, Restaurant Depot, or some other mass production facility.   I was very sad to learn that Molten Chocolate Cake dessert can be microwaved in a minute and served.  Sigh.

One time, at Outback Steakhouse, my plate came out with a plastic bag on it.  Inside the bag were my veggies, freshly microwaved, I presume.    Honestly, it’s why I cook.   I know where my stuff comes from and who made it.

So, inspired by some of the most esteemed names in French Cooking saying they had to preserve the French Cuisine, I wanted to make a real, authentic shortcake.  My small attempt to rescue the true shortcake from the “dessert shell” purgatory it’s currently in.   On the plus side, there are plenty of old recipes.  On the minus side, they are all different.   Of course they are!!!

First of all, shortcake is not so named because the cake is short.  It’s because a fat inhibits the flour from forming long structures.   Adding a fat (in this case two, butter and shortening) creates the “short” part of the shortcake.    Shortcake also got a boost of lightness from the advent of chemical leaveners like baking soda and baking powder.    Traditional English shortcakes made without chemical leavening are extremely dense.

I think it’s amazing that a classic dessert is built around the humble strawberry.  A fruit that, realistically, was only available for a very few weeks every year.   Strawberries are fragile and they have a short harvest season.  Despite the restricted availability of strawberries during her time, Fannie Farmer has no fewer than 3 dessert recipes for just Strawberry Short Cake in just one of her cookbooks.  She also has one for “Fruit Short Cake”, which, according to Mrs. Farmer may also include strawberries.  The dessert called for the strawberry  to be paired with a quick cooking “shortcake”.  Originally, whipped cream was not part of the dessert.   Just a sweetened shortcake, strawberries, sugar and butter.  By the mid-1800s, whipped cream became integrated into the recipe.

While any berry could be used, the dessert is synonymous with strawberries.  You can certainly make a “raspberry shortcake”, but let’s just say they didn’t name a doll “Raspberry Shortcake”. This is certainly a classic summer recipe.  And, really, making the shortcake is very easy.  Make the whole dessert and really, you won’t be disappointed.

I love cooking from extremely old, some would say “historic” cookbook.  I feel a bit like an archeologist trying to recreate the exact dish the author did over a hundred years ago!  I picked a very traditional recipe from Fannie Farmer’s Boston Cooking School Cook Book called:  Rich Strawberry Short Cake, she credits a “Hotel Pastry Cook” with the recipe.

Rich Strawberry Short Cake

2 cups of flour
1/4 cup of sugar
4 teaspoons baking powder
1/2 teaspoon salt
1/8 teaspoon nutmeg
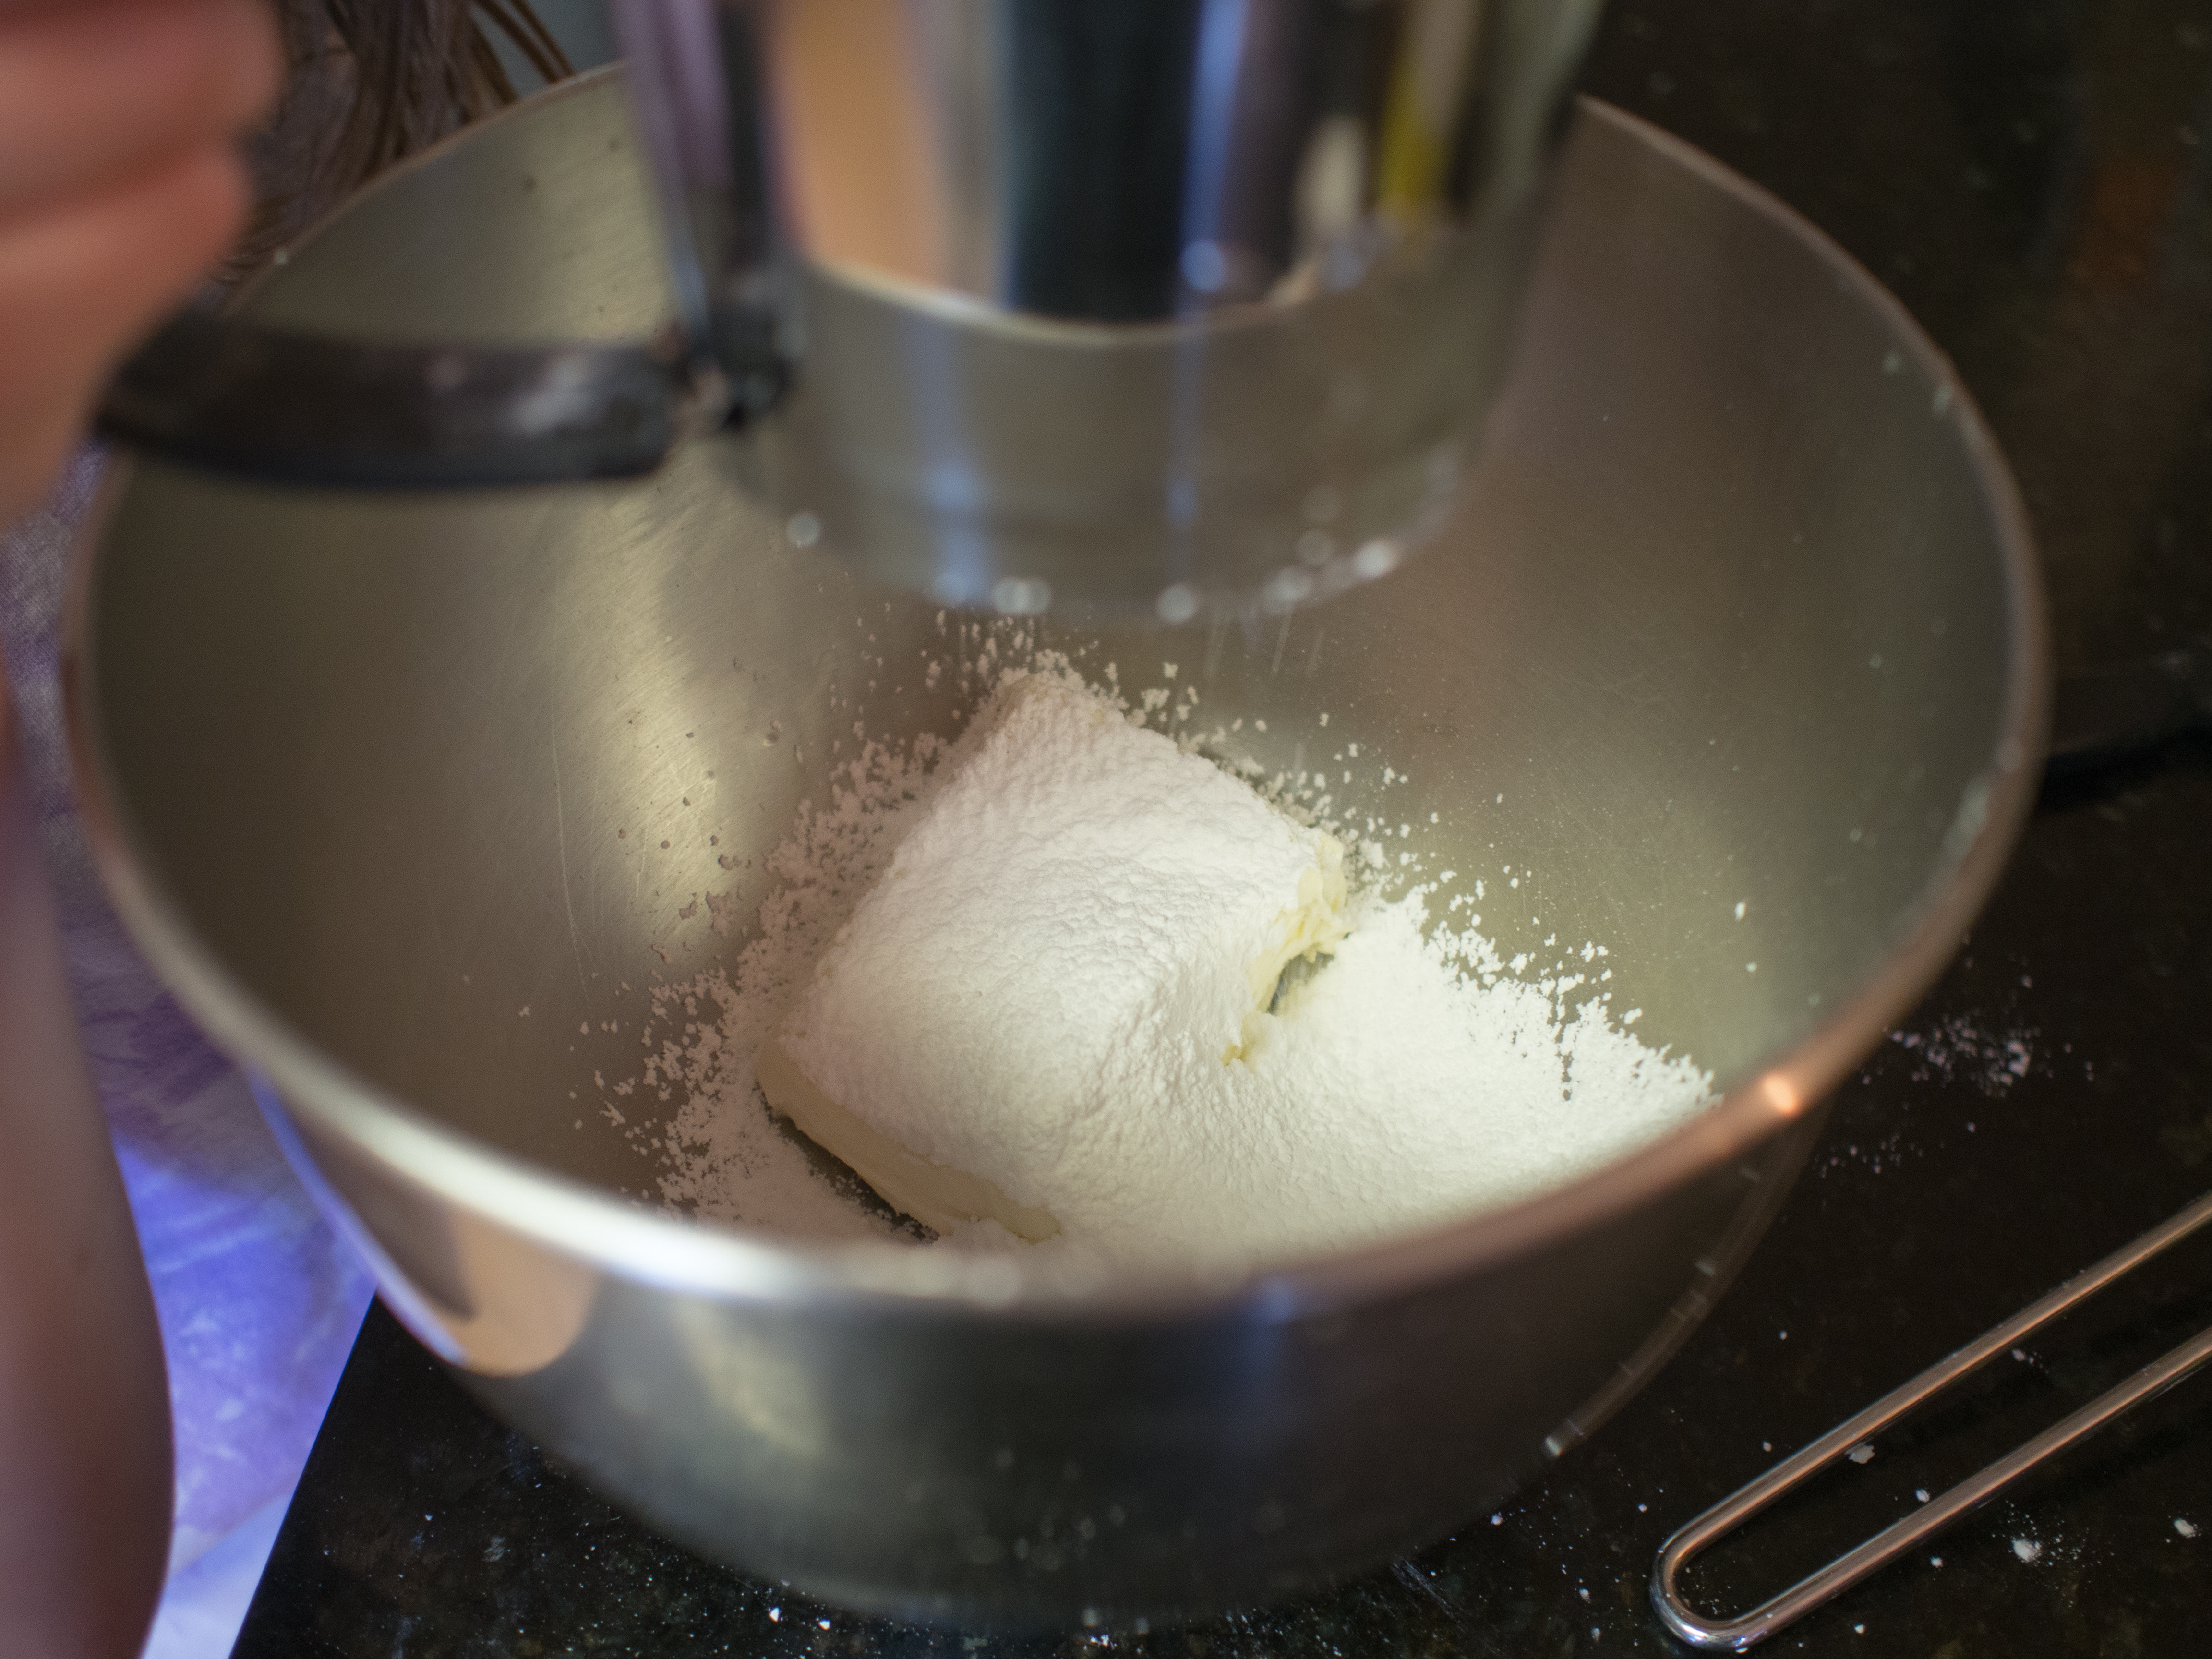
1/3 cup butter (about 5 1/3 tablespoons butter, diced)
1 1/4 tablespoons lard or vegetable shortening
1 egg, well beaten
2/3 cup of milk
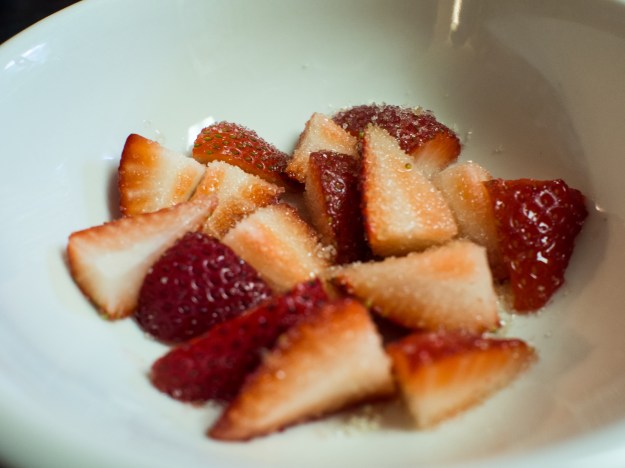
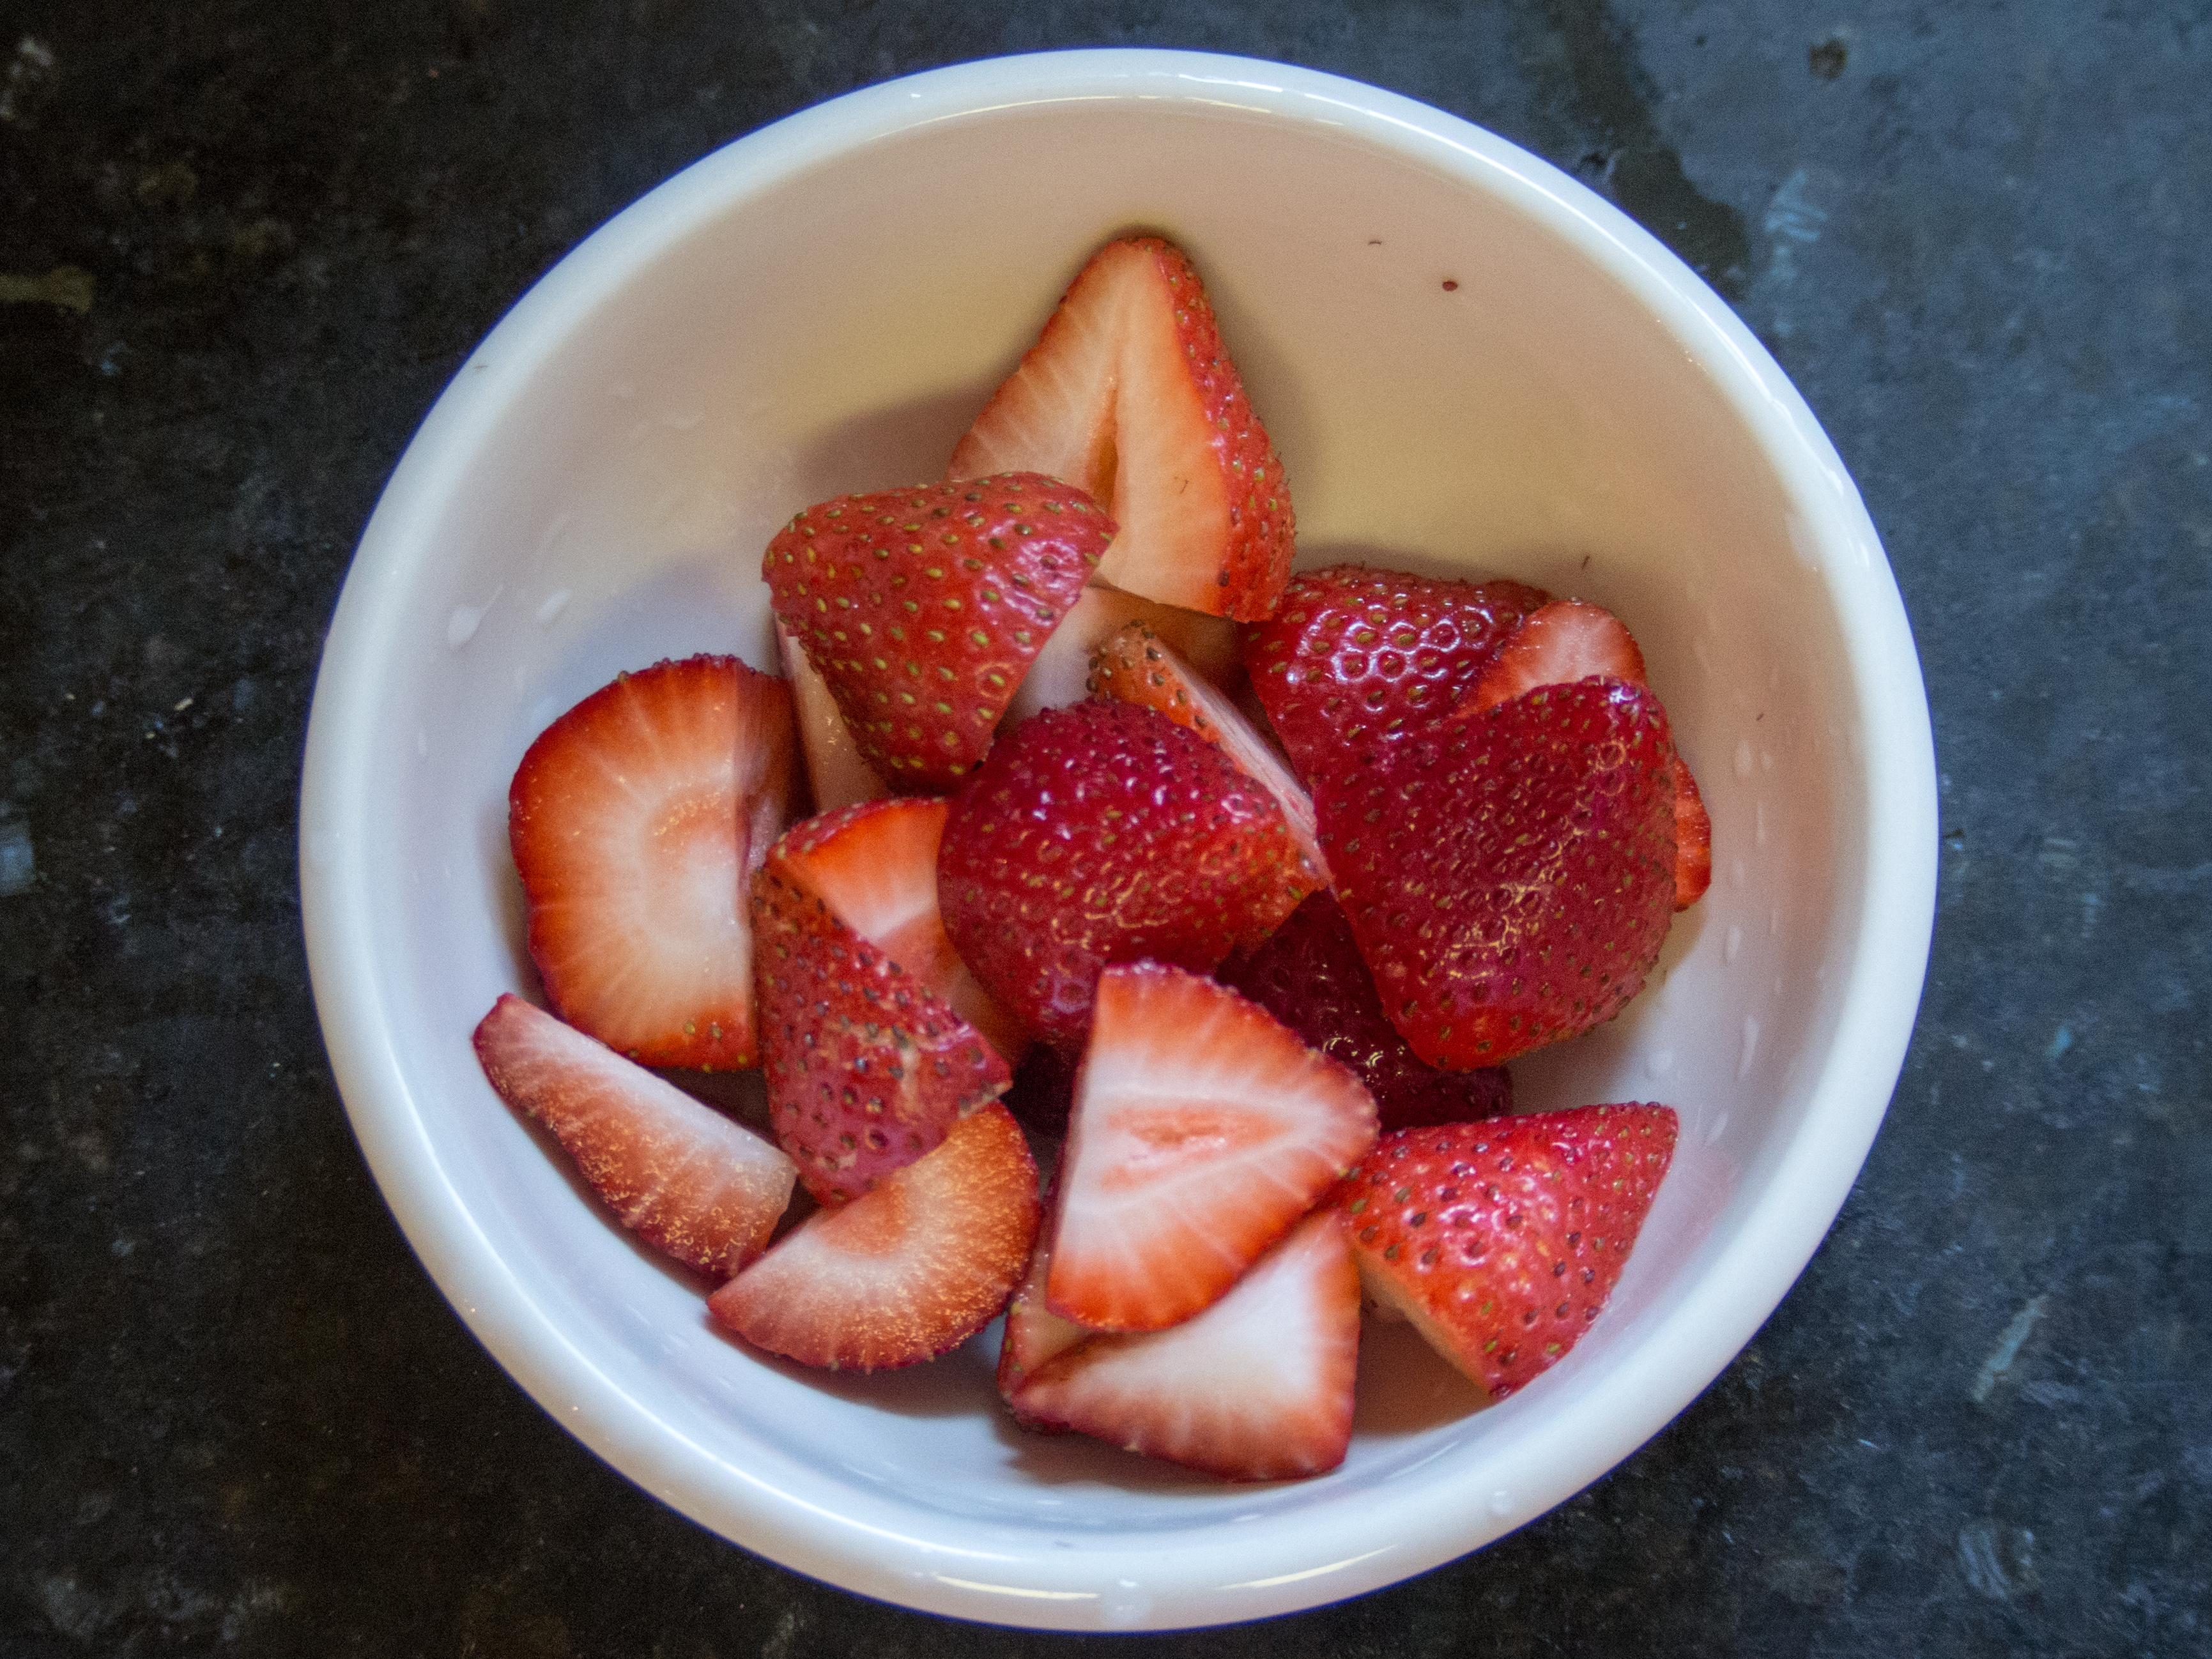
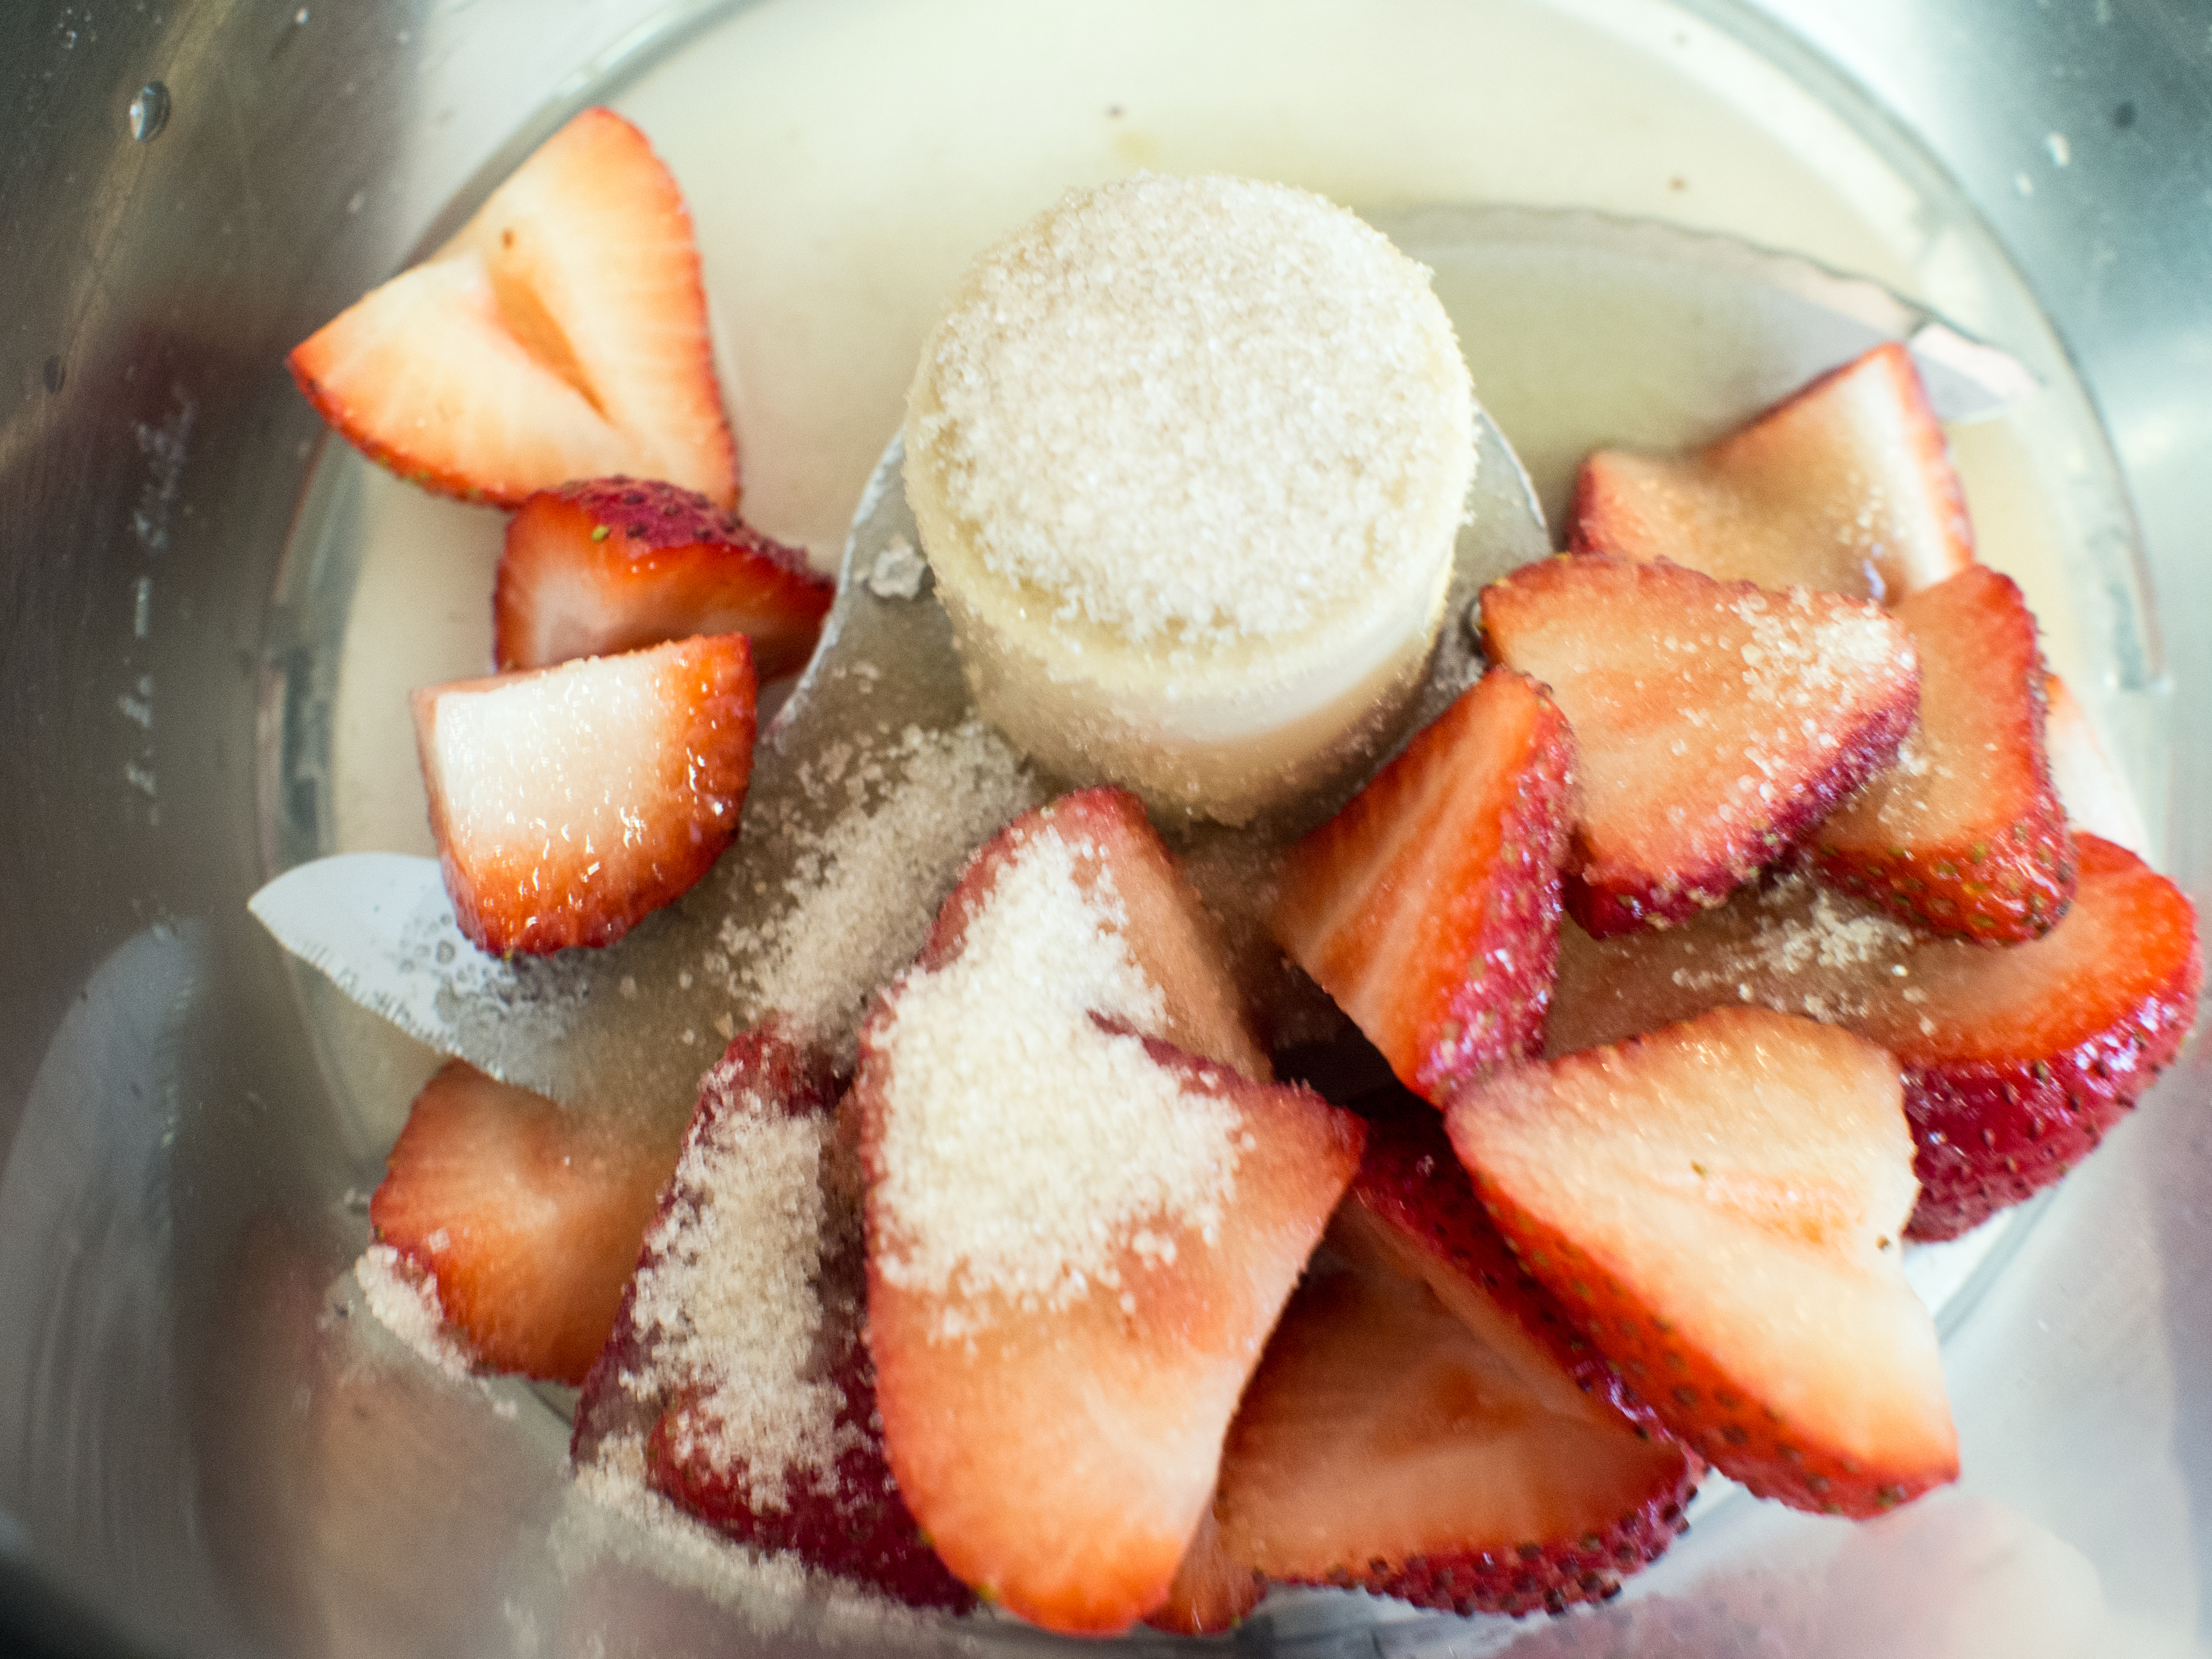
1 pint strawberries, washed and quartered with tops removed
Sugar
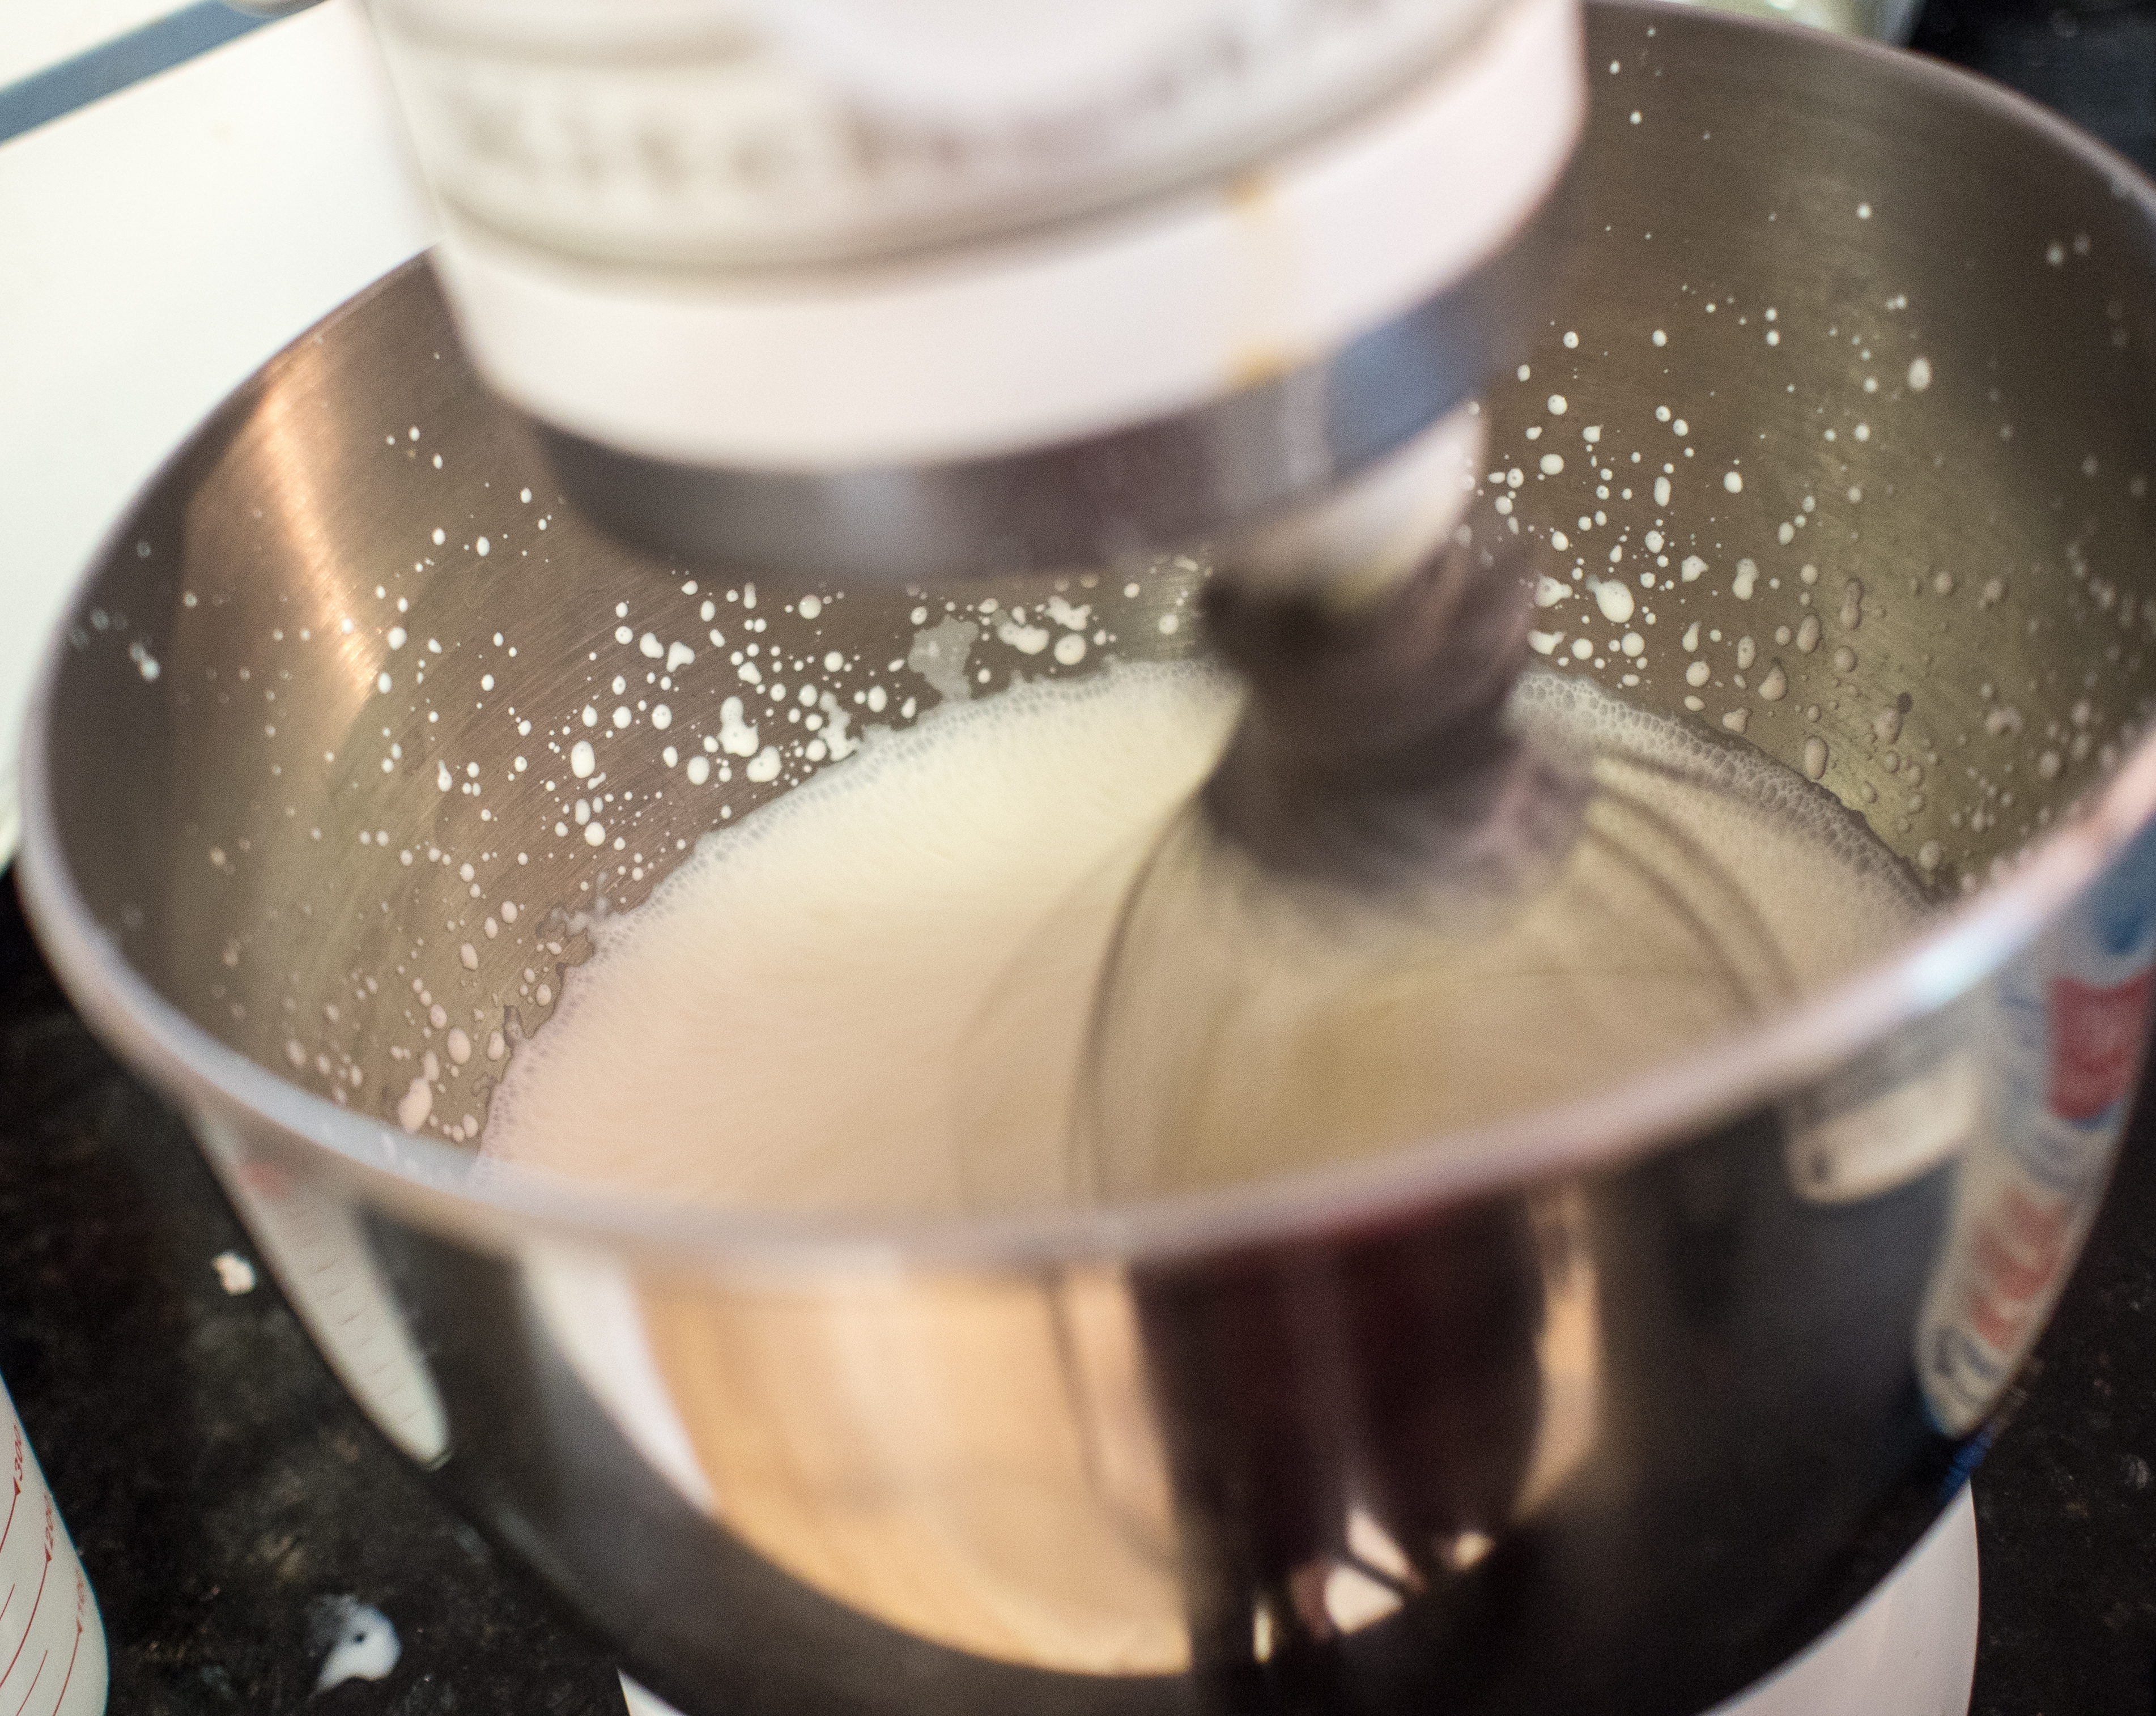
1 quart heavy whipping cream

Heat oven to 425 degrees Fahrenheit. Lightly grease 12 inch cast iron skillet with lard.

Mix dry ingredients and sift twice. Work in butter and lard to the flour mixture, until mixture appears crumbly. Add egg and milk. Stir until the dry ingredients are moistened. You may need to add a bit more milk if there is still a lot of dry flour. Place mixture in the cast iron skillet, and use your hands to spread mixture into the pan. (Tip, oil hands first!) Bake until the bottom is lightly browned and a slight crust is apparent when the shortcake is touched, about 12 minutes.

While the shortcake is baking, sprinkle enough sugar on the strawberries to sweeten the fruit and slightly macerate, about 1-2 tablespoons, depending on the strawberries.

Whip the cream until stiff peaks are formed. If sweet whipped cream is preferred, add a tablespoon of sugar to the cream while it is being whipped. A bit of vanilla extract (a teaspoon) can be added too.

Split shortcake, add whipped cream and strawberries layered with the shortcake, and serve.

OLYMPUS DIGITAL CAMERA

OLYMPUS DIGITAL CAMERA

OLYMPUS DIGITAL CAMERA

OLYMPUS DIGITAL CAMERA

Peanut Butter Cream Pie

OLYMPUS DIGITAL CAMERA

You’re invited to a cookout. You want to bring something, but what? You could pick something up at the local supermarket. I find those foods sort of sit because people want to try the homemade stuff first. But you are busy, right? No time for homemade. Or, maybe your cooking skills just aren’t up to where you would like them to be.

You want to take something that will be the talk of the picnic. You want to be fawned over. I get it. Who doesn’t? No one wants to be potato salad #3 at a picnic with 5 different types of potato salad.

So, I offer the following dessert: Peanut Butter Cream Pie. Why? Because, frankly, fruit desserts just aren’t my thing, with the exception of apple pie. Peanut Butter Cream Pie combines some of my favorite ingredients: cream, sugar and peanut butter. What’s not to love? It’s not like Chocolate Cream Pie, so don’t be worried about whether the pie will “set” or if you will need to serve it in bowls. If you have a mixer and a freezer, you can totally make this dessert. It’s that easy. I found this dessert years ago in New Orleans at Emeril’s. He put the recipe for it in his cookbooks and now, on his webpage. The pie is crazy easy. Combine peanut butter, cream cheese, confectioner’s (powdered or 10x) sugar and whipped cream. Pour into crumb crust. Freeze. Done. Seriously. If you want to be fancy, melt some chocolate and stripe the top of the pie.

Some caveats. This is a really rich pie, so cut the slices small. You will want to cut a hunk of pie off and eat it. Don’t. You can’t. My 10 year old son who grows 6 inches a year tried and couldn’t. Also, you need to not just like peanut butter, you need to love it.

Now, I mentioned that I was inspired by Emeril to make this recipe, and I was, but this recipe is inspired by Martha Stewart. Why? Well, Emeril called for 4 cups of cream and Martha 2. I had 2. So, the winner was Martha! Her original recipe can be found here: http://www.marthastewart.com/258413/chocolate-peanut-butter-pie

My deviations are the crust and the amount of peanut butter. I looked at a pre-made graham cracker crust, but that had trans fats. So, I was resigned to the fact that I was going to have to make a crust. I thought chocolate wafer crust would be the best, but the thought of taking the middles out of a ton of oreos made me weep. Luckily, on my travels to three different grocery stores (can’t 1 just have everything I need?), I found an oreo cookie crust with no trans fat or other terribly nasty ingredients, so I went with it. As a result, that last minute find made this recipe super easy and fast. I reduced the peanut butter by 1/4 cup just to bring a little more balance to the pie.

Peanut Butter Cream Pie
Serves 6-8
Prep Time: 15 minutes
Total Time: 2 hours, 15 minutes

6 ounces of cream cheese, room temperature
3/4 cup confectioner’s sugar (sifted)
1 teaspoon coarse salt
1 cup smooth peanut butter
1 tablespoon vanilla extract
2 cups heavy cream
1 oreo pie crust
1 ounce semisweet chocolate, melted, for decorating

Cream together the cream cheese, sugar and salt, until well combined and “fluffy”. Add the peanut butter and vanilla and beat until combined. In a separate mixing bowl, whip the heavy cream until soft peaks form. Loosen the peanut butter mixture by folding in about a third of the whipped cream. Add the rest of the cream to the peanut butter mixture and, using a mixer with a whip attachment, whip until well combined.

Pour peanut butter mixture into oreo pie crust and freeze for about 2 hours. Place melted chocolate in a freezer bag and snip a small opening on a corner of the bag. Drizzle chocolate on the pie and serve.

OLYMPUS DIGITAL CAMERA

OLYMPUS DIGITAL CAMERA

OLYMPUS DIGITAL CAMERA

OLYMPUS DIGITAL CAMERA

OLYMPUS DIGITAL CAMERA

OLYMPUS DIGITAL CAMERA